Concrete planters are made using a small container and a large container as molds. How far you push in the interior container will affect the thickness of the walls of your finished concrete planter. Once finished, the foliage and bright blooms of your plants create vivid contrast with the textured gray container.

You can do this very easy from your own home and it is really fun to do. All you need is a nice bucket and some concrete. You have to make the concrete and then add it to the bucket in order to get your planter. This is not too difficult, but it will take a few minutes of your time like about 25 to 30 minutes.
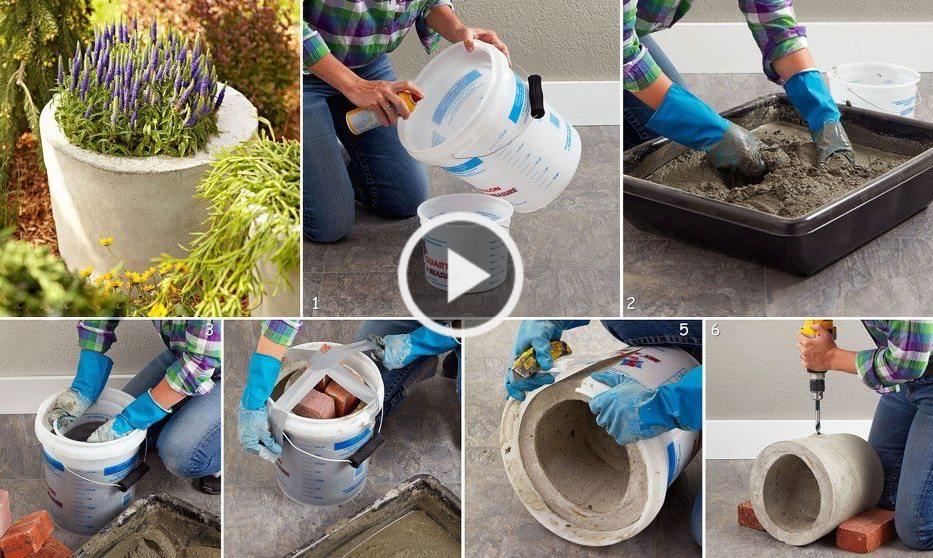
To make a concrete planter, choose two containers to use as molds. Use a paintbrush to thoroughly coat the inside of the larger mold with cooking oil.
Oil the outside of the smaller interior container. Use a paintbrush to thoroughly coat the outside of the smaller mold with cooking oil.
Mix concrete according to directions. Fill the larger mold with concrete to about 1 inch from the top. Shake to eliminate air bubbles; level the surface.
Push the smaller mold into the center of the concrete, leaving an adequate thickness for the bottom of the planter. Place a weight in the smaller mold and let the concrete set for 24 to 48 hours.
Gently remove the molds. Smooth rough and sharp edges with a stone or file.
Choose container shapes that complement your garden’s style, and make sure plants will have a suitable container in which to thrive. Drill drainage holes into your planters after the concrete has set, or place a cork or piece of foam in the bottom when forming the pots. When you water concrete planters, they will darken, then lighten as they dry.
Read More
- Upcycle Wheelbarrow for Garden
- Latest saree blouse designs for 2018 that will amaze you
- Easy DIY : Basket Woven from Recycled Newspaper
- Instructions to Use LEGO to Teach Kids Math
- How To Make Fairy House Lamps from Plastic Bottles


