What can be more tender and beautiful than the first spring flowers? It is with their appearance comes the realization that, finally, the cold has ended and nature begins to awaken from hibernation. That the spring mood does not leave the year round, we suggest you to make a bouquet of crocuses with your own hands.
Materials for crafts
Recently, more and more popularity for the manufacture of handicrafts is gaining fame. This modern material is used by needlewomen to make jewelry, ornaments, postcards, floristic decor and compositions. Foamiran sheets are very suitable for children’s creativity. Having a bright color and plasticity, this material is perfect for creating crafts, appliqués, toys.
To start working with new material, first of all, it is worthwhile to figure out what it is. In the manuals it is indicated that foamiran is a decorative foamy material. Many craftsmen often call it “Fom” for short. In the people there are other, not consonant names: foamed rubber, reveler, plastic suede, etc. A fom is produced in sheet form with a thickness of about 1 – 2 mm. Due to its properties, the reel has good plasticity (it can be easily stretched in different directions, while a new shape will remain). After heating, it also takes on any shape. Easily liable to cutting, so cutting out even small parts from it will not be very difficult. It is well suited for gluing with glue gun, glue PVA, universal super glue, glue “Moment”.
It is important to note that phaa-isan is environmentally safe. It does not emit harmful fumes and unpleasant odors. Considering all of the above, you can easily offer a fom in working with children.
Bouquet of crocuses from foam sheet: a step-by-step master class
Now that there is a first understanding of the new material, you can start working on making crocuses from foam sheet. For beginners, we suggest using a detailed master class on the creation of the first spring flowers.
For work it is necessary to prepare the following materials and tools:
- foam sheets (yellow, white, lilac and green);
- a tube of glue or a thermo-gun (an adhesive gun);
- scissors;
- ruler;
- wooden scoop or toothpick;
- wire;
- corrugated paper (green);
- iron;
- crepe-tape.
The whole work can be divided into several stages.
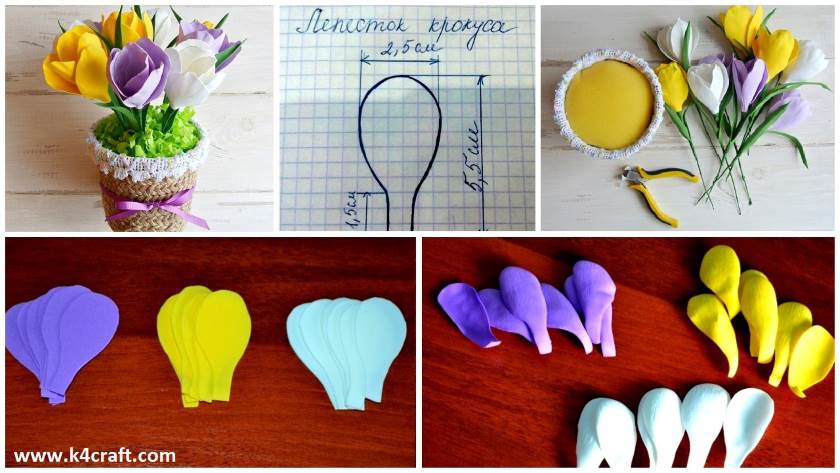
1. Construction of the petal pattern
To build a pattern, we use a tetrad sheet in a box.
Draw the petal itself with a base width of 0.8 – 1 cm, we extend the leg of the lobe by 1.5 cm and make an extension to 2.5 cm.
At a height of 4 cm we make a smooth rounding. The diagram shows an approximate pattern of a single flower petal.
Cut out the template and paste it onto cardboard or thick paper.
Again cut out the workpiece. A dense pattern is easier to use in the work (with further reusable pattern, the edges do not crinkle and retain the original shape).
2. Blanks
- Apply the template to the background sheet and press the toothpick lightly around the outline.
- For the correct consumption of the material, the next petal is applied by turning upwards with the base.
- To make one flower you need 6 petals of the same color.
- With sharp scissors, cut out all the blanks and lay them out in stacks in colors.
- Heat the iron (on the middle mode) and for a few seconds iron each part.
- With your thumb, we press the heated part to the corrugated paper along the
- strips, creating the shape of the boat. Since the corrugation has a stiffened structure, veins are imprinted on the warm petal, which will make the flower more natural and realistic.
Thus, we bend all the parts.
- Each petal at will is toned at the base with a dry pastel (light green and yellow).
To make a flower pestle, thinly cut one side of the yellow rectangle with a fringe fringe. - The edges of the fringe are gently scrolled between the fingers to make the edges thinner.
- On a piece of wire (approximate length of 12 cm) tightly wound a rectangle, leaving the fringe from above.
- That the stamen is not untwisted, edges of a detail we fix by means of glue.
- Around the resultant pistil, we evenly distribute the finished stamens (if there are no factory blanks available, then we can do it ourselves: for a small length of wire, tightly wrap a piece of cotton wool and color it in yellow).
We prepare the greens for the flower. To do this, the rectangle of green foam(1.5 cm by 13 cm) is cut along along the diagonal. We iron the part of the sheet for a few seconds with a warm iron and immediately bend it in half. Leaf is ready. We prepare the necessary number of leaves per each bud per 2 leaves.
3. Flower picking
One crocus flower consists of 6 petals, arranged in 2 tiers, middle (stamens) and 2 leaves. Having all the blanks, we proceed to the collection:
To the stamen glue in a circle 3 petals.
The second tier is glued on top of the first in staggered order.
The basis of the glued petals is masked with the help of an insulating tape (teip-tape).
Bottom paste 2 green sheets.
Spring crocuses are ready!
Flowers can be used as decoration or for making bouquets (floral arrangements). Stylish and original look bouquet of crocuses from foyamir in ornamental pots and baskets.
Decorative flower pot
Make this composition is not difficult. You will need a usual small plastic pot, glue gun, jute rope, braid.
The progress of the work on the decorative pot:
- From a rope a plait a long pigtail.
- Piglet wrap the pot and fix it with glue.\
- On top of the inside, attach the braid and turn outward.
- For stability on the bottom of the pot, put the pebbles and fill the floristic
- sponge cut into the shape of the container. You can use foam or washcloth.
The ends of harvested flowers are cut to the required length and inserted into a pot (in a sponge).
At the edges we lay decorative grass (sliced corrugated paper cut into thin strips) and decorate with a satin ribbon.
Spring bouquet is ready! Such a charming composition will decorate the interior all year round and delight you and your friends!
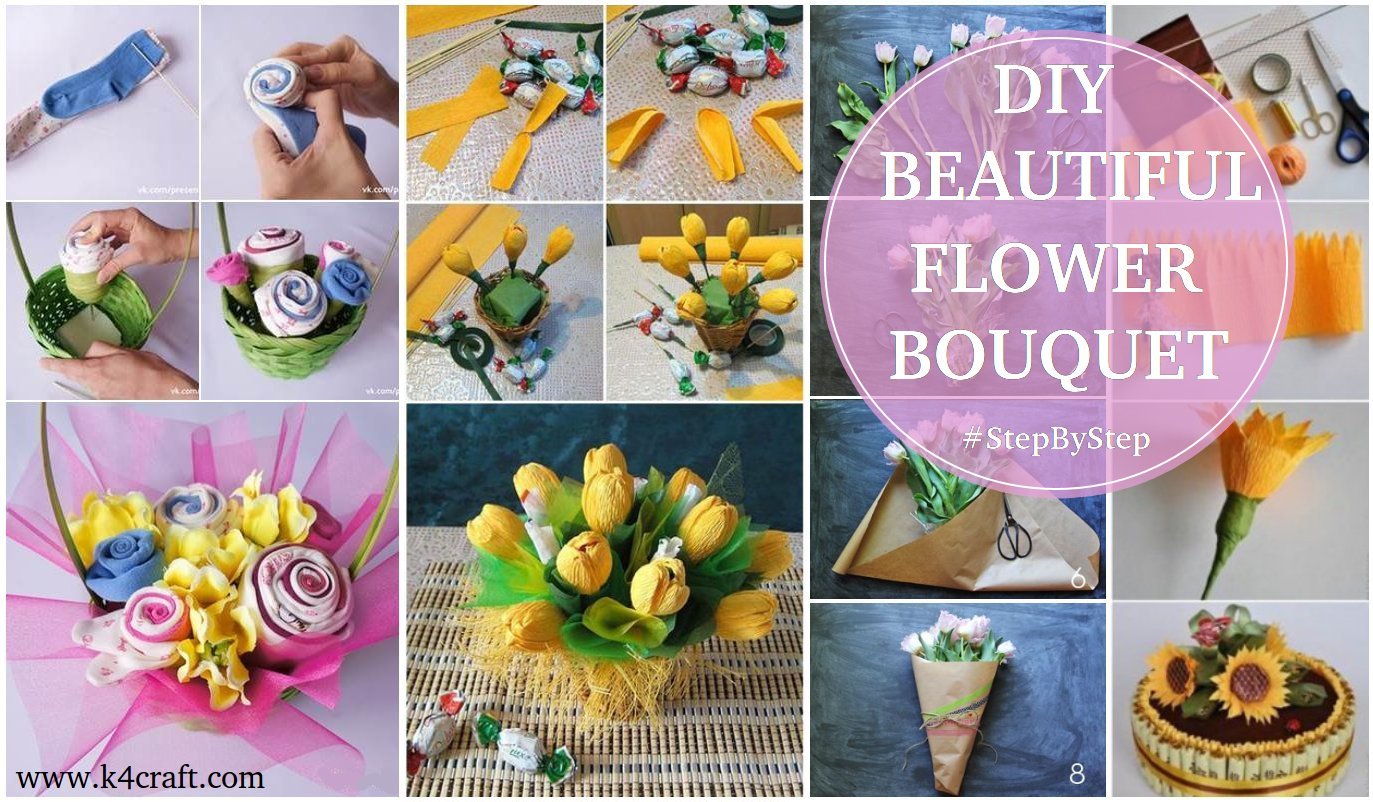
DIY Beautiful Flower Bouquets – Step by step
Read More
- How to make flower bunches using old shopping bag
- How to make cardboard item holder
- How to make a doll dress from foam
- Thin bangle set – Making with silk thread – Jewellery tutorial
- Plastic bottle craft organizer – Best out of waste


