How to sew stumpwork dragonfly

Basically, I’ve worked out how to do the head, body, and tail and the first thing to do was to ignore the instructions that came with the kit which, in part, were:
It seemed to me that this working plan was not only biologically inaccurate – the written part described the rounded end as the head and the long, thick part as the body, when the body is where the rounded part is and should have had a small area added for the head, and the ‘body’ should be much thinner and called ‘the tail’ – but also that the stitch instructions weren’t quite right.
I realized that it was a padded raised stem stitch band that was being described here, and found much more helpful instructions in Country Bumpkin’s ‘The Embroiderers Handbook’, which you can see a part of here:


See a major difference? The kit said work all along one band, but the CB book says to work from one end to the other in columns rather than rows. As this is what every other set of instructions I’ve seen for stem stitch band, padded or otherwise, said, I decided to use the CB version instead.
As the tail part was clearly far too wide – dragonfly and demoiselle fly tend to be rather on the narrow side here – I cut the padding back from three stitches wide to two. Still too wide really, one would have been enough, but I went with two just the same.

The next step was to add in the bands all along the length of the tail section.

After that, beginning at the body end, you need to hook each stem stitch through each band and work from one end to the other.

Repeat this step until the whole area is covered – you might need to put in more lengths than you might think in order to keep the stitches close together and cover the padding well.
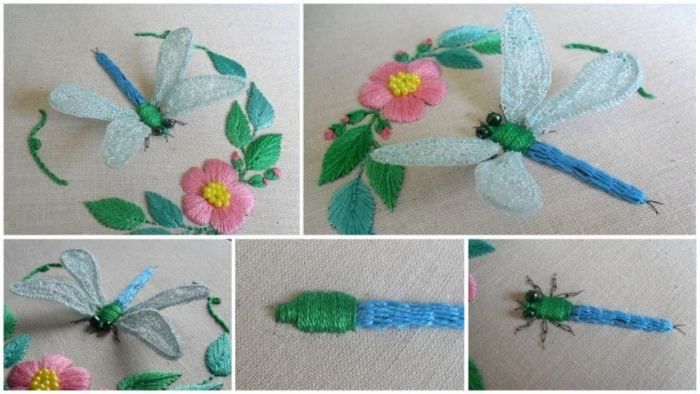
And here’s the finished result from both top and side:


First I covered the last of the padding stitches with satin stitch in two strands, making the far left-hand side considerably narrower to form the head.

Next, I added two beads to the eyes. I still feel these are a little large for the context (actually, the whole insect feels much too large for my comfort), but the ones supplied with the kit were even larger, so it could have been worse!

Following on from this stage was adding in the legs and one or two other parts in Kreinik Cord. I used the greyish brown shade here.
I also added one or two stitches in dark grey on the tail area in keeping with the real thing – as seen in my good old British Wildlife book.

Last, of all, the wings were attached using the method detailed in my tutorial on assembling a wired stumpwork flower.

And here is the whole finished item from two angles:

courtesy: sew-in-love.blogspot


