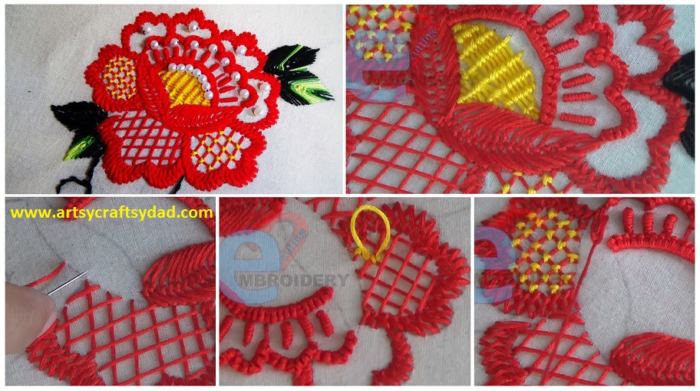
Brazilian Embroidery Flower – Step By Step Tutorial
Brazilian Embroidery (BE) is my obsession because it’s all about 3D texture! It uses special rayon threads that have a gorgeous sheen and are meant to be lofted (puffed up). Let’s make a classic BE rose.
What You’ll Need: A sharp needle, BE rayon thread (I recommend EdMar’s Iris), a small embroidery hoop, and fabric.
The Center: Make a small, tight French knot. This is your rose’s center.
The Pistil Stitch: Around the French knot, make 5-6 straight stitches radiating outwards. These are your base guides.
The Cast-On Petal (The Magic!): This is the signature stitch. Anchor your thread near the center. Now, cast loops onto your needle itself—about 5-7 loops. Hold the loops with your thumb, pull the needle through, and then anchor the loop bundle down on the fabric just outside a pistil stitch. This creates a full, knotted petal.
Build Outwards: Continue making cast-on petal stitches in overlapping rows around the center, each row slightly larger than the last. The key is to fluff the threads with a needle to give that full, dimensional bloom.
It takes practice, but the effect is unlike any other embroidery style!
Brazilian embroidery flower – Step By Step (Tutorial)
Read More:
- Hand Embroidery of Flowers with Polan Stitch
- Beautiful Hand Embroidery Flower Design For Kurti
- How to make bead embroidery flower
- How to make sequence embroidery flower
- Brazilian Embroidery Flower – Step By Step (Tutorial)