How to Make a Wall Hanging from Clay
Air-dry clay is my favorite medium for creating textured, modern wall art without a kiln. I made a series of clay leaf hangings for my living room, and their organic, tactile quality adds so much warmth. It’s easier than you think!
You’ll need: Air-dry clay, a rolling pin, clay tools (or a knife/ toothpick), acrylic paint, and twine.
Let’s create:
Roll & Shape: Roll your clay out to about 1/4-inch thickness. Use a knife to cut out your desired shape—organic shapes like leaves, circles, or abstract forms work best. Smooth the edges with a damp finger.
Add Texture & Detail: This is the fun part! Press lace, leaves, or textured fabric into the clay to create patterns. Or, use a toothpick to carve lines, dots, or geometric designs. Don’t forget to poke two holes at the top for hanging!
Dry Thoroughly: Let the clay dry bone-hard according to package directions, usually 24-48 hours. Patience is key to prevent cracking.
Paint & Seal: Paint your piece with acrylics. A popular modern look is to paint the entire piece one color, then lightly sand the high points to reveal the raw clay underneath for a rustic, weathered effect. Seal with a clear varnish or mod podge.
Hang It Up: Thread twine, leather cord, or ribbon through the holes and tie a secure knot. Your unique, handmade wall hanging is ready to display!
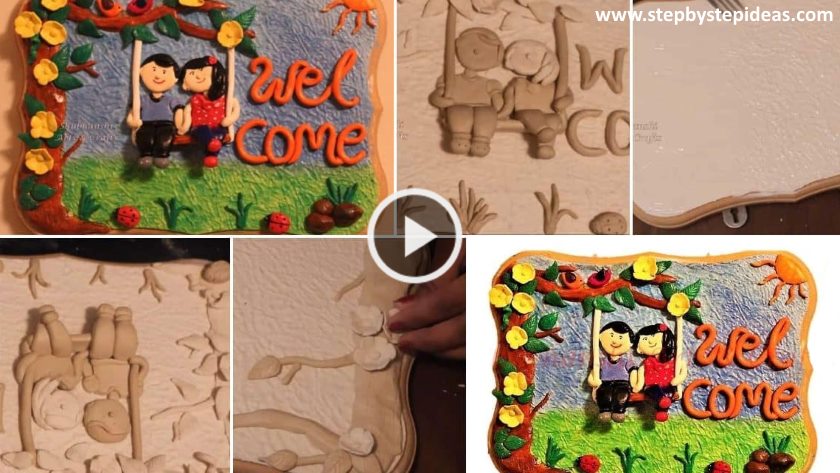
There are many ways with which you can decorate the walls of your home, But Clay work or mural technique is one such type of art where you can create stunningly beautiful 3D wall decors. In this video, I am going to show you how to make one such Clay Wall Hanging that looks so charming that anybody will instantly fall in love with it. This is a 3D Ceramic painting that depicts 2 kids from a family are sitting on a swing and welcoming you to their home. These are crafted purely with hands and very easy to make.
How to make polymer clay butterfly fairy

Read More
- How to make peacock lamp using clay for home decor
- How to make polymer clay calla lily necklace
- How to make Desk Organizer from clay art
- Painted Decorative Clay Vase Craft Tutorial
- How to make polymer clay butterfly fairy doll