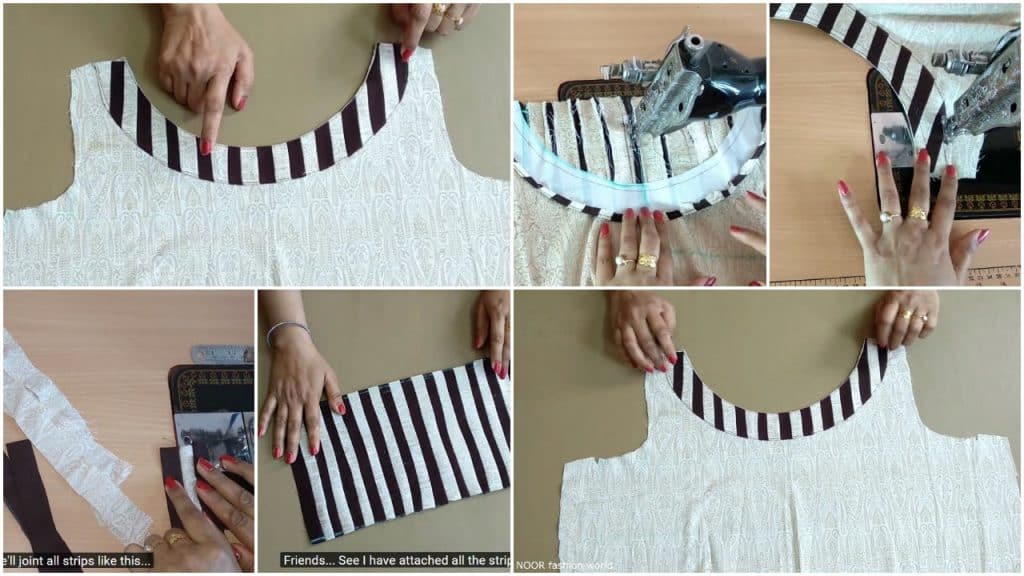
A boat neckline is a timeless, elegant style that widens the shoulders and creates a beautiful frame for the face. But when you add stripes, the cutting and matching can feel tricky. Don’t worry—it’s easier than you think with one simple trick!
The Key to Perfect Stripes: Alignment
The most important step happens before you even cut. You must ensure the stripes on your front and back pieces will match at the shoulder seams. I learned this the hard way on a top where the stripes were painfully off!
Step-by-Step Guide:
Pattern & Cutting: Fold your striped fabric carefully, aligning the stripes perfectly between layers. Place your front and back pattern pieces on the fold. Before cutting, use a ruler and a fabric marker to draw a line along a specific stripe that runs through the center of each piece. This is your matching guide.
Pin for Precision: When pinning the front and back together at the shoulders, don’t just match the raw edges. Precisely align the guide lines you drew. Pin heavily along that stripe to prevent shifting.
Sew & Press: Sew your shoulder seams with a straight stitch. Press the seams open to reduce bulk. The result? A perfectly continuous stripe across your shoulders that looks professionally done!
Pro Tip: For a truly clean finish, bind the neckline with bias tape made from a coordinating solid color instead of folding it under. It makes the stripes pop!
I’ve always loved boat neck dresses, and yet don’t think I own a single one. How can that be?! Welp, that had to change and I thought stripes would be the perfect way to incorporate it. So, I pursued the cotton jersey aisle and found this bold striped fabric that would hug in the all the right places. I was all set.
Watch Full Video
In this video I will teach you how to make Boat Neck with stripes in very simple and easy way. You can add this design to your Party Wear and regular kurtis and blouse. In this video you will learn boat neck. This is a complete cutting and stitching tutorial.