All winter, bright noodles delight us with their bright red breasts. With the advent of spring, these lovely birds live in forests, and not so often they can be seen in the city. But do not get upset – we propose to make these hands of these red-breasted handsome men. Our master classes are not difficult to perform, therefore, following the step-by-step instructions, it will be easy for you to understand the technique of performing a bullfinch from threads.
Feathered handsome man of multi-colored wool
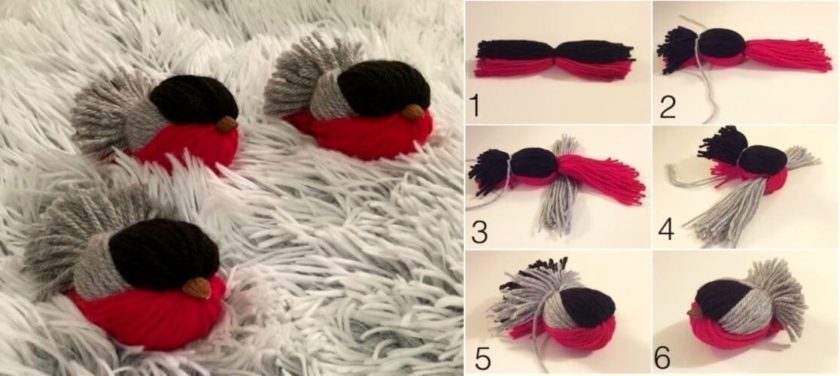
As we know, the feathering of this bird is bright colors, so we will use threads of red, white, gray and black colors. The photo shows the whole step-by-step progress of the work:
Firstly, we wind the wool yarn on a cardboard base with a width of 7-8 cm. It should be noted that it is at this stage of the work that the size of the bird is determined – the wider the cardboard strip, the bigger the bullfinch will eventually be. Next, following the instructions, we form the bird’s body. Beak is made from half a kernel of almonds, pinned on a thick needle (for this purpose you can take a toothpick or a piece of thin wire). Eyes make with the help of small beads or beads of dark blue color. They can be glued with a super glue or a glue gun.
Bullfinch from pompoms
The winter bird can be made from pompons wound from threads. Use for this purpose is best acrylic yarn – it is well-fluffed after pruning. And acrylic has the property not to fade in the sun, it is pleasant in work, usually bright saturated colors. The photo shows the stages of making a bullfinch:
Application
This work is good because this picture can be used both as a postcard and as a panel. Not expensive and simple in doing the craft can decorate the wall and give pleasant moments to the gift recipient.
You will need the following set:
- a sheet of cardboard (white or colored, this will be the basis of the craft);
- thread;
- scissors;
- paper napkins;
- a simple pencil;
- black felt-tip pen;
- PVA glue.
Progress
On the basis of drawing a simple pencil sketch-outline bullfinch. If it is difficult for a child to draw a bird himself, then it is possible to print out the picture in advance or to suggest that a prepared template be circled.
Woolen yarn is cut into small pieces (fluff) not more than 5 mm in length. For convenience in work, it is best to arrange the scraps in separate plastic disposable plates.
Now apply glue to the picture. The glue is applied not at once to the whole bullfinch, but partly. First, cover the breast with a thin layer, apply fluff and cover with a napkin. For a few seconds, press the napkin with the palm so that the threads are glued to the base. Try to sprinkle the threads so that they do not go beyond the contour and are distributed evenly over the part without spaces.
Similarly, we lay out all the other details and parts of the picture.
The paws and the beak are drawn with a black felt-tip pen or marker. The application is ready!
Of threads and cardboard
In needlewomen, keen on knitting, undoubtedly, a lot of yarn remains are stored in the stocks. There are not enough small bobbins for knitting a full-fledged thing, but for handicrafts they will come at the right time.
It is necessary to prepare:
- a cardboard (the old box from under footwear will approach also);
- paints and brushes;
- compass;
- yarn of red, gray and white colors;
- scissors with sharp tips;
- darning needle;
- simple pencil.
Process of implementation
We prepare a template for a future craft on a regular sheet of paper. With the help of a circular draw circles of different diameters. Then draw the tail, head and beak.
The cut out template is transferred to the cardboard and cut out along the contours. It is necessary to prepare 2 such details.
Cover with black paint on both sides of one of the cardboard blanks, the second left not painted. After the paint dries, draw on both sides of the eyes or glue already ready.
We put the items together so that the tails are not on the same level – this will facilitate the work when tying the threads.
Using a needle with a wide eyelet, wrap the lower part with a red thread. This will be the breast of the bullfinch.
Similarly, we wind the threads of gray and white colors for the bird’s back.
Gently inserting the scissors between the cartons, cut the yarn. We put in the middle of the thread and bandaged. Unpainted detail we remove and straighten the cut ends.
One of the tips of the working thread is pulled through the hole and tied, making a loop so that it is possible to hang the hand-made article.
Now bright bullfrogs will please you and your loved ones all year round!
DIY Tutorial : Homemade Bird Feeder form Plastic Bottle

Read More
- Full Hand | Simple And Easy Mehndi Design
- 2 Basic finger tip mehndi design tutorial
- Easy Colourful Rangoli Using Various Tools Rangoli
- Easy, Small and Unique Peacock Rangoli Design
- 15 August independence Day special rangoli design


