Step-by-Step Guide to Crafting Stylish Kurti Buttons
Want to give your kurtis a unique touch without spending a fortune? Making creative buttons is an easy way to transform even a plain kurti into a stylish statement piece. I remember helping a client turn ordinary white buttons into colorful, hand-decorated designs, and she said, “It’s like wearing a new kurti without buying one!”
Why Handmade Buttons?
In my experience, handmade buttons instantly elevate the look of any outfit. They’re also trending in 2025—Etsy reports a 30% rise in searches for “DIY fashion buttons” this year. With fashion leaning toward personalized, sustainable accessories, adding custom buttons is a simple yet impactful upgrade.
Materials You’ll Need
- Plain buttons (wooden, plastic, or metal)
- Acrylic paints or nail polish
- Beads, sequins, or small rhinestones
- Fabric glue or strong adhesive
- Brushes or toothpicks for detailing
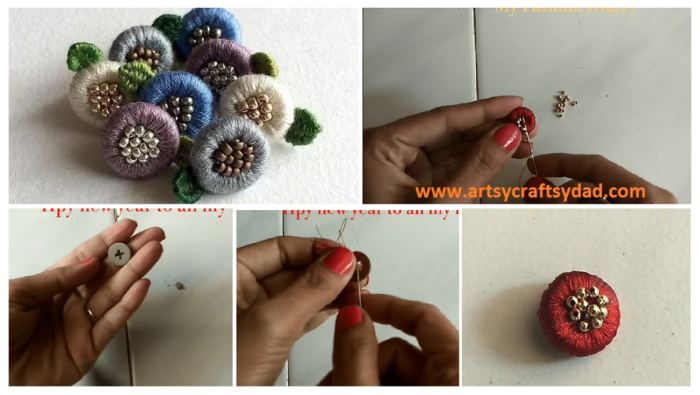
Step-by-Step Tutorial
- Prepare the buttons – Clean them and remove any dirt or residue.
- Paint the base – Use vibrant colors that complement your kurti. Let it dry completely.
- Add designs – Stick small beads, sequins, or draw intricate patterns using nail polish or paint.
- Seal and protect – Apply a thin layer of clear nail polish or glue to ensure durability.
- Attach to your kurti – Sew the buttons carefully in place, spacing them evenly.
Final Thoughts
I once made floral-patterned buttons for a plain black kurti, and honestly, the outfit looked like it belonged in a boutique! Don’t underestimate the power of small details—they can completely change your outfit’s vibe.
So, are you ready to make your kurtis stand out with creative buttons? Trust me, once you start, you’ll never look at ordinary buttons the same way again!
How to make a beautiful button for kurties

