Inspire kids’ artistic talents with this step-by-step doll face art and craft tutorial. A fun, imaginative project.
Unleash your child’s artistic flair with this captivating doll face art and craft tutorial. Embark on a journey of self-expression and creativity as your little one transforms simple materials into enchanting, one-of-a-kind doll face masterpieces.
Beautiful Doll Face Art And Craft

Must Read: How to make newspaper doll – African doll making
Supplies & Tools
- Blue sheet, white sheet,
- Black marker, pink blush, red marker, green or blue marker
- Yellow sheet
- Pencil
Doll Face Art And Craft Instructions
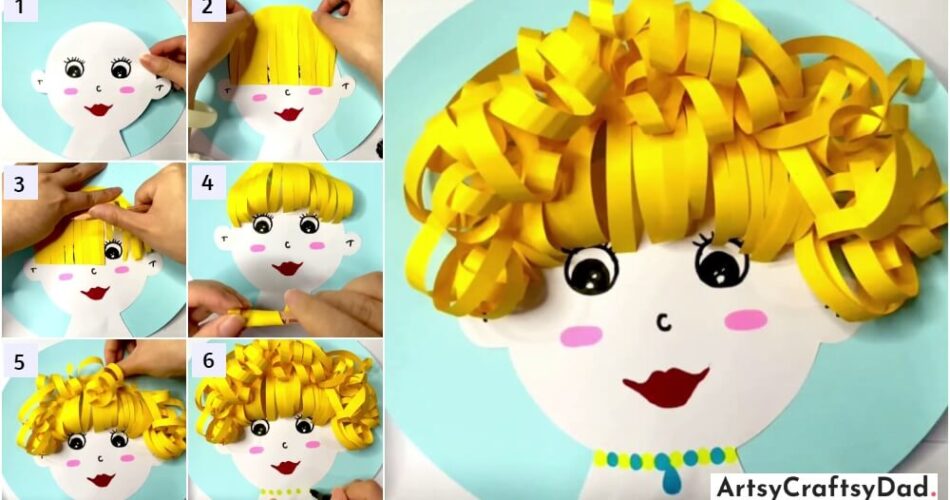
Step #1: Make A Face

Take a sky-blue sheet that is cut in a circular shape. Take a white sheet and cut it into a face and shoulder structure. Make eyes, ears noses with the help of black marker lips with red marker, and chicks with a pink sheet.
Step #2: Use A Yellow Sheet For Making Her Hair

Take a yellow sheet in a semi-circular way and after we will cut it with the scissors straight and paste near its head.
Step #3: Use Pencils

Use a pencil or any round thing so that her hair becomes curly.
Step #4: After Curling Its Seem Bangs

After folding the yellow sheet it looks like bangs. then use another sheet and do it again.
Step #5: Paste Another bangs

Then the other bangs should be pasted on the above.
Step #6: That’s How Her Hair Looks Like

That should be the look of her hair at the end.
Step #7: Make Necklace

Now with the help of a green marker, we can draw the particular necklace.
Congratulations! Your Craft Is Ready

That is how it should look.

