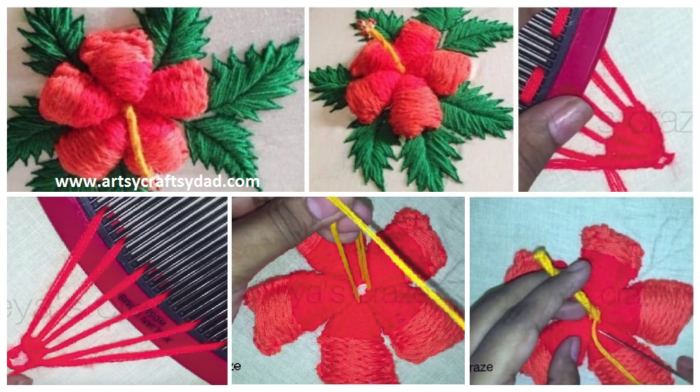
DIY Hibiscus Flower Embroidery: Step-by-Step Instructions
If you want to add a tropical touch to your outfits or home décor, hibiscus flower hand embroidery is a perfect choice. Its bold petals and vibrant colors instantly brighten up any fabric. I remember teaching a client to stitch a hibiscus on a plain kurti, and she couldn’t stop smiling when she saw the final result—she said it looked like a designer piece!
Why Hibiscus?
In my experience, hibiscus flowers are not only beautiful but versatile. They work well on kurtis, cushion covers, and even wall hangings. According to Pinterest trends in 2025, searches for “tropical flower embroidery” have jumped by 38%, showing a rising interest in bold, handmade floral designs.
Materials You’ll Need
- Fabric (cotton or linen works best)
- Embroidery hoop
- Embroidery needle and thread (red, pink, yellow, green)
- Fabric chalk or marker
- Scissors
Step-by-Step Tutorial
- Secure the fabric – Place your fabric in an embroidery hoop for a taut surface.
- Draw the design – Sketch the hibiscus flower outline lightly with fabric chalk.
- Stitch the petals – Use satin stitch for a smooth, filled look. Layer colors if you want a natural gradient.
- Add the center – French knots or small seed stitches create a realistic stamen.
- Finish with leaves – Use a stem stitch or backstitch for stems, and long and short stitch for leaves.
Final Thoughts
I once embroidered hibiscus flowers on a tote bag, and it quickly became a favorite accessory! Don’t underestimate how a few hand-stitched flowers can transform a simple fabric.
So, are you ready to pick up your needle and bring this tropical bloom to life? Trust me, once you see your hibiscus blossom under your fingertips, you’ll be hooked on hand embroidery.
Hibiscus Flower Hand Embroidery – Step By Step (Tutorial)