Your child’s inner archer with this fun and easy-to-make bamboo crossbow craft! Great for developing fine motor skills and imaginative play.
Fostering a child’s creativity and sense of adventure can be as simple as providing them with the materials to craft their own toys. One particularly engaging project is building a bamboo crossbow, which combines engineering, target practice, and unbridled imagination. This step-by-step tutorial will guide little hands through the process of creating a functional, yet whimsical, crossbow that can provide hours of spirited playtime.
Creative Bamboo Crossbow Craft Activity Tutorial For Kids

Must Read: Popsicle Stick Airplane Craft Model Tutorial For Kids
Supplies & Tools
- Bamboos
- Glue
- Scissors
- Rubber
- Custard sheet
Bamboo Crossbow Craft Instructions
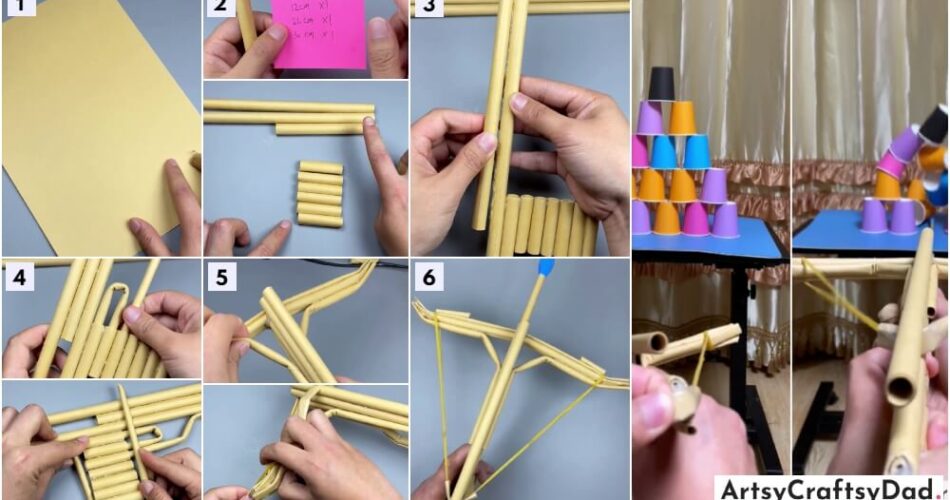
Step #1: Prepare A Base

Use a plain custard sheet.
Step #2: Roll It

Roll the sheet completely.
Step #3: Make Bamboo

Using the sheet prepare a bamboos from it.
Step #4: Exact Measurement

All the sticks should be cut as mentioned in the above sheet.
Step #5: Cut The Sticks

Cut the sheets according to the manner which is derived above.
Step #6: Use Permanent Glue To Paste

Put glue on the smallest sticks.
Step #7: Paste It To Each Other

Now, Paste all the sticks with each other on the finger.
Step #8: Paste Another Stick

Then, paste another long stick with a bunch of small sticks.
Step #9: Another Longer

Then paste another longer to that.
Step #10: Fix It Properly

Then fix it properly and make sure it got pasted right.
Step #11: Add Glue

Add glue in the middle of the stick.
Step #12: Cut The Extra

Then cut the extra stick using a scissor.
Step #13: Paste Another Stick

Then, paste another shorter stick than the previous one.
Step #14: Add Another Bamboo

Add another bamboo to the previous bamboo.
Step #15: Cut The Bamboo

Cut the first aligned long bamboo from the bottom in a diagonal way a little bit.
Step #16: Put Another Bamboo

Put another long bamboo in the first medium-pasted bamboo.
Step #17: Fold It

After inserting fold the bamboo in the middle.
Step #18: Put It In

Then, put one end inside the medium longest and another end at the first bamboo of the bunch.
Step #19: Take Another Bamboo

Then, insert one more long bamboo in the second bamboo of the bunch of the bamboo.
Step #20: Fold It Accordingly

The inserted bamboo should be folded as first it should be straight then a little bend then again straight like a refiel.
Step #21: Cover The Bunch

Then, cover the bunch of the bamboo with the help of long bamboo as shown in the above picture.
Step #22: Paste It Carefully

Then, paste it carefully with the help of glue.
Step #23: Fix It

Fix it in the total area from top to bottom, and ensure it is pasted properly.
Step #24: Should Seem Like This

It should seem like this, it should look like a rifle.
Step #25: Use Another Bamboo

Then use two bamboos of different sizes.
Step #26: Cut It

Cut both the bamboo diagonally at the end of the bamboo.
Step #27: Paste It

Then, paste it on the upper area of the gun, it will pasted in the horizontal direction.
Step #28: Fix It Properly

Fix it properly the longest bamboo which is folded as a triggered point It should get a little fold from the above and get pasted with another as shown in the figure.
Step #29: Repeat The Steps

Do exactly same repeat the steps, do same as we did in the upper step but this time on the left side.
Step #30: Paste A Short Bamboo

Paste a short bamboo on the right side of the horizontal bamboo.
Step #31: Use Rubber Band

Use a rubber band and make a tight knot on it,
Step #32: Put In The Corner

Then, take a custard sheet fold it a little bit, and paste the rubber inside of the sheet.
Step #33: Bind It On The Right Side

Bind the rubber with a knot on the right side.
Step #34: Bind It From The Other Side

Then, bind it from the other side of the bow.
Step #35: Stretch The Rubber

Then, stretch the rubber slightly backward; it seems like a bow and arrow.
Step #36: Put Another Bamboo At The Top

Then, paste another bamboo stick at the top targeting straight.
Step #37: Fix The Stretch Rubber

The stretch rubber should be stretched under the long bamboo attached to the medium bamboo.
Step #38: A Step Before Final

That is how it should look alike.
Congratulation! Your Output Is Ready

Here, are the before and after, At first it shows that after throwing the ditch the glasses are kept symmetrically but after the match gets hit the glasses will spread.
The bamboo crossbow craft is a fantastic way to nurture a child’s problem-solving abilities, fine motor skills, and love of adventure. By following this simple tutorial, young makers can construct their own unique crossbows and engage in exciting target practice. This hands-on activity not only sparks creativity but also encourages active, imaginative play that children are sure to enjoy.
You Might Also Like This
- Ant Eating Apple – Creative Craft Tutorial For Kids
- Creative Orange Peel Chicks Craft Tutorial For Kids
- Creative Clay Pen Holder Craft Tutorial For Kids
- Creative Swimming Jellyfish Paper Craft Tutorial
- Fun and Creative 3D Paper Craft Projects For Kids


