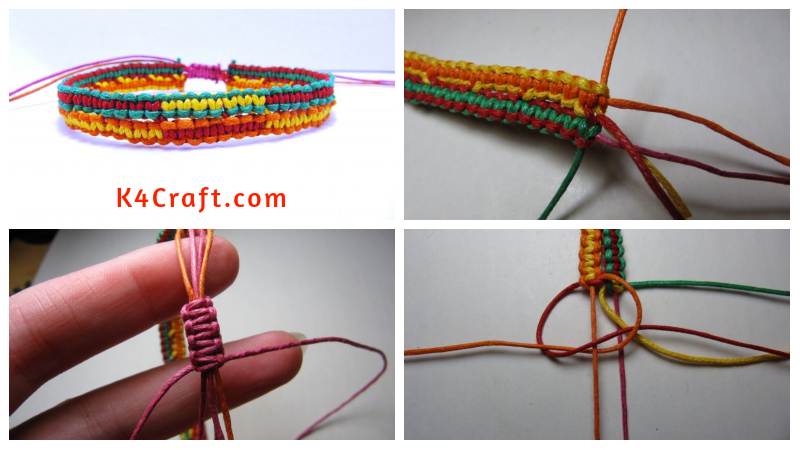
Welcome to my next master class on weaving from the cord, in the technique of macrame. Today I would like to present to you one of the brightest bracelets woven from a waxed cord. At this bra, the weaving is simple, uncomplicated. With the manufacture of such a bracelet to cope even a small needlewoman . So stock up on cord, patience and the desire to learn something new. So, let’s get started!

Materials
- Cord of waxed five different colors: red – 1 meter; green – 1 meter; orange – 1 meter + 40 centimeters; yellow – 1 meter; pink – 40 centimeters + 20
- centimeters;
- scissors;
- Super glue;
- tablet (I have a tight cardboard);
- Binders (clamps).

Step 1. The basis of a bouquet.
Take forty centimeters of pink and orange strings, we connect them on both edges together.

Bright coiffure of waxed cord
We fasten these bundles to the tablet with binders. Behind the plate should be the same length of the edge of the base.

Step 2. Beginning of weaving.
We take our colored cords one meter and press it with the binder on top of the tablet. We grip only the edges about one centimeter. We fasten two cords on both edges of one base cord and two other colors along the edges of the other base cord.
Let’s start the weave from one, let’s say the right, the cord-base (pink). We take red and green cords, bend the green and pass under the pink cord-base and put it on the red top. Red bend and put on a pink cord-base, then pass under the green cord. So it should look like the photo.

When we tighten the red and green cords, the pink will be between them.
Further we do so: red we put from above on pink, and green on red and we under pink and we pass in a red loop. In the photo, everything is clearly visible.

When we tighten and this time cords – it turns out a node, in macrame referred to as a square node.
We make the node the same way as the previous one, but in a different sequence.
First, put the yellow cord on the base cord, and put the orange on top of the yellow and poddev under the cord-base, output in a loop yellow. Again the photo will indicate the correct actions.
Tightening the edges, we continue the weaving of the square knot.
Yellow bend and put the cord on the cord, and orange on the yellow top and bend it up under the cord-base and remove from the yellow loop.

Tightening the edges of the cords, we get a square knot, but in a mirror image.
Next, we need to fix the two rows together. For this we need to take the loose cords that are inside the work, and twist them. So to say – to cross.

And then we just continue the weaving. This time the green passes under the pink cord-base, and the red one under the green and into the loop of the same green color.
Tightening the edges, we get the next square knot.

Again we pass to the other side. Make the node in the mirror image of the previous one, red-green.
After tightening the edges, we get a beautiful weave.
We can safely continue the weaving. The next crossing can be done somewhere in five square knots.

By the way, alternating nodes (the right side, then the left one) in the weaving is not necessary.
The main thing is not to forget to cross both sides. If this is not done, then both sides will be separate, in principle, this is permissible. Or if you do not cross less often, you will see crevices between the weave, and it will not look very nice.
We weave 4-5 knots and cross the cords again.
And tat further. Our crossing should not be seen at all, so carefully make sure that the cords go in the same direction each time they cross.

Step 3. Change colors.
So I doplela to the place, roughly in the middle, where I want to change the colors of the weave.

In order to change the color combination, we need to swap internal cords. We take red and yellow and cross them twice. Not one weave, but two. So we have two colors swap places. Yellow will be paired with green, and red will be paired with an orange cord.
And we continue the knot behind the knot with our uncomplicated weaving.
Right side.

Left-hand side.

Here such change of colors at us turns out.

Bright coiffure of waxed cord
Step 4. Return to the color combination.
Here I wove about seven knots with a change of colors. Now we will change the internal cords back. We make two bindings, so that the red becomes paired with green, and yellow with orange.
And again we continue to weave the square knots.

So I finished the length that suits me. To do this, I put a bracelet on my wrist and left between the edges of the baubles about two centimeters for the lock.
This is how the wrong side of our baubles looks. If you like the wrong side, take it as a base, like a front one.
At the end of the work, we should cut off the extra tails and carefully drip the superglue on both of the last square squares to anchor our weaving.

Bright coiffure of waxed cord
Step 5. Weaving the lock.
We will add our bracelet so that the tails of the base cord are side by side, but look in opposite directions.

We take in hand and a pink cord, about twenty centimeters, wrapped around to begin the weaving of the first knot.
Then make the first node as in the photo.

We carefully tighten and weave the second knot in the opposite direction.
Pay attention to the tightness of the knots on the lock. It is necessary to tighten properly, because over time, the cords in the places of friction will soften, and they will separate themselves.
Here is the first bundle.

Spray the knots so much to put the bracelet on your hand, it does not choke your wrist and does not hang out or fall off your hand.
Accurately cut the ends and drip superglue on both sides of the node, from the sides where the ends of the cord come out.

Here is our bracelet-bauble ready! Thank you for attention! Pleasant all homemade !
DIY Bracelet Making Ideas for Girls

Read More
- Different types of frock neck designs
- Different types of kurtis designs
- Latest Mehndi Design For Hand – Step by Step
- Attractive Henna Mehndi Design for Hand – Step By Step
- Indian bridal henna designs | Eid special henna design for hands 2018 – Step By Step (Tutorial)