What do you think, what were the plastic spoons for? For use in fast food establishments or for nature treks? This is true, but here are the real handmade masters added to this list also unlimited possibilities for creativity. This usual and unremarkable cutlery made of plastic in skilled hands turns into a universal tool for creating amazing New Year (and not only!) Crafts. Do not believe me? Well, then we invite you to the master classes on creating crafts from disposable spoons, which you can easily repeat on your own at home. So, we plug in an outlet glue gun and go!
Snowmen from plastic spoons
What is the New Year without funny snowballs? Without these helpers Santa Claus holiday would be boring, especially since they are so fond of children. To sculpt a snowman from the snow for sure, every child knows, but not everyone knows how to make a funny snowman’s craft with his own hands from plastic spoons. It is not difficult to do this at all. To do this, you will need:
- plastic spoons (1 piece for 1 snowman);
- a small plastic cup or a clay pot for flowers (1 piece for 1 snowman);
- felt (you can take fleece) blue or blue;
- paint (watercolor or gouache – that you have);
- colored paper (1 sheet of blue or blue);
- glue stick;
- glue gun;
- brush;
- gel pen in blue or black;
- foam or foam rubber (a small piece that can fit on the bottom of the glass can also be replaced with cotton);
- New Year’s Tinsel.
The step-by-step instruction is as follows:
1. To begin with, you need to make a pedestal for a child’s craft – it will be a plastic cup or a clay flower pot (depending on what you find at home). On the outside, paint it with a blue or blue paint. After painting, leave the pot to dry for a few minutes. If you have a plastic cup, then you need to wrap it with colored paper. To do this, cut a strip of appropriate length and width, wrap around the cup and glue the ends with glue.
2. To give the brightness and make the handicraft more fun, on the walls of the glass / pot you can paint with white paint snowflakes. After color, do not forget to leave the craft for everything to dry up properly.
3. During this time, while the paint dries, prepare for the snowman a hat and a scarf made of felt. For the scarf, cut a strip 1 cm wide and 5-6 cm long (so that the scarf can be wrapped around the “neck” of the snowman), and for the cap cut out either two triangles (then the cap will be in the form of a cone), or two semicircles – in a word , the form of the headpiece for crafting remains at your discretion. Cut the ends of the scarf to make it look like a fringe. Wear the cap carefully from the work pieces. You can also make a pompom of New Year’s tinsel for her.
4. Now you can collect a snowman. Cherpak – this will be his head. On the “neck” (this is the place of connecting the scoop and handle), put on the scarf: wrap the prepared piece of cloth several times (it will be enough two turns) and fix it with the help of an adhesive gun (if you do not have it, you can sew the joint with threads). On the “head” crafts put on a hat, and so that it does not fly off, it can also be gently glued to the scoop. Draw the face with paint and a gel pen.
Advice! If you are doing a New Year craft with your children, then when working with an adhesive gun, tell us about the safety precautions. Always be near when the child does something and uses it with a glue gun!
5. Put a piece of foam / polystyrene cut into size to the bottom, or fill the bottom with cotton wool. If you are using cotton wool, then it will be necessary to fill the glass fairly tightly to the middle.
6. Then stick the spoon into the base, and fill the remaining space with New Year’s tinsel. That’s all – your craft for the New Year is ready!
New Year’s candlestick made of plastic spoons
Very simple in performance, but incredibly beautiful and original hand-made – a candlestick made of plastic spoons. For its manufacture you will need:
- spoons in an amount of 30-35 pieces;
- glue gun;
- A wooden or plastic stick for a base length of 5-6 cm;
- aerosol paint in a can of gold or silver;
- candle-tablet.
To make a candlestick, you need only scoops of spoons, so you need to cut the handle. Collect the handicraft you need layer by layer, with each successive layer of spoons to be staggered in relation to the previous.
So, the first row is the base of the candlestick. Spoons must be glued to a wooden stick so that there is no gap between the spoons. The second row should be glued, leaving a gap of 1 spoon wide. The next row is in checkerboard order and so on, until you reach the end of the base sticks.
Now the candlestick can be painted. To do this, use aerosol paint in the can. Carefully paint all the gaps between the spoons. Leave the artwork for a while in the side, so that the paint is well dried – usually it takes from 10 to 20 minutes. At the end, glue the candle-tablet in the center of the candlestick. Such decor will certainly become an original decoration of your New Year’s table.
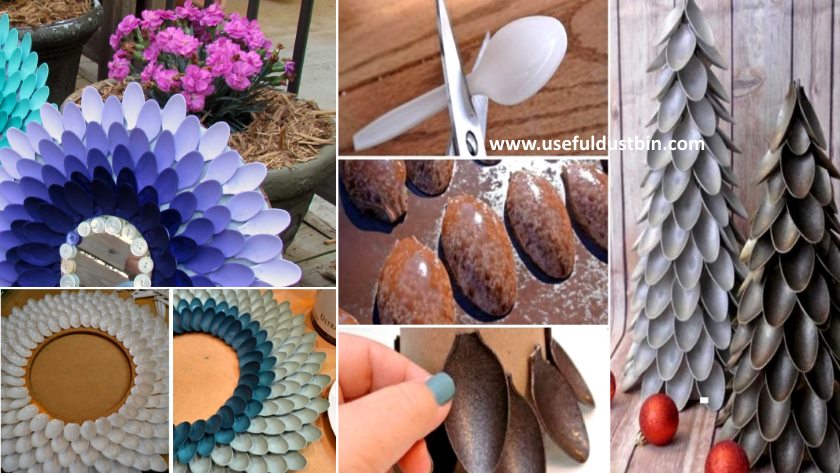
Christmas tree made of plastic spoons
Your child was asked in the garden or at school to bring a craft for the New Year? Make a wonderful New Year’s tree with your beloved child. You’ll see, for such a cilar to the process of manufacturing a candlestick, but it will require a different foundation. So, here’s what you need:craft of your child must be praised.
The principle of creating a Christmas tree from plastic spoons is generally sim
- cone of cardboard (the height of the cone depends on what height you want to make a Christmas tree);
- plastic spoons (their number also depends on the height of your future craft, but it is better that there are at least 100 of them);
- spray paint of green, gold, copper or silver color;
- glue gun or super glue;
- scissors or clerical knife;
- New Year’s decorations (beads, bows, an asterisk or a large flower to decorate the crown) – if desired.
The manufacturing instructions are as follows:
- Cut off the plastic handle to the base of the scoop.
- Now you need to paint the blanks in the selected color. You do not have to do
- green work – be creative and choose for your New Year tree “clothes” of copper or gold shades. To paint the spoons, first arrange them all on a flat surface and paint them (to make the color more smooth, better paint in two layers), and then do the same for the other side. The main thing is to wait for each layer to dry completely.
- Collect the handicraft you need as well as the candlestick – row by row, and stick each successive series you need with an overlap on the bottom row and in staggered order.
- When you reach the top, fix the prepared ornament on the vertex. At your discretion, you can additionally add decor of tinsel, beads or toys.
Just? Still would! Such a chic New Year’s beauty you can make with your child in just an hour and a half, and, believe me, both of you will be satisfied with the result.
New Year’s mirror: a decor of plastic spoons
Do you want the interior of your house to play with new colors without spending a lot of money on new furniture or decor? Make your own unique framing for the mirror, which will become a stylish accent in the interior of the bedroom, living room or hall.
What should be done:
1. First you need to cut out the plywood foundation. The diameter of the base must be twice the diameter of the mirror itself. After you cut out the base, it is advisable to clean the edges so that they are smoother. The inner diameter (diameter of the mirror) is surrounded by a thick line – this will be the boundary of the inner row of spoons.
2. Now you need to prepare the spoons. Since in the decoration of the handle will not “participate”, they should be cut with scissors or a knife.
3. We pass to the next, most responsible stage – gluing the blanks to the base. Glue them in rows. The first outer row should be glued so that there is no gap between the spoons (ie, close); the second row is overlapped first; the third row is staggered. In this way, you need to glue the entire free base, reaching the mirror line.
4. To make all spoons “tightly” glued to the frame, wait a few minutes (this will take about 10-15 minutes). Now you can proceed to painting. It is best to paint all the spoons and the base several times, so that there are no “empty” places. The paint should also dry well, so leave the workpiece for 30 minutes in a well-ventilated area.
5. Glue the mirror to the center. Done! If you wish, you can paste the New Year’s decor to the hand-made.
Advice! If you want to make your mirror even more colorful and interesting, you can divide all the spoons into three to four equal parts and paint each part so that the shade of each one is lighter one tone. To do this simply: before painting the next part of the blanks in the chosen color, add a very slightly white paint.
Now you have learned from your own experience that plastic spoons are a completely unusual cutlery, which not only is convenient to use in nature, but with its help you can make all kinds of crafts. And it’s a pleasure to do it with children on New Year’s Eve. The main thing is to fantasize and teach your child in your own example!
Read More
- How to decorate waste slipper
- How to decorate a doll from foam sheet
- Stylish double layer kurti making
- Very simple and beautiful rangoli design
- Very easy and beautiful rangoli design for festival


