Looking for a fun and creative craft project for kids? Check out this amazing DIY paper basket tutorial that is perfect for children of all ages.
Get ready to unleash your creativity with this fun and easy DIY paper basket craft tutorial for kids! Whether you’re looking for a fun rainy day activity or a handmade gift idea, this project is perfect for children of all ages. With just a few simple materials, your little ones can create their very own unique paper basket to hold small trinkets, treats, or even Easter eggs. So gather up some colorful paper, scissors, and glue, and let’s get crafting!
Creative Paper Basket Craft Tut0rial For Kids

Must Read : Tiny Woven Basket: Wool & Paper Cup Craft Tutorial
Supplies And Tools
- Paper Cup
- Pliers Tool
- Glue
- Scissors
Paper Basket Instructions
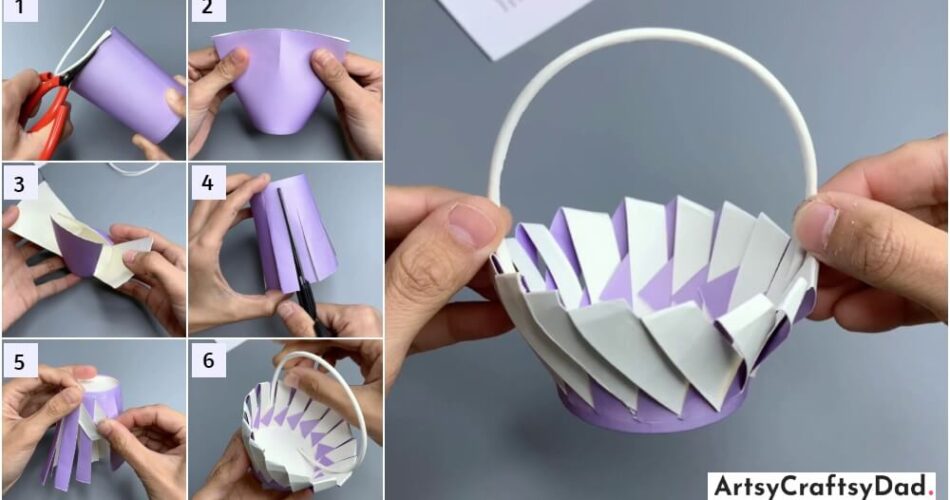
Step #1: Taking A Cup

Firstly, we take a paper cup and remove the fold-top of the cup from the pliers tool.
Step #2: Folding Paper Cup

In this step, we fold the paper cup at the top position using your index finger. And cut some parts using scissors.
Step #3: Unfolding Paper Cup

Now, In this step, we unfold the cutting side of the paper cup using your index finger.
Step #4: Folding One Cutting Side

In this step, we fold the cutting side and make an equal position for cutting the other strips.
Step #5: Cutting Strips

In This Step, we cut some strips(half-inch) of paper cup at the top position using pliers tools.
Step #6: Folding outward

In This step, we get one strip and fold it outward. Insert the one strip diagonally into the second strip to the right and follow the same process for the other strip.
Step #7: Folding Outward Other strip

In This Step, use the same process to fold and outward the other strip of the paper cup.
Step #8: Completing basket

In this step, we complete the fold outward process and also complete the amazing basket
Step #9: Pasting Handle

In This Step, we get the top fold that was removed in the first step from the paper cup and flatten it. After, pasting the top fold on both sides of the basket using glue.
Finally, Amazing DIY Paper Basket Craft Is Ready

In conclusion, the DIY paper basket craft tutorial for kids is a fun and creative way to engage children in a hands-on activity that also helps develop their fine motor skills and creativity. This project is not only enjoyable for kids, but also allows them to create something useful and practical. So gather your materials and start crafting with your little ones today!
You Might Also Like This
- Weaving Basket: Jute Thread Craft Tutorial
- How to Make Accordion DIY Paper Basket
- Recycled Flower Basket: Fruit Foam Net & Plastic Bottle Craft Tutorial
- How to make a paper basket – Best out waste
- Paper Origami Sofa Craft Tutorial For Kids

