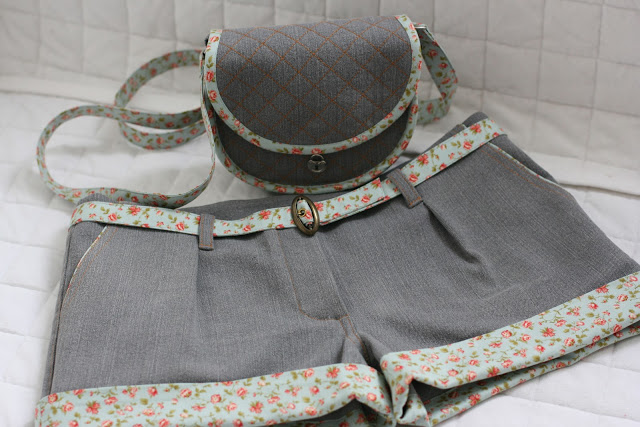
How to Sew Denim Skirt Handbag
Turn your old denim skirt into a stylish new handbag with this easy sewing tutorial! This fun, eco-friendly project helps you recycle denim while creating something useful and trendy. Perfect for beginners or anyone who loves DIY fashion, this step-by-step guide shows how to make a handbag from recycled denim.

Basic supplies needed for this bag are:
• Denim skirt (women’s size small or girls), depending on the size bag you want to make. I use recycled ones from second-hand stores.
• Poly/cotton fabric, approximately 2/3 yard.
• If interior pockets are desired, 1/4 yard contrasting poly/cotton (or leftover denim if it is lightweight).
• Some extra contrasting fabric for inside pockets and embellishments, about 1/4 yard.
• Iron-on interfacing, approximately 2/3 yard (choose your desired stiffness-I to prefer a medium weight interfacing).
• One of the products that prevent
fraying, like Fray Check.
• Supplies needed for the style of handles you choose.
Instructions With Photos
1) Decide on the length of your bag and measure down each side adding 1”. Mark those points and draw a straight line across the skirt. Slowly cut through both front and back layers at the same time.
2) Lay the skirt on top of the lining fabric and use it as a pattern. Allow for 1/2” at the top and bottom edges of the lining. Cut the lining out (see photos) and set it aside.
3) Turn the skirt wrong side out and pin the bottom edges together. Sew a 1/2” seam across the bottom of the skirt. Reinforce that stitch with another seam on top of it.
4) Flatten the skirt’s bottom corners, carefully lining up the bottom seams with the side seams. Measure from center point down the middle of the triangle to 2”, pin, mark, and sew straight across. Draw a line if that will help you make sure the seam is straight. Sew for the second time to reinforce.
5) Cut a triangle off 1/4” from the seam and put a dot of product to stop frays at the end of each seam–do not forget any center seams. Allow drying according to package instructions. You now have a denim handbag shell. Turn it right side out, finger pressing corners into nice points.
6) Using the lining as a pattern, cut the iron-on interfacing 1/4” smaller than the lining. Iron in place according to package directions.
7) It’s at this point that the pockets are made of the lining. For this project, I layered a smaller pocket on top of a larger pocket for both sides of the lining, with the smaller pocket having a band on the top made from the lining fabric. Photos correspond to the following steps:
a. First, cut all pockets to the size wanted, adding 1/2″ for seam allowances. Fold top of each large pocket over and press, then sew the fold in place.
b. Cut 2 decorative bands about 2 1/2” wide by the length of the top of the small pocket and pin one to the top of each small pocket, right sides together. Sew a 1/2” seam.
c. Fold band up and press. Fold raw edge of the band back toward the top edge of the small pocket and press. Fold band over the raw edge, pin in place, and topstitch to hem.
d. Place small pocket on top of the large pocket, lining up the sides. Fold sides over, press and pin together.
e. Fold the top edge of large pocket over folded sides, pin in place and topstitch to hem–see 3 photos.
f. Pin center of small pockets and sew down the centers–see 2 photos.
g. Position the pocket assemblies on each side of the lining, pin in place, and topstitch sides and bottoms.
h. Use a fray stop product on the seam corners and allow to dry according to manufacturers instructions.
8) Sew the lining sides together, then the bottom seam straight across. Finish the corners exactly like the denim skirt shell corners were sewn and then trimmed.
9) For the handles, I designed tabs needed to be made and added. See photos below. Keep in mind that you could make any type of handle.
a. Cut 4 pieces of denim from the cut off the bottom of the skirt 3 1/2” by 2”, and cut 4 pieces of lining fabric the same size. Right sides together, pin denim pieces to lining pieces and sew the long sides together leaving ends open.
b. Turn right sides out and press. Topstitch sides for a neat finish. Fold in half and lightly press.
c. Position tabs at evenly spaced intervals to suit the design of the handle that will be used.
d. Pin in place and stitch below the top edge of the waistband.
10) Slide lining into a shell and fold the top edge of lining down, fitting the lining neatly into the shell with the fold just below the topstitching of the waistband, pinning into place. Hand sews the lining of the denim skirt bag using a large needle and small stitches.
11) Designing embellishments for a bag is a really fun part of these projects. I created a “belt” for this handbag that would look like a bow. Measuring the length needed and cutting the ends wider allowed me to have the bow effect without tying a large knot to the front of the bag.
12) The “belt” needed to be position properly and hand stitched in place to secure it. I created a western styled medallion for the center of the bow/belt using silver trims.
13) I used silver, black, and clear beads to make a handle, but these handles can be purchased ready to use, or you could easily make a cloth handle for a bag like this one.
Using Belts For Bag Handles:
A Last Look at Denim Skirt Handbag: #2
This first photo is the bag that created this hub. Its new owner is delighted to use it when she goes to Gamecocks ball games.
These second and third photos are of the bag that always gets me in trouble. I designed it for my own use, but every time I take it out someone asks me to make one for them. Time seems to get in the way, though, and I can’t always say yes.
Hope you enjoyed this tutorial and that it helps you design and make one for yourself or for a gift. I promise it’s a no-fail present!’
courtesy: feltmagnet
Read More:
- DIY Round Purse Using Old Jeans And Old CDs – Recycling No Sew Purse
- Phone case tutorial from scratch out of old jeans
- How To Make Clutch Purse With CD & Old Jeans
- Unique & Attractive Origami Craft Ideas
- Creative Origami Craft Ideas for Kids