Tired of messy desks? Let’s organize your pens in style with a DIY pencil holder you can make in under 30 minutes! I remember making these with my team during a creative workshop, and it was a blast seeing everyone’s unique designs.
You’ll Need: An empty can (coffee, tin, or plastic), decorative paper or fabric, scissors, and glue (Mod Podge or a glue gun).
Let’s Get Crafting:
Clean & Prep: Remove any labels from your can and give it a good wipe down. Let it dry completely.
Measure & Cut: Wrap your paper or fabric around the can to measure the height and circumference. Cut it to size, leaving a tiny overlap.
Stick It: Apply a thin layer of glue to the back of your paper or directly onto the can. Carefully wrap it around, smoothing out any air bubbles as you go.
Seal the Deal (Optional): For a glossy, durable finish, brush a layer of Mod Podge over the paper. This seals it and protects it from wear and tear.
Accessorize! This is where you get creative. Glue on ribbons, buttons, or even twine around the top and bottom edges to hide any rough cuts.
That’s it! You’ve just created a custom organizer that clears clutter and adds a personal touch to your workspace.
Conversion of cardboard spools of yarn in pencil holders.
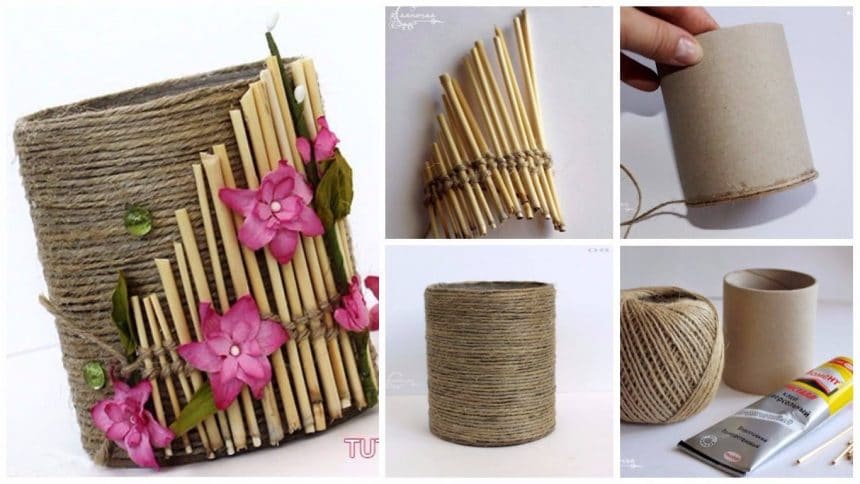
Step 1: We need:
-bobina out of yarn;
-glue;
-solomka, flowers or ornaments for decorating;
-twine
Step 2. From the bottom of a cardboard cut out.
Step 3. Glue to the bottom of a reel.
Step 4. Apply a thin strip of glue on the outside.
Step 5. Glue the twine around the reel, pressing firmly. At every turn of the glue is applied again.
Step 6: The result pencil holders, ready for decoration.
Step 7. Begin to decorate pencil holders. We will need the straw (can take sticks, twigs or skewers as clear up your imagination))) and twine.
Step 8. Begin to weave a “fence”.
Step 9. Twine folded in half to form a loop. Put the straw in the loop, the free ends of stretch in the loop.
Step 10. Tighten the knot.
Step 11. The second straw put on a string.
Step 12. The free ends are extending into the opening from right to left across the top of the straw.
Step 13. Tighten the knot.’
Step 14. By attaching straws do “fence” We needed length. Hedge End anchoring knot.
Step 15 is ready to “hedge” is pasted on the pencil holders. Decorate with leaves and flowers. Pasted acrylic drop.
And we admire the result
courtesy: liveinternet

