
Discover a fun and easy paper bird craft tutorial that’s perfect for kids. Transform simple materials into delightful paper birds and unleash their creativity.
Embark on a delightful journey of creativity with this captivating paper bird craft tutorial for kids. Unlock their artistic potential as they transform everyday materials into charming winged creatures that will bring a touch of whimsy to any space. Dive into a world of imagination and unleash the joy of crafting together.
Creative Paper Bird Craft Tutorial

Must Read: Crane Bird Landscape: Leaf Craft Tutorial
Supplies & Tools
- Blue sheet, Red sheet, green sheet, yellow sheet, White sheet
- Black marker
- Glue
- Scissor
- Black color
- Artificial eyes
- Red, yellow, orange strips
- Pencil
Beautiful Paper Bird Craft Instructions
Step # 1: Begin With The Craft

Now, take a blue sheet and use a black color, with this black color make concentric circles.
Step # 2: Use A Yellow Sheet

Now, use a yellow sheet and with the help of scissors circularly cut the sheet.
Step # 3: Cut It In Half

Now, using scissors cut it in half.
Step # 4: Paste It On The Sheet

Now, paste that half-cut yellow sheet design on the blue sheet in between the drawing of concentric circles and also paste the artificial eyes with the help of glue.
Step # 5: Paste The Beak

Using a red sheet cut a small triangle and paste it just above the eyes as the beak of the bird.
Step # 6: Use A Red Sheet

Now, use a red sheet cut a semi-circle out of that, and paste it in the middle of the yellow semi-circle shape.
Step # 7: Use A Red Strip

Now, use a red strip, and by using a black marker put some lines in the red semi-circle accordingly.
Step # 8: Fold The Strip
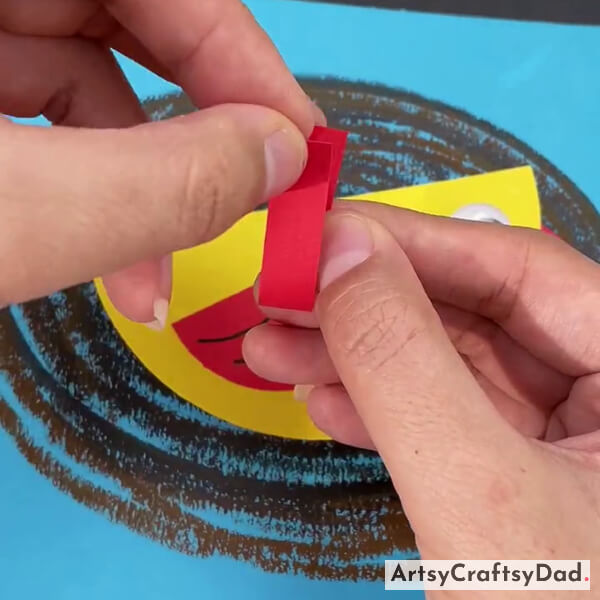
Now, fold the red strip from the middle and paste both ends together.
Step # 9: Paste The Folded Strip

Now, paste the end of the red strip to the left end of the yellow semi-circle.
Step # 10: Use A White Sheet

Now, use a white sheet draw a circle on it, and cut the oval with the help of scissor.
Step # 11: Paste That Oval Shape

Now, paste that oval shape design on the black color area, and also paste other strips of color red and yellow on the backside of the yellow semi-circle and near the orange strip.
Step # 12: Make Leaves
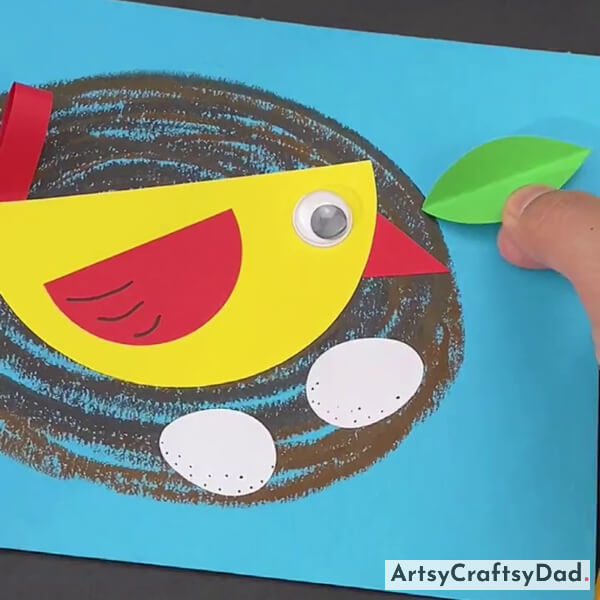
Now, take a green leave cut the design of the leaf from it, paste it at the right upper side end of the concentric circle, and paste one more egg just near the prior one by making some dots using a black marker at the end of the egg designs.
Congratulation! Your Beautiful Paper Bird Craft Is Ready.

Paste more leaves accordingly and egg too. Congratulations! Your beautiful paper bird craft is ready.
This paper bird craft is not only a fun-filled activity but also a valuable learning experience for children. As they immerse themselves in the process of making these delightful paper birds, they’ll develop fine motor skills, problem-solving abilities, and a deeper appreciation for the art of crafting. Witness their imagination soar as they create their unique feathered friends.
You Might Also Like This
- DIY Paper Bird Craft Step-By-Step Tutorial For Kids
- Easy To Make Paper Bird Flying Craft Tutorial For Beginners
- Paper Plate Bird Crafts for Kids
- Fallen Leaves Bird Craft Tutorial With Garden View
- Leaf Singing Bird Craft Tutorial Step By Step For Kids


