This work is intended for teachers of additional education and parents, as well as for school-age children. The application can be used to participate in autumn exhibitions held in institutions, and to decorate a children’s room.
Purpose: to create a 3D application using different methods of paper plastics.
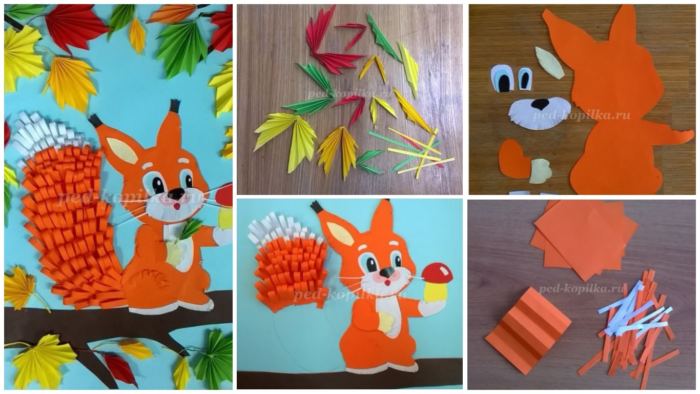
3D Squirrel on a Branch Craft for Birthday Party
Tasks:
– to teach you how to perform complex applications from colored paper
– to introduce the method of gluing paper strips into “droplets”
– to teach you how to make leaves in the technique of folding “accordion”
– to teach admission of notching
– to develop creative abilities.
Required material:
– A3 cardboard or white sheet of A3 size,
– white writing paper,
– a sheet of copy paper;
– colored xerographic paper,
– scissors,
– glue – pencil,
– glue PVA
– felt-tip pens.
Stages of work:
1. The application is made on a sheet of paper in A3 format. You can take A3 colored cardboard or apply a white sheet of A3 size to two sheets of Xerox paper of blue, green or yellow color. Choose a colored paper for the background of future work.
3. We plot the carved squirrel on an orange sheet of paper and cut it out. Protein should be traced in pencil, putting it back.
4. Cut all the crayons of the detail on the workpiece: muzzle, middle of ears, nose, eyes, paws, breast (3 pieces of different size).
5.Reduce all the cut-out details on colored paper, putting them back, and cut out. The muzzle, paws, the eye must be cut along the edge with scissors (imitation of fur). The cut-out the squirrel from the orange leaf is cut all over the edge. All the details are glued on the squirrel, we finish pink cheeks, antennae, mushrooms.
6. Cut a branch of brown paper. We paste a branch of a tree on a ready background, a squirrel and a pencil draw a contour of a tail.
7. Take a whole sheet of orange and a sheet of thin white paper folded several times, so that the sheet is divided into 8 identical rectangles.
8. Each rectangle should be folded several times into 8 lanes. Then each strip should be cut in half. That is, from a single rectangle you get 16 narrow bands.
9. From the narrow white stripes glue “droplets” and glue to the tip of the tail. Glue “droplets” in rows, gradually going down. We make a few white rows, then rows of orange “droplets”.
10. Cut out the headers for the autumn leaves from the colored paper according to the scheme and add them to the accordion.
12.Sostavlyaem composition of autumn leaves, finishing twigs of paper, all laid out and glued to the glue PVA. Marker draws the dot on the face.
13. The work of my students!
courtesy: ped-kopilka
Read More:
- DIY Paper Bird Craft Step-By-Step Tutorial For Kids
- Easy To Make Paper Bird Flying Craft Tutorial For Beginners
- Paper Plate Bird Crafts for Kids
- Fallen Leaves Bird Craft Tutorial With Garden View
- Leaf Singing Bird Craft Tutorial Step By Step For Kids

