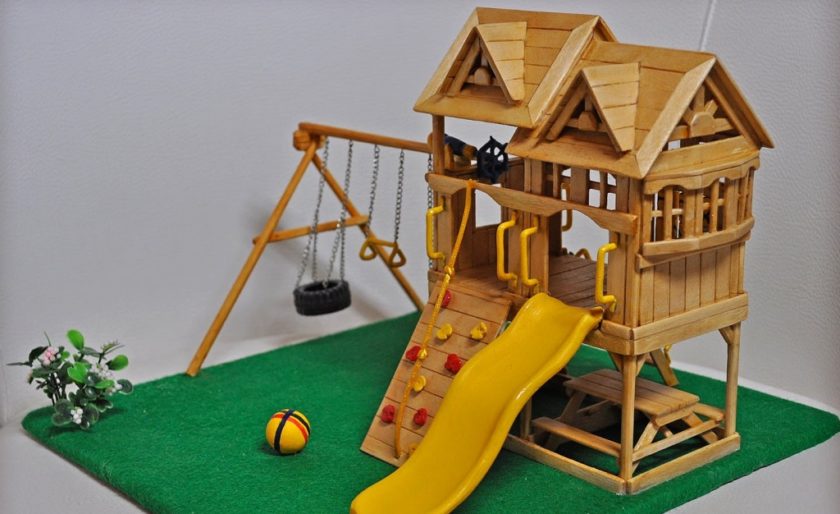
Doll house refers to developing toys that help the child learn new experiences, help the child try on different social roles. It will be useful to have such a house not only for girls – boys too are happy to play with this toy. And if the girls settle in the houses of long-haired beauties and princes, then the boys prefer to use it for storing men from Lego, soldiers.
In the process of playing with doll houses, you can instill in children rules of conduct, concepts of a healthy lifestyle, the basis of etiquette, the proper conduct of the household. Playing in a joint game can not only have positive stories, but also situations that cause a child’s feelings of fear and other negative emotions (visiting a doctor, quarrel with parents and friends, separation from loved ones, etc.).

Toy houses with own hands
For the game is best to choose a wooden house. Since wood is a natural material, when exposed to which aesthetic taste is formed in children, the tactile center of perception develops, and the game itself becomes more emotional.
Toys of this kind can be purchased at children’s toy stores or ordered online. The only downside is the too high price for doll houses. Save the family budget and spend time for joint creativity with the child can, if you decide to make a house with your own hands.
Homemade stick house: step by step instruction
You can make a toy from various materials. This can be plywood, cardboard boxes, match boxes, plastic packaging from CDs and much more. Unusual decision will be to build a house of sticks from ice cream. For these purposes, you can collect sticks from packages of all your favorite treats, or you can buy sticks separately or use wooden medical spatulas.
Children will be connected to the production process with pleasure. Do not forbid them to take direct part in the construction of a toy house. This hand-crafted article will be especially valuable.

Necessary materials:
- Ice cream sticks;
- glue PVA or glue gun;
- scissors and a stationery knife;
- material for decoration.
Step-by-step master class for the manufacture of toys:
- Preliminary talk with the child about the appearance and size of the house.
The proposed version of the doll’s dwelling is designed for a medium-sized - doll, so 14 ice cream sticks will be needed to make a billet for one wall. If you decide to make a small house, then take more sticks.
- On a flat surface, put 12 ice cream sticks close together, gluing the sides of the contact with glue.
- On the top parallel to a distance of several centimeters from the edge, glue 2 sticks.
- For the house you need 7 similar blanks. On 2 of the blanks intended for the roof, glue on the back side not 2, but three sticks.
- Three walls glued together and glued to the “floor”.
- For the roof, glue 3 pieces in the form of a triangle, protruding beyond the edges from the bottom (see photo).

- Top the walls glue the roof.
- From the several cut ice cream sticks, glue the ladder.
- From the shreds, sew a doll’s bed and a rug.
The house is ready! No child will refuse to play with this toy, and happy parents can be proud that they made such a necessary hand-made article with their own hands.

Having mastered the basics of building a house of ice cream sticks, you can undertake to implement the most daring ideas! Such a toy can be used not only in the children’s game, but also as a table lamp, a stand for discs and just a souvenir decorating the interior. All offered variants represent voluminous hand-made articles, but from sticks it is possible to make still huge set of original hand-made articles.
Magnet on the fridge (birdhouse)
For the manufacture of crafts you will need:
- 14 ice cream sticks;
- magnetic tape (flat magnet);
- paint and brush;
- colored cardboard;
- glue gun.
Progress:
- Pre-painted in pink and lilac colors (12 pieces) and dried ice cream sticks are laid out on a flat surface.
- Out of 9 blanks, put a rectangle and, pushing the middle stick up, cascade spread from the other sides of the rest.
- We glue the sticks with each other.
- For reliability, we glue together the back of the part with 2 unstained sticks.
- We turn the work and have the lilac details on the top crosswise (the roof) and perpendicular to the main ones from the bottom.
- We decorate the magnet with decor elements (rhinestones).
- From the cardboard we cut out the circle and paste it in the middle.
- Cardboard bird is attached from below on the perch.
- At the back we glue the magnet.

The house for birds is ready! It can be glued to a refrigerator or presented to friends.
Photo frame “Small house”
Make an unusual frame for photos is very easy, using the work of ice cream sticks. The principle of making the frame is understandable and accessible (the description is similar to making a part for a doll house). In addition to chopsticks, you will need glue, cardboard and photos. The work uses the most common and available materials, and the result is very effective!

Colorful souvenir houses (decoupage)
For work it is necessary to prepare:
- ice cream sticks;
- paper napkins with a thematic pattern;
- glue;
- paints (acrylics are best suited);
- priming;
- elements of decor.
Detailed description of the work progress:
- We have 9 ice cream sticks densely to each other, spreading them with a ladder.
- We fasten the sticks together with two parts, gluing a loop from above simultaneously.
- Turn over the work, fix the top of the house on top.
- The base is ready. We leave it to dry under the press (you can put a stack of books on top).

After complete drying, we apply a primer on top. If there are any gaps between the parts, it should be primed again.
While the primer dries up, we prepare a napkin. Separate one layer of napkins and put it on cellophane (you can use food film or file). Using a spray, we moisten the napkin with water.
Apply the primed side of the wooden blank to a wet napkin and turn it over. Carefully smooth out to avoid the formation of bubbles and wrinkles.
Remove the cellophane film from above and remove the excess napkin on the sides.
When the work dries, do not cover the place with a napkin should be painted with paint of the appropriate color.
Dry the house covered with a transparent varnish and draw the patterns with golden sequins.
It turned out an excellent souvenir, which you can decorate the wall or the New Year tree!

We wish you inspiration and creative success!
Creative Life Hacks Using Recycled Items
Read More
- How to Make Door Hanging Toran
- Heart Shaped Door Mat from Old Clothes
- Simple and Easy Fuller Mehndi Design
- Independence Day Border Rangoli Design
- Beautiful rangoli design with trick/Comb


