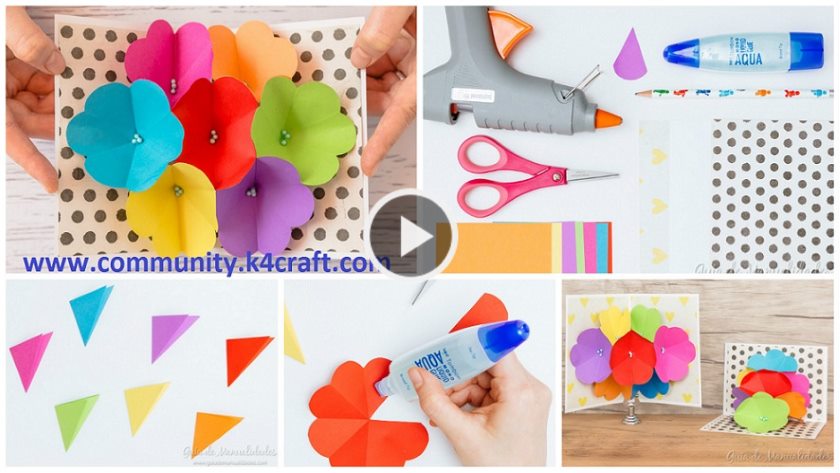
What a special card! They need a nice detail to give to a person they love a lot or to surprise on their birthday … this idea will love them! I show you step by step how to make this card pop up with a beautiful and colorful bouquet. You will see that doing it is very simple and you can combine the colors you want. Shall we begin? Girls take note because they are going to fall in love with this idea…

Required Materials:
- Colored papers 10 x 10 cm (7 colors)
- White paper for card and a design paper
- Printing Pattern
- Adhesive in bar or liquid
- Scissors
- Pencil
- Rule
- Hot glue gun
To make this card I took some papers for origami of 10 x 10 cm that had in a beautiful range of colors. The pattern for printing is prepared based on these measurements. If you are going to use larger paper to get a bigger card, do not forget to enlarge it to print
 With the colors ready and the pattern printed and cut we begin to assemble the flowers. Place the paper on the work surface and fold in half diagonally. Then we fold one end towards the other in the middle and to finish we fold the piece obtained in the middle. We repeat the same with all the papers until folding the 7 pieces that we need.


We took the pattern, and with a pencil, we marked it on all the pieces we did in the previous step. We cut and open. We already have the flower but we must cut a petal. We cut it carefully and paste it to close the flower again. We re-fold it and present it in the combination of colors that we want to obtain.


Here I will explain the step by step photo by the photo to make it easier:
We will arrange a color presentation, 2-3-2. The row of 3 flowers will be the center of the bouquet on the card. We will begin to work for the first flower of the central line of 3 flowers (turquoise in my case).

We put glue on the white spots that we see in the photograph and we separated the first two flowers from the lines of 2 pieces (yellow and fuchsia in my case). And we paste both flowers in the glue points that we put.

Thus you see the three flowers already joined. Now we will place glue on the white spots we see in the photograph and separate the second flower from the central 3 flower line (red in my case) and paste it there.

This will be seen once we glue the previous flower.

Now we will place glue on the white spots we see in the photograph (left side) and separate the second flower from the left two line (lilac in my case).

We stick it there and we get this piece as a result.

Then, we will place glue on the white spots that we see in the photograph (right side) and separate the second flower from the line of two right (orange in my case).

We stick it there and we get this piece as a result.

And we go to the last flower. We will place glue on the 3 white spots we see in the photograph.

And we paste the last flower of the line of 3 central (green in my case). And let dry well. Then, we will place glue on the white spots that we see in the photograph (right side) and separate the second flower from the line of two right (orange in my case). We stick it there and we get this piece as a result. And we go to the last flower. We will place glue on the 3 white spots we see in the photograph. And we paste the last flower of the line of 3 central (green in my case). And let dry well. Then, we will place glue on the white spots that we see in the photograph (right side) and separate the second flower from the line of two right (orange in my case). We stick it there and we get this piece as a result. And we go to the last flower. We will place glue on the 3 white spots we see in the photograph. And we paste the last flower of the line of 3 central (green in my case). And let dry well. And we paste the last flower of the line of 3 central (green in my case). And let dry well. And we paste the last flower of the line of 3 central (green in my case). And let dry well.

We prepare the base of the card now. We will cut a base in the white paper of 21 cm by 15 cm. And two pieces of design paper 10 cm by 14 cm. We glued them to the white base and prepared the hot glue gun. We place a glue point on the flowers on the central sides (in my case turquoise and green) and stick to the inner sides of the card. Do not put more glue than a point since otherwise, the pop-up of the card will not work.

It’s ready! If they want, as an original detail, they can add beads or other small central details to the flowers. Do not forget to put a nice message on the front. A beautiful idea! they do not believe?


Hope you like this bouquet flower pop-up card.
Image cource: Guia de Manualidades
How to make cardboard corner shelf
Read More
- How to Make Flower Bouquet Pop up Card
- How to make flower pop up card for valentine’s day
- Flower bouquet pop up card
- How to make handmade pop-up card
- How to make a cardboard furniture for computer