Bright and colorful, cheerful and very positive sun will become an crochet toy for your baby. Moreover, it is an excellent way to learn and remember each color, count the rays and develop the skill of the ordinal (and also quantitative) account, to study with the child one of the main geometric figures – the circle, to get acquainted with the concept of “size” (big circle – a small circle) and just have fun.
Crochet Toy “Sun” For Children

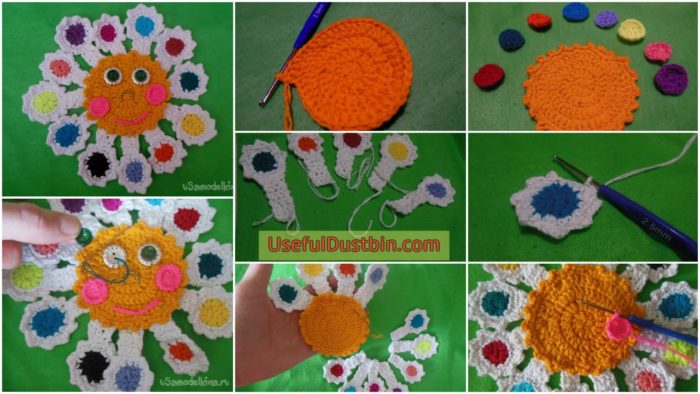
Children’s educational toy “Sun”
And to create such an entertaining thing will help the usual hook for knitting and a lot of small multicolored glomeruli (necessarily yellow or orange for the round base of the sun, white for the “leg” of each ray and 12 separate colors for their round “heads”).

How To Make Crochet Toy “Sun” For Children
A large central piece is knitted with circular knitting (from pre-assembled into the ring 4 air loops). All parts of the product are preferable to knit with a single crochet so that the sun is soft and pleasant to the touch.

The circle of the necessary sizes (again, based on one’s own preferences) should at the end be tied with denticles (the 3rd c. Is fixed in the initial loop, repeating this regularity every 2 bars).

Next, we begin to create the rays, or rather their upper part. All rays have a rounded end of a certain color, which is no longer found on any ray. In addition, each circle should also have its own size, that is, knit them absolutely the same is not worth it.


The circles should be evenly expanded (it is not necessary to place several large consecutive rows, as well as small ones).
Based on the size of the “head”, the size of the “leg” is formed (small – short, large – legs are more authentic).


Tie circles of white yarn. The first row is simply a column without a crochet, in the second one, in addition, the denticles are also knitted (according to the same principle as in the sun, only the distance between the teeth is already made with 3 pillars instead of 2).


The remaining 3-4 loops of the previous row are knitted st. / S 1 to 8 rows (for a long ray) or 6 rows (to create a bead on a short leg).


We connect the protruding threads with the wrong side and trim it neatly.

Finished rays spread on the table, determining the place of each in the sun, then in this order alternately and sew them.

Then from the bright pink thread we knit the round cheeks to our sun and make a smile from the pigtail.


It is better not to knit a nostril. To make it neat and beautiful looking, just sew a folded two threads or a thin chain (as in this case).

Eyes can be made any (embroider, tie, glue factory or sew ordinary beads). In this case, the usual buttons are used (two for each eye, where a big button with a smaller diameter is placed inside).


From the back to the base, sew the same circle (now it can not be knit, but cut out of a dense fabric, for example) and stuff the toy with a sintepon. Luchiki are also subject to further processing. Here for each sew a “narrow pocket”, inside which is placed a piece of copper wire, then gently sew up. Now the rays can not only stand well, but also bend in different directions.
The toy though and self-made, but it looks very nice. She attracts attention with her brilliance and is sure to be interested in the child for a long time.

DIY: Crochet Step by Step Instructions with Pictures

Read More
- Beautiful boat neck design (Tutorial)
- Designer kurti cutting and stitching – Step by step (Tutorial)
- How to make a homemade pendent Lamp
- Reuse old pants convert it into jacket (Tutorial)
- Printed designer kurtis and tunics