Today I present to your attention for modeling and assembling a bracelet with sunflowers.

Bracelet with sunflowers made of polymer clay on a wooden base/
Material Required
• Wooden base for a bracelet
• Glue Titan
• Cord

Bracelet with sunflowers made of polymer clay on a wooden base
• Polymer clay

Bracelet with sunflowers made of polymer clay on a wooden base
• Paste machine
• Toothpick
• Boat leaves
Procedure
First we need to prepare the basis for the bracelet. Take the sandpaper and gently walk down the bracelet to raise the villi. Lubricate excessively with glue and start wrapping the cord. The cord near the cord should be very tight.
 Set aside the prepared base to dry.

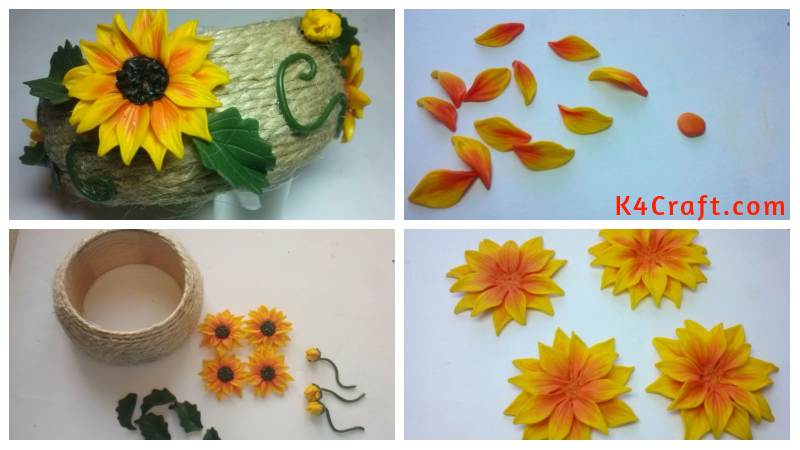
Take the yellow and orange clay, in a 2: 1 ratio. Fold in one rectangle.
Roll the layer until the transition from yellow to orange becomes smooth.
Then fold it into a bar and roll, so that as a result you have a very thin and long ribbon.
 Fold it with an accordion.

And then connect the lower edges from the orange side, pull out the cane and roll it to reduce it in diameter.

Slice into thin slices. Finge each slice with your fingers and give a petal.
Floss with a toothpick along the groove and squeeze the edges.
 Form a small cake, on which you will spread the petals. Floss the first row of petals with a toothpick. They must fit tightly together. On the first row choose the petals of a larger size. Fasten the petals to the edge of the cake.

The second row is placed from the petals of smaller size, they should be located between the petals of the first row.

For the bracelet I needed four flowers.

Our flowers are missing only the middle. To do this, roll the cane off the black clay and cut the slices.
Form the ball, and then press it on one side, put it on the middle of the flower.

Scissors make a notch on the core.

Three more flower buds must also be blinded. To do this, roll the ball, and for the convenience of work, put it on the toothpick. Take the smallest slices and overlay the ball. The first ball of petals should completely cover the core, and at the second edge slightly protruding. If there are no small ones among the slices, then roll the cane, so that it becomes thinner and cut.

Roll out a thin layer of green clay to make the sepal of our bud. I used the smallest felling.

Then she gave a texture to the toothpick, pressed the edges with fingers, so that they became sharpened and attached from the back of the bud.

In the same way, I blinded two more buds.
Make a hole on the back side. Roll a thin thread of green clay, give a slight undulation and insert the tip, before dipping it into the gel, into the hole. It will be a stalk.
Material
- the leaves.
- Roll out the layer of green clay.
- Then cut the cutter leaves.

Texture for leaves I did from the living leaves, picking up such leaves, so that they had a dense vein net. To make streaks on the leaves you have turned out the right ones, you need to apply the plastic on the back of the leaf, then the veins will go inside, and not stick out.

Give them a ripple.
Roll up the green threads, and tighten them, by this we will fill the voids. Send all the blanks from the plastic to the firing.

The firing temperature is written on the packaging of your clay.
The firing is carried out only in the fryer, in no case it is impossible in the microwave!
After firing, the rear side of the products should be degreased with alcohol.
Glue I use only Titanium, as it remains transparent after drying and tightly holds the glued products. Apply glue from the back of the flower and attach to the base.

First, glue all the flowers.
Then we glue buds and leaves.

And after our curls.

We let it dry for 24 hours and can be worn with pleasure.

DIY Bracelet Making Ideas for Girls

Read More
- Painting a vase with stained-glass paints
- How to make a vase wrapped in fabric bundle
- How to make pink flower
- Henna Design for Hands Step By Step
- Bridal Design Henna -2018 Mehndi Design For Hands


