What could be better than a creative idea? Each needlewoman will force this question, at least, to think hard. Any experience is invaluable, especially if it teaches something and expands our horizons. Every day a person has to deal with different things that he used to use standardly or, as they say, “on purpose”. Undoubtedly, this has its advantages, which are very, very many, but often the reverse also happens. Therefore, when you have to throw away already served “household attributes”, think about the new application of these things.

Here, for example, what can be done from a plastic bottle? How else can it be used? And why not as a material for souvenirs?
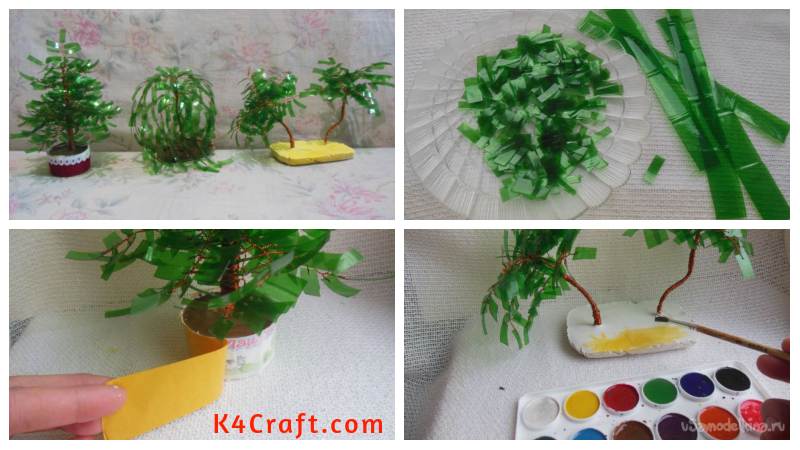
Unusual plastic trees will be an excellent addition to any interior. For greater naturalness and similarity with natural prototypes, use green plastic. Trim the top and bottom, leaving only the straight middle part of the bottle to work.

From smooth plastic, cut long strips of 1 cm wide of which after make small “leaves”.

Next, plastic blanks should be pierced and prepare a copper wire for weaving twigs (from 0.2 to 0.5 mm).

The branch is collected in different ways: by placing the leaves opposite each other horizontally or vertically. The first example of weaving is suitable for creating any standard tree, because such branches can be distributed along the trunk as you like.
Cut a piece of wire 30-50 cm long, fold in half and thread the first leaf. Scroll the ends of the wire 2-3 times, tightly fixing the leaf in the center.
The first element is the tip of the branch, the other parts should be placed on both sides and against each other.

Between pairs of leaves we retreat a distance of about 3-4 mm, also scrolling the wire.
The finished sprig of the necessary length is again terminated by scrolling the two remaining ends of the wire.
As mentioned earlier, any tree (birch, poplar, oak, ash) can be collected from such branches. In this case, a Christmas tree is planned. To make it magnificent you need to weave a lot of twigs of different length (3 pairs of leaves, 4, 5, 6 and 7).
 In general, each tier will contain 5 branches. Small (triple) need 6, because one of them must become the top of the tree; the largest (seven-pair) – 10, to make the two lower tiers volumetric.
We collect a herringbone from above, gradually weaving into the trunk on a branch.

When small twigs are in place, proceed to adding larger ones. They should be weaved a little differently, because now the trunk has become thick and it is simply impossible to scroll it. We will add a whole tier (we apply branches and wind wire over the barrel).

After all these actions will turn out very nice (and, most importantly, quite natural) tree.

Put the beauty is better in the pot (any jar from yoghurt or a regular disposable cup is suitable), filling with liquid alabaster.

“Earth” in the pot painted over with brown paint and decorate the pot outside.
Covered with a double-sided adhesive tape wrap the yarn and decorate the lace with a lace top of the pot.

Now the lush and green herringbone is completely ready. Such a tree can be an excellent New Year’s souvenir.

The same principle of weaving branches is also suitable for creating a palm tree. On one tropical tree you need about 15 branches, the top of which contains more leaves, the lower ones – less.
The palm consists of only two tiers, where the second is also attached by winding the wire over the trunk and its lower branches.
In contrast to the tree, the palm has a thinner and longer trunk. It can be bent or left even.

For an exotic wood pot will not be so appropriate, in this case it is better to create an island.
Take an elongated container (any sudokach, soap dish or saucer), cover with a food film and fill with liquid alabaster.
Immerse the palm tree (in our case, they are as many as two) and put it to harden for 10 minutes. When the mixture is cold, remove the “island” from the container.
It remains only to paint it and you can send this piece of exotic to the shelf.


The second principle of weaving is very simple, but very narrowly applicable. These twigs will go only for the willow.
A long twig with a small end (more precisely the beginning) is created easily and quickly. The end of the wire length of 20-30 cm is twisted for the subsequent interlacing and joining of the branches with each other.
Work is to be done with one end of the wire, placing the leaves sequentially.

The leaves also twist and leave a little space between them.
The top branches of a tree (about 15 pieces) should have 12 leaves each.

Lower it is better to connect in pairs. Number of leaves from 5 to 8.
We collect the tree according to the already familiar and described scheme.

The “holder” of the willow should be a fragment of the rock, which can be recreated artificially. Prepare alabaster (this time it should be very thick), a strip of plastic (we cut out of a bottle), a button, a sheet of cardboard or a piece of newspaper, a food film.

Fasten the edges of the strip with the button and cover with a film. This construction should be placed on the prepared plane and filled with a thick mixture.
Immerse the willow in the resulting container and allow time to dry the alabaster.
Disassemble the form should be only after full hardening. The top of the “cliff” should be slightly corrected with alabaster, making the surface sublime.

Again, we take in the hands of paint and color the rock in brown-black colors.

DIY Step by step Christmas Tree Crafts for Kids to Make

Read More
- How To Make Handmade Fan
- How To Make Mill of Plastic Bottles
- Housekeeping Toys For Home Decoration
- How To Make Handmade Fabric Flowers
- 8 Ideas for Decorating Mini Tree