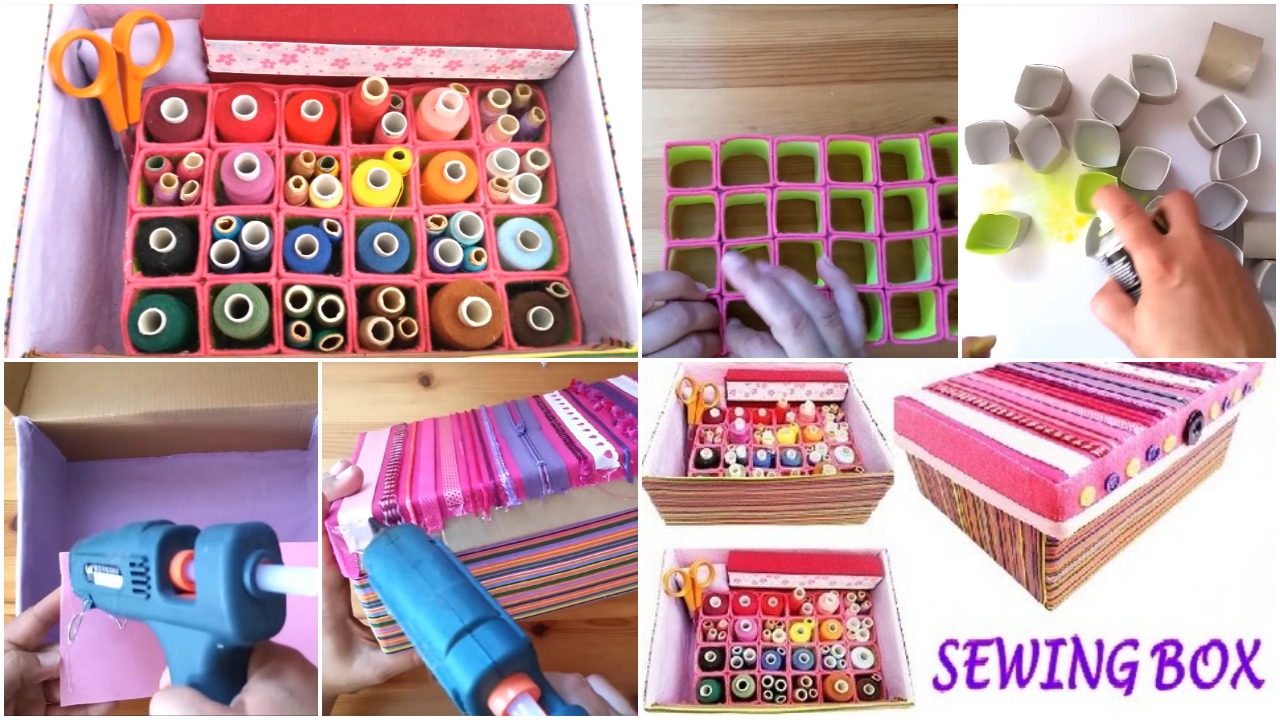
How to Make a Thread Organiser
Is your sewing box a tangled mess of thread spools? I feel your pain! I made a simple organizer from cardboard that completely revolutionized my crafting space. It’s cheap, customizable, and keeps every color visible and accessible.
You’ll need: Sturdy cardboard (from a shipping box), a ruler, a box cutter, and glue.
Let’s get organized:
Cut the Base: Cut a rectangle of cardboard to your desired size—think A4 or slightly larger.
Create the Comb: This is the clever part! Cut several long, thin strips of cardboard, about 1 inch wide and 2 inches taller than your tallest spool. Notch the top of each strip every ½ inch to create a “comb” that will hold the threads in place.
Assemble: Glue the bottom of each “comb” strip vertically onto your base, spacing them about 1.5 inches apart. You should have a series of vertical dividers.
Organize: Slide your thread spools onto the dividers. You can organize them by color, type, or project. The notches will keep them from sliding around.
For a prettier finish, you can cover the cardboard in wrapping paper or contact paper before assembling. It’s a game-changer for any crafter!
Tired of a tangled thread box? I feel you. I remember dumping my entire sewing kit out just to find one colour. This shoebox hack is a game-changer and costs nothing.
What You’ll Need:
One sturdy shoebox (with a lid)
Cardboard or foam core
A ruler, pencil, and craft knife/scissors
Glue or tape
The Simple Process:
Create the Internal Combs: Cut rectangular pieces of cardboard the same height as your shoebox. Measure and cut 1-inch slits, about ½-inch apart, along the top and bottom of each piece. You’ll need 2-3 of these “combs.”
Interlock Them: Slide these cardboard pieces together at the slits to form a grid. This is the genius part—it creates customizable slots for your spools.
Secure the Grid: Place your newly formed grid inside the shoebox. It should be a snug fit. Use a dab of glue on the bottom edges to secure it if needed.
Organize & Label: Drop your thread spools into the slots. For extra efficiency, use the lid to store needles, bobbins, or a small scissors. You can even label the grid rows by colour family!
It’s a fantastic weekend project that finally brings order to the creative chaos. What will you do with all the time you save not untangling knots?


