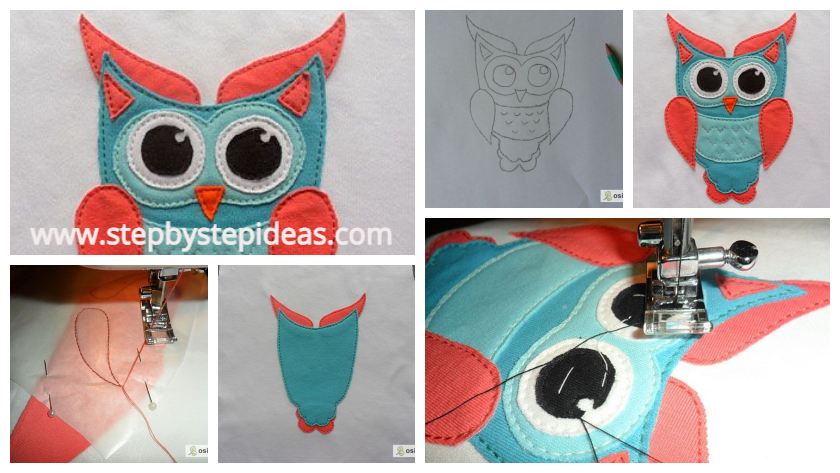
The feathered beauty is made in the technique of multi-layer application. This application can decorate clothes, interior items, bags.

To implement it, you will need: a sewing machine, a picture of a paper-on-the-egg, an interlining for sizing and a shred of multi-colored knitwear.
Want to buy felted slippers?
Choose the image you like, print it. Previously, the image can be enlarged or reduced to the desired size.

The image needs to be broken down into component parts. Understand which layer is the bottom and the bottom. Collect the application from the bottom layer. In our case, this is the eyebrows and tail.
Each layer of application is transferred to a tracing paper. You can do this by attaching a tracing paper to the picture.

All the knitted scraps of knitwear are glued together with non-woven fleece.

The fabric on which the application will be placed should also be strengthened with non-woven fabrics.

Let’s start assembling the applique. On the fabric, we place scraps of cloth on the first layer of the application. Above the tracing paper with the transferred drawing. All the layers are chipped with sewing pins.

The machine is threaded in the tone of the fabric. If you fill two threads – the line will be more “greasy”.

We lay a line straight on the tracing paper.

That’s how it should turn out. We put the remainder of the thread on the wrong side.

We sew the thread neatly from the wrong side.

We remove the tracing paper.

Cuts very close to the seam. The remains are not thrown away – they can come in handy.

Here they are, gloomy eyebrows and a beard)))

We try the second layer. This carcass is an owl. It is of turquoise color. Repeat all the previous operations.

We have the result.

We pass to the third layer. It’s glasses and breast.

We repeat all the same operations.

The fourth layer we make wings and ears. They are coral in color.

You can use the scraps after the first trimming of the fabric.

Here is a hatchery looming.
We pass to the fifth layer. These are the eyes, they are of white fabric.

Here, the owl is already so ..

Pupils can be cut right away so that there is no glare with glare.

We mark out.

We sew the pupil with a black thread.

We remember that we are stretching the remainders of the thread to the wrong side and tie it.

Almost finished sovushka.

You can embroider feathers with your hands.
From the wrong side, the fleece is cut close to the seam.
We admire the work.


Flowers from wire and fabric with your hands

Read More
- Handmade bridal sleeves in heavy work
- Kids friendly drawing with numbers as a base
- How to make a flying airplane using plastic bottle and cardboard
- How to make door hanging toran (Tutorial)
- How to make kurti neck cutting, stitching and embroideries designs


