Learn to create an easy paper rabbit craft with our step-by-step tutorial. Follow simple instructions to make a charming rabbit using basic materials, perfect for a fun and creative project.
Welcome to our step-by-step tutorial for crafting an adorable paper rabbit. This easy-to-follow guide will show you how to create a charming rabbit craft using simple materials and basic techniques. Whether you’re a beginner or an experienced crafter, join us in making this fun and cute paper rabbit that’s perfect for decorations or creative play.
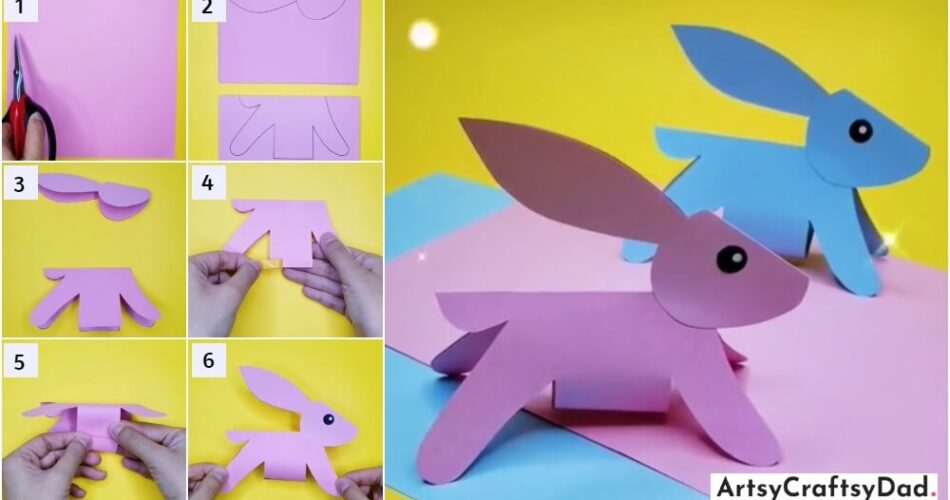
Simple Paper Rabbit Craft Tutorial For Kids

Must Read: Amazing DIY Paper Basket Craft Tutorial For Kids
Supplies & Tools
- Pink Sheet
- Scissor
- Glue
- Artificial Eye
Paper Rabbit Craft Tutorial Instructions
Step #1: Prepare The Base

Firstly, we will take a pink plane sheet.
Step #2: Cut The Sheet

We will then cut the sheet with the help of scissors.
Step #3: Cut It From The Middle

We will cut the sheet from the middle and I will put in two equal parts.
Step #4: Draw Image Of Rabbit

Then, we will draw an image of a rabbit, the upper part of the rabbit will be drawn in the upper sheet and the lower part of the rabbit will be drawn in the lower sheet with the help of a pencil.
Step #5: Cut The Shapes

Then we will cut the shape drawn on the page with the help of scissors.
Step #6: Make An Eye

Then, we will make an eye to the face of a rabbit, we will paste the artificial eyes.
Step #7: Add A Glue To The Lower Part Of The Rabbit

Then, we will add glue to the lower part of the rabbit.
Step #8: Fold Its Legs

Now, fold the part where we added glue.
Step #9: It Will Look Like This

Then, the lower part will look like this only.
Step #10: Paste The Upper And Lower Part Together

Now, paste the upper part with the lower part properly.
Step #11: Your Rabbit Will Look Like This

That is what your rabbit will look like.
Congratulation! Your Paper Rabbit Craft Craft Is Ready

Here, is the final look of your craft. This is how it should be looked at.
This paper rabbit craft is a wonderful way to nurture your child’s artistic talents and problem-solving abilities. The easy-to-follow tutorial ensures a rewarding experience, leaving them with a unique, handcrafted creation that captures the playful spirit of a rabbit.
You Might Also Like This
- Fun & Interesting Paper Rabbit Craft Tutorial
- Amazing Paper Dragon Fruit Craft Step-By-Step Tutorial
- Red Rabbits Paper Craft Step By Step Tutorial For Kids
- Crab Paper Craft Step By Step Tutorial For Kids
- Paper Strips Tree Craft Step By Step Tutorial


