Polymer Clay Mushroom Tutorial : With the establishment of warm weather, we spend more and more time in the fresh air. For the resting place most often choose park areas, places near water bodies, country plots. And if urban and local authorities take care of improving the places of public recreation, then about coziness and restoring order should be thought of by the owners. Already in the early spring, the owners of summer cottages and country houses begin their labor activity in caring for the site: mow the grass, plant flowers and ornamental plants, paint trunks and prune dry branches of fruit trees, try to create an additional cosiness with decorative fences, alpine slides, . An interesting and original idea decoration for garden sites and a garden are decorative figures.
Ready-made various garden figures can be bought in specialized stores, and you can make by yourself. These decorative crafts give the landscape a kind of charm, unusual, and also emphasize the nature of the owner. Funny and funny, and sometimes majestic figures for the garden, especially those made with your own hands, are able to cheer up, please and give the exterior a certain “highlight” and emphasize the individuality.

Polymer Clay Mushroom Tutorial
Undoubtedly, you can buy ready-made (factory) garden figures from a poly-stone (the so-called artificial stone material, based on acrylic resin). But it’s much more interesting to make them with your own hands! Only in this case, you can be 100% sure that none of this will happen to anyone.
Materials for garden crafts
To make crafts for the garden, a variety of materials are suitable. It can be stones, twigs and bars, polystyrene, car tires, plastic bottles and much more. In this case, we offer to your attention a step-by-step master class for the production of figurines from gypsum.
To the process of making funny mushrooms from gypsum, you can attract children – they will benefit from such a joint work. Creative work will promote the development of fine motor skills, as well as thinking and imagining.
Material Required : Polymer Clay Mushroom Tutorial
In order to make a mushroom from gypsum, it is necessary to prepare the following materials and tools:
- special sculptural gypsum (not less than a kilogram);
- building adhesive PVA;
- varnish;
- acrylic paints designed for glass and ceramics;
- a set of brushes (thin for drawing elements and thick to cover the base);
compass; - set for wood carving (can be replaced with an awl or clerical knife);
- a simple pencil;
- plastic bottle (1,5 – 2 liter);
- bowls (corresponding to a mushroom-sized hat);
- glue (choose a water-resistant adhesive);
- vegetable oil (sunflower or any other suitable);
- block soap;
- water.

Procedure : Polymer Clay Mushroom Tutorial
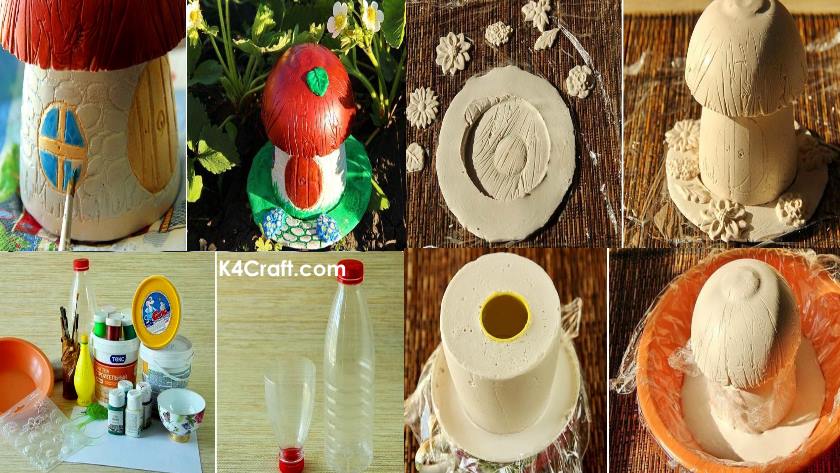
Stage 1. The mushroom foot
We select a suitable plastic bottle. If it was stored milk or sweet drinks, before further use, you should wash the bottle.
With the help of scissors with sharp ends or a clerical knife, we cut off the upper part – this will be the form for making a part of the mushroom leg, into which the liquid gypsum solution will be poured.

So that after hardening the part could easily be removed from the mold, the inner surface of the bottle should be covered with a special soap solution. You can make a solution by mixing the soap grated on a fine grater, sunflower oil and water (in a ratio of 2: 1: 7). Stir the solution until the solution is completely dissolved with a flat silicone brush applied to the inner walls of the bottle and leave a little to dry.
We prepare the gypsum solution, following the manufacturer’s instructions (make sure that the powder is completely dissolved and there are no lumps left). Liquid gypsum is poured into a cut off bottle and left until it is completely solidified.
In order to reduce the consumables and to make the figure lighter in weight, you can use the following trick. Inside the cropped bottle, when inserting the solution from the gypsum, insert a slightly smaller container (bottle). A smaller bottle will float up, so you should put a load on top of it, which will hold it inside (a flat stone or a thick book will do).

Already after half an hour you can remove the hardened part. The plastic bottle should be incised and carefully removed the stem of the future fungus.
Stage 2. Hat of a garden figure
In order to make a mushroom cap, you should take a medium-sized bowl (a deep cup) and cover the inside surface with cellophane or food film. In the process of work, we must try to prevent the appearance of folds on the cellophane coating.
The solution of a gypsum to fill in a bowl and after a little time to insert in a solidifying mass a leg a wide part upward.
After the details have hardened, you need to get the mushroom from the bowl, remove the film and leave it in a well-ventilated area until it dries completely.
In order for the figure to be stable, it should be placed on the base-pad. Take a small basin and cover the bottom with food film. Pour a small amount of gypsum solution to the bottom. The mushroom knot is wrapped in cellophane and placed in gypsum – this will make it possible to make the fungus removable in the future. After the solution has dried, it will be possible to proceed with the design of the figure.

Stage 3. Decorating the garden figure
If you have factory stencils of figures of insects or flowers (often sold in children’s sets for creativity), then you can use them to decorate the garden figure.
On the bottom of the base of the mushroom, after complete drying, we paste the mini-figures with water-resistant glue. Shilom or a clerical knife scratches the edges of the legs of the contours of grass and around the imitation of bricks. With a circular, we draw circles on the mushroom foot (door and windows).

Next, we cover the figure with a primer (we use a special primer mix or a dilute construction adhesive in the ratio 1: 2). This is done for the purpose of minimum paint consumption and better coloring of the surface.
After a few hours, when the primer grasps, you can begin to decorate the mushroom. Color the figure is best bright colors, so that it is not lost in the grass, but immediately struck.
To prevent the burning out of the paint under direct sunlight and washing it off with rain, it is necessary to coat the mushroom and the base with varnish in several layers. After each coating, it is worth waiting a little, so that the previous layer will dry before applying the next one.

Polymer Clay Mushroom Tutorial
A fabulous fungus is ready! Now you can decorate your garden with them.
Spectacular decorative compositions for the garden
Excellent look at the suburban areas, not only individual figures, but also compositions. You can make a big mushroom family. For naturalness, you can glue several cones and acorns to the base.
To the figurine of the fungus was noticeable from afar, it is worth thinking about its design. It is possible to decorate an original hat not only by brightening it with bright color, but also by decorating with colored glass and mirror fragments. Glass will shine in the sun, and your garden will be the object of envy of neighbors.
To add paints to the site, it is necessary to glue the top of the hats of the mushrooms with colored fragments. In this case, bright glass can be laid out in a pattern or glued in a random order.
Having mastered the principle of work on making mushrooms from gypsum, you can easily undertake any other plaster figurines. For inspiration is worth familiar with the options for garden figures presented in the photo.

This is only a small part of what you can decorate your garden. But whatever figure you bought or made with your own hands, we must remember that the decoration should fit organically and be one in the whole composition of the garden plot.
Subtlety of landscape design
To warn against typical errors of arrangement of garden sculptures the following advice of experienced landscape designers will help:
- All garden figures should be made in the same style.
- Animal figurines should be placed in accordance with their habitual habitat (hedgehogs, dwarfs and other animals are located in the grass, among flowers, and frogs, snails, herons are best placed near the pond).
- Large, majestic figures and sculptures should be placed in the center of the garden (in the middle of the site).
- On the sites where children’s playgrounds are equipped, the fairy-tale heroes will look great.
 It does not matter if you ask for help from a professional landscape designer or decide on your own to decorate the site, the main thing is to observe the sense of proportion. Considering all the above tips, you can create an atmosphere of warmth and coziness on your site, and your family and guests will appreciate all the efforts.
Hope you liked this Polymer Clay Mushroom Tutorial to engage your kids in their free time. Click here for more clay tutorials.
Amazing Clay Models To Make At Home
Read More
- 6 Party Hairstyles In Just 60 Seconds – Step By Step
- Designer Ear Cuffs Earring Designs
- Designer Gold Drop Earrings With Weight
- Traditional Indian Style Gold Jhumka Designs
- DIY Flower Vase Of Recycled Plastic Spoons