Discover a fun and easy Colorful Origami Umbrella Paper Craft Tutorial for Beginners. Perfect for all ages to learn and create vibrant paper umbrellas step-by-step!
Creating a colorful origami umbrella is a delightful and accessible craft for beginners. This tutorial guides you through simple steps to produce a vibrant, decorative piece. Engaging in this activity not only enhances your folding skills but also brings a splash of joy and creativity to your day.
Origami Umbrella Paper Craft Tutorial

Must Read: Thread Weaving Umbrella Decor Craft Tutorial
Supplies & Tool
- Sheet (Blue, Yellow, Orange, Green, Red, Pink, Sky Blue)
- Glue
- Stick
- Scissor
- Pearl
Umbrella Paper Craft Instructions
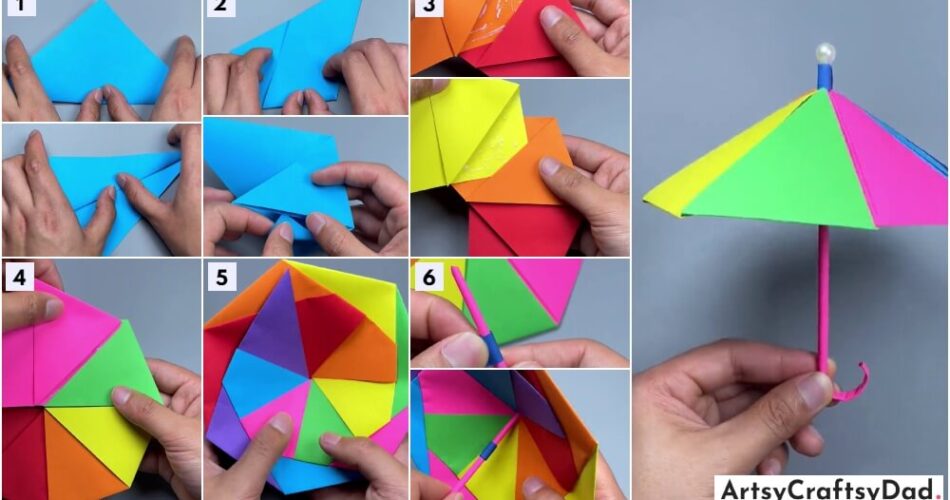
Step #1: Take A Blue Sheet

In the first step, you will use a blue sheet and then fold it from the middle.
Step #2: Fold It Properly

In another step fold it properly in the middle after folding it. It will be in triangular shape.
Step #3: Fold Again

Then, folds to the corner of its back and it should seem like two right angle triangles whose perpendicular sides are connected.
Step #4: Another Fold

Then, it gets folded from the top in an upward direction.
Step #5: Another Fold

Then, make another fold from the short side of the shape upward.
Step #6: Close The Shape From One Side

Then, there is a gap in between then we put one side in that gap and close its one end.
Step #7: Make More Like This

Make more shapes like this. Here, we are using pink, yellow, green, orange, blue, and red sheets and make the same shape.
Step #8: Paste The Left End

Now, put the glue on the left side of every shape.
Step #9: Paste The Ends With Each Other

Now, paste the left end with each other’s left end. You can choose according to which color comes after which.
Step #10: Fold The Remaining Part Of The Triangle

Then, fold the remaining part of the triangle inside.
Step #11: Do Paste Another Sheet

Now, paste another sheet exactly in the same manner as another one.
Step #12: Fold It Inside

Then, again fold the left sheet inside of the umbrella.
Step #13: Repeat The Steps

Repeat the steps until and unless you do not get what you desire.
Step #14: Put The Glue On The Last Sheet

Put the glue on the last sheet carefully.
Step #15: Paste It

Paste it carefully and the remaining part fold inside.
Step #16: The Look Of The Umbrella

Here, is the final look of the umbrella but this is a back look. if your back look is pasted and made perfectly then your front part will look more graceful.
Step #17: Use A Stick

Use a stick of whichever color you want here, I am choosing pink which suits my umbrella. Put the blue paper to cover its handle from the middle.
Step #18: Paste The Stick

Paste the stick of the umbrella in the middle of the back side of the umbrella. Remember, it should go out from the upper but a little bit.
Step #19: Paste The Sheet

Then, paste a sheet on the topmost stick, and paste the blue sheet.
Step #20: Cut The Remaining Part
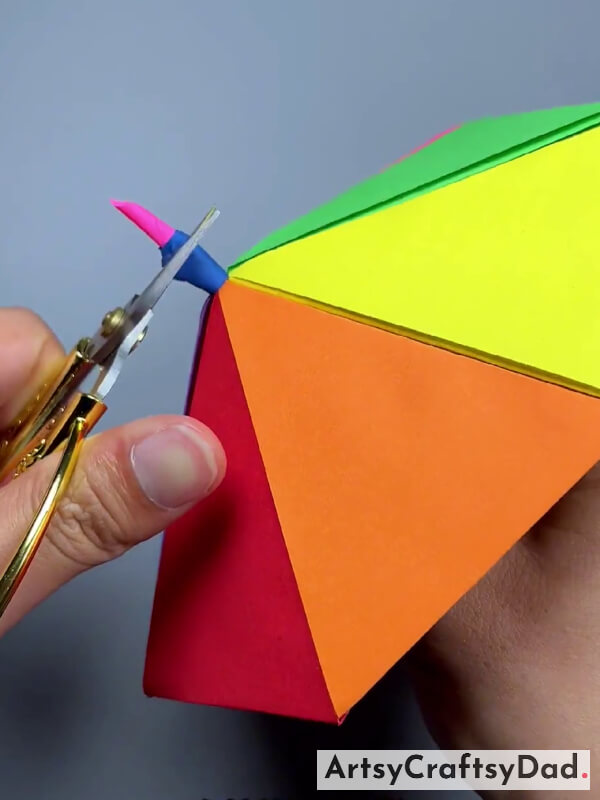
Then, cut the remaining part of the stick which is extra.
Step #21: Add Pearl

Now, add a pearl at the top of the stick it make it more beautiful.
Step #22: Fold The Stick

Then, fold the stick a little bit from the bottom.
Wow! Your Umbrella Craft Is Ready.

Here, is the final look of your umbrella craft it should look like this.
Origami, the traditional Japanese art of paper folding, transforms simple sheets of paper into intricate and beautiful designs. One of the most delightful and accessible projects for beginners is crafting a colorful origami umbrella.
You Might Also Like This
- Paper Origami Chinese Fan Craft Tutorial For Beginners
- Colorful Snails Paper Craft Tutorial For Beginners
- Paper Heart Origami Craft Tutorial For Kids
- Colorful Origami Paper Craft Ideas for Kids
- Paper Hair Stick: Origami Flower Design Craft Tutorial


