Let us make cute paper snails with the help of this step-by-step tutorial! You will also get to learn paper cutting and pasting through it!
We welcome you to this step-by-step tutorial on making paper snails! This includes a fun and exciting way to make paper snails! This craft will boost the kid’s creativity and will help them to drive motor skills like cutting, pasting, and drawing! This craft will be a perfect activity to do in the boring afternoon hours, instead of spending time on their phones and devices! So, what are you waiting for? To get a hold of these benefits, start to make it now with us!
Paper Snails Colorful Craft Tutorial For Beginners

Must Read: Colorful Button Jellyfish Craft For Kids
Supplies & Tools:
- Colored Paper Sheets
- Black And White Markers
- Scissors
- Craft Tweezers
- Glue
Paper Snails Craft Tutorial
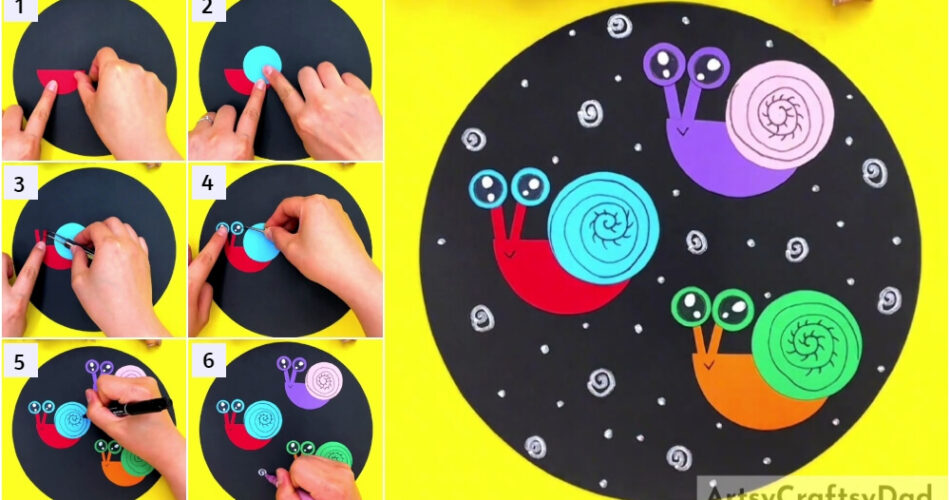
Step #1: Cutting Out Semi-Circles

Begin this craft by taking black, red, and purple paper sheets and a pair of scissors. Cut the black paper sheet into a circle to make the base for your craft. Also, cut out small semi-circles from the red and purple paper sheet using the scissors.
Step #2: Pasting The Red Semicircle On The Base

Using glue, paste the red semi-circle on the middle left of the base as shown in the image.
Step #3: Pasting A Blue Circle

Paste a blue circle on the right corner of the red semicircle and above it. The red semicircle will be the body of the snail and the blue circle over it will be its shell.
Step #4: Making The Snail’s Tentacles

Cut out 2 small red strips from the red paper using the scissors and paste them above the snail body on the left using glue and craft tweezers. These will be the tentacles of the snail.
Step #5: Pasting Eyes Of The Snail

Cut out 2 small blue circles using scissors, Also, white circles but further smaller than the blue ones, and paste the white ones over the blue ones using glue. Now, using a black marker color the white circles leaving 2 tiny circle in it to make the eyes look shiny. Now, paste these eyes on the end of the tentacles using craft tweezers and glue.
Step #6: Drawing Spiral Over The Shell And A Smile

Using the black marker, draw a spiral all over the circle shell of the snail. Also, draw a ‘v-shaped smile on the body below the tentacles.
Step #7: Making More Snails And Detailing The Shell

Following the same previous steps make 2 more snails of body and shell color combinations, one of purple and pink and the other of orange and green. Paste the purple snail on the left top and the orange one on the below left of the base. Now, using the black marker, make curved strokes on the spiral boundary in the middle.
Step #8: Making Spirals On The Base

Using a white marker, make small spirals on the base randomly.
Step #9: Making Dots On The Base

Using the marker, draw dots on the base along the spirals randomly.
This Is The Final Look Of Your Colorful Paper Snails!

Damn! Look at the final outcome! Your cute paper snails are ready!
This craft is definitely a piece to showcase! Place it anywhere, in your room, in the drawing room, or anywhere! It will be thriving anywhere! You can also customize this craft using your imagination and creativity to make it as unique as you are, like changing the background of this craft, anything! You can also use it as your school craft project!
We are hoping you liked the article! If so, give it a like and share it with your buddies! Also, don’t forget to give your feedback in the comments section!
You May Also Like:
- Clay-Paper Sunflower Garden Craft Tutorial
- How to make a Paper Flower Vase – Paper Craft Tutorial
- Easy Paper Crafts For Beginners
- Clay Chicks In Garden Craft Tutorial
- Clay Heart Leaf Tree Craft Tutorial For Kids


