Craft a cute paper giraffe with this engaging tutorial for kids. Ignite your child’s creativity and love for wildlife through this easy-to-follow DIY project.
Embark on a wild, creative adventure with this adorable paper giraffe craft tutorial for kids. Featuring a whimsical design and easy-to-follow steps, this engaging DIY project is sure to delight young learners and ignite their imagination.
Paper Giraffe Craft Tutorial for Kids

Must Read: Giraffe Face Painting Step-by-Step Tutorial For Kids
Supplies & Tools
- Sheet( Yellow, Blue, White, Pink, White)
- Glue
- Scissors
- Leaves
- Brown marker or highlighter
- Red marker
Cute Paper Giraffe Craft Instructions
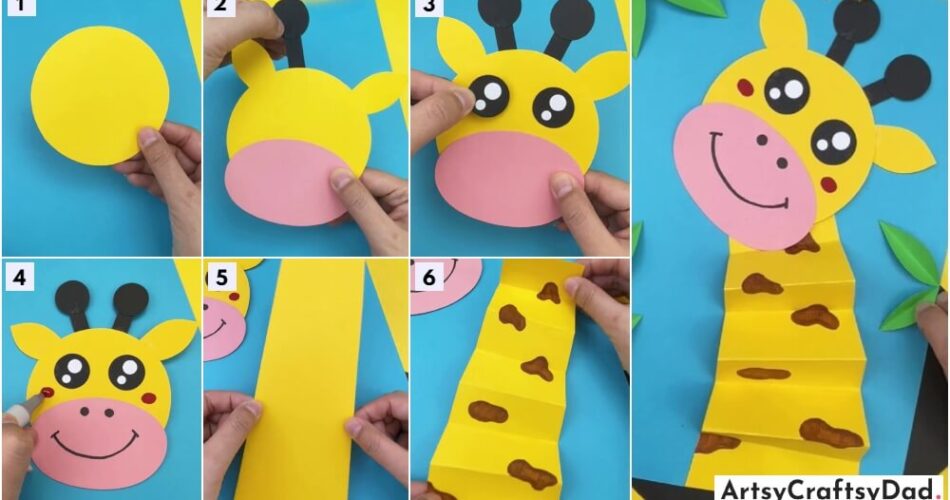
Step #1: Lets Begin With The Base

Take a blue sheet and then take a yellow sheet and cut it into a circular shape.
Step #2: Take A Pink Sheet

Then, take a pink sheet cut it into an oval shape, and taste it bottom of the yellow sheet.
Step #3: Add Dunks On The Head

Then, paste the dunks on the head, and make the dunks by using black sheet.
Step #4: Paste Eyes

Now, paste the eyes on the yellow sheets, make it by using black sheet cut two big circles and make two dots with the use of white color inside the black circle, and paste it on the yellow sheet.
Step #6: Make Chicks

Make chicks by using the red marker and a highlighter.
Step #7: Use A Long Yellow Sheet

Now, use a long rectangular shaped yellow sheet.
Step #8: Make Designs On The Yellow Sheet

Now, use a brown marker to fill the color on the yellow sheet by making a design.
Step #9: Fold Them Alternately

Now, fold the sheets alternately.
Step #10: Unfold It

Then unfold it now, it will have some folding marks.
Step #11: Paste It On The Blue Sheet

Then, paste the yellow sheet on the lower part of the blue sheet.
Step #12: Paste Some Leaves On The Corners

Now, paste the leaves on the corners of the sheets.
Congratulations! Your Cute Paper Giraffe Craft Is Ready

Finally! Your craft in ready.
After pasting the leaves your cute paper giraffe craft is ready.
Craft your charming paper giraffe with this captivating step-by-step tutorial. This delightful DIY project is a wonderful way to nurture your child’s artistic skills and foster their appreciation for the wonders of the animal kingdom.
You Might Also Like This
- Cute Paper Easter Bunny Craft Tutorial For Kids
- Red Rabbits Paper CraftStep-By-Stepp Tutorial For Kids
- DIY Paper Trees CraftStep-By-Stepp Tutorial For Kids
- Paper Cutting Cute Tigers Craft Tutorial For Kids
- Crab Paper CraftStep-By-Stepp Tutorial For Kids


