Learn how to create a beautiful rose flower bouquet artwork with this fun tutorial for kids. Using simple materials like paper, scissors, and glue, children can easily follow along and create their masterpieces. Join in on the fun and make a gorgeous rose flower bouquet today!
Flowers are a beautiful and timeless gift that can brighten anyone’s day. In this tutorial, we will be exploring how to create a stunning rose flower bouquet artwork that is perfect for kids to make and give as a special gift. Using simple materials and easy-to-follow steps, children can unleash their creativity and create a masterpiece that showcases their love and appreciation for others. Let’s dive into the world of art and create something truly special together!
Beautiful Rose Flower Bouquet Artwork

Must Read: Flower Bouquet: Clay & Tissue Craft Tutorial
Supplies & Tools
- White circular craft paper
- Tube watercolor (White, Red, Green)
- Earbud
- Paint Brush
- Tissue Paper
- Sky Blue Maker
- Glue
- Red Ribbon
Rose Flower Bouquet Instructions
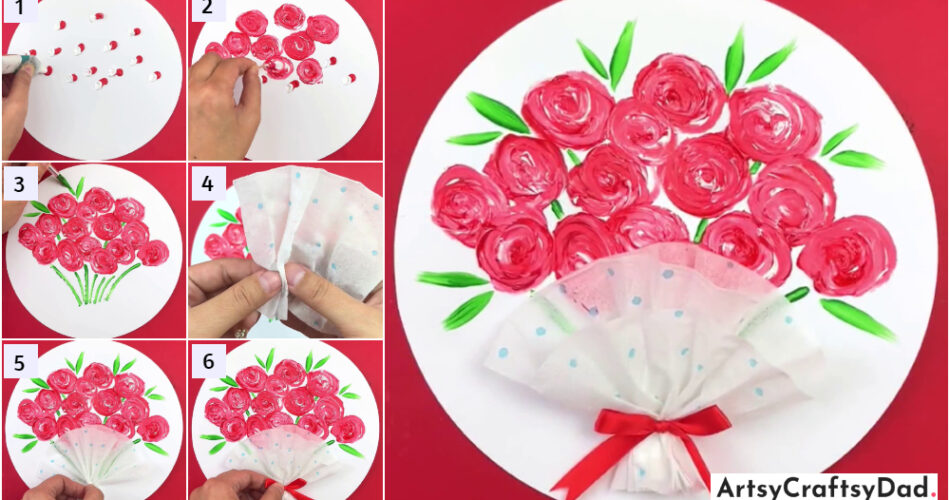
Step #1: Putting Red Color

First, take a white craft paper and cut it into a circular shape & use it as a craft base. Now, take a red color tube and drop the color on the craft base one by one, just like in the given image.
Step #2: Putting White Color

Put some more red colors in the same manner. Now, take the white color tube and put a drop of white color alongside the red drop, as shown in the image.
Step #3: Mixing Both Colors

Now, take a clean earbud and begin mixing red and white colors.
Step #4: Drawing Stems

Now, get the clean earbud & dip it into a light green color, and draw the stem of the flowers.
Step #5: Making Leaves Using Paint Brush

Now, take a clean paintbrush and dip it into the light green color. Draw leaves above the flowers.
Step #6: Making Dots On Tissue

In this step, take a clean white tissue and a sky-blue marker & draw some random dots on the tissue.
Step #7: Gathering Tissue From The Bottom Side

Now, take a tissue paper & start gathering tissue with the help of your hand from the bottom side as shown in the above image.
Step #8: Pasting Tissue

Now, paste the collected tissue paper on the bottom side of the flower using glue.
Step #9: Pasting Ribbon

In this step, we take a ribbon & make a bow shape of it & paste it on the tissue paper on the lower side.
Pretty Flower Rose Bouquet Is Achieved Here!

This is the final look of our pretty rose flower bouquet.
Rose flower bouquet craft ends here. You could decorate your home with this pretty rose bouquet to brighten any room. You could also gift this to your friends & bring a smile to their faces. Also if you want to customize this craft then you can make some other flowers like Lotus, Jasmine, Lily, etc. You could try this painting with your friends. Please share your opinion in the comment section about this craft.
Thank you for choosing us! Have a nice day!
You Might Also Like This
- Clay Flower and Tissue Paper Bouquet Craft Tutorial
- Bubble Wrap Carrot Artwork Craft Tutorial For Kids
- Clay Ladybugs In Field Artwork Craft Tutorial For Kids
- Handprint Snowman Artwork Tutorial For Kids
- Clay Circles Tree Artwork Craft Tutorial For Kids


