Create an eye-catching artwork with us using the basic arts & crafts supplies! This tutorial will guide you to make clay ladybugs in the field!
Hello and welcome to the wonderful world of crafting where we create something inspired by the imagination or the pretty nature! This time it is a nature-inspired one! This is a step-by-step tutorial on making a craft artwork of clay ladybugs in the wheat fields! The center of attraction in this artwork craft will be the realistic ladybugs with the 3D design! Kids will love to play and mold the clay to create them easily with us! Grab the listed supplies to begin with us!
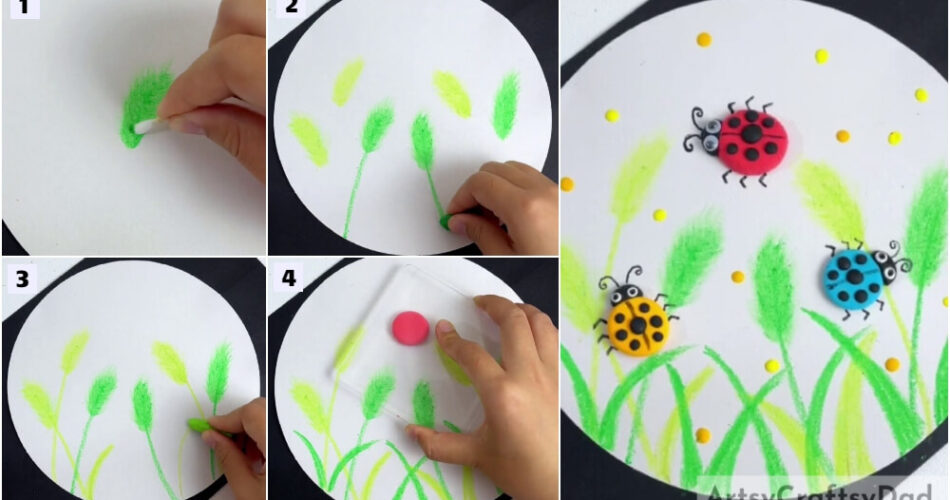
Ladybugs Artwork Craft Tutorial For Kids

Must Read: Beautiful Clay Peacock Paper Artwork Tutorial
Supplies & Tools
- White Circular Paper Sheet
- Polymer Clay Pressing Tool
- Colored Clay (Red, Blue, Yellow, Orange, And Black)
- Cotton Earbud
- Wax Crayons (Green And Yellow)
Clay Ladybugs Artwork Instructions
Step #1: Making Common Wheat

Begin this artwork by taking a white circular paper sheet as the base for the drawing craft, a cotton earbud, and a green wax crayon. Using the green wax crayon, make a small curved line over the bottom of the base, and then using the cotton earbud make strokes from the lines slantingly upwards from both sides of it to spread the color and form a common wheat. See the image for reference.
Step #2: Making More Common Wheat And Their Stems

As you made the green common wheat, make more of them randomly over the base and also the yellow ones. Now, using the respective color of the common wheat, make their curvy stems to the end of the base. See the image for reference.
Step #3: Making Leaves To The Wheat Stems

Using the same crayons, make the curvy small leaves at the bottom of the base among the stems randomly. See the image for reference.
Step #4: Flattening A Clay Circle

Take red clay and dough it into a clay ball. Place the clay ball above the common wheat and using a polymer clay pressing tool, press and flatten the clay ball into a clay circle.
This Is The Final Look Of Your Ladybugs In Field Artwork!

For the last step, turn the clay circle into a ladybug. Take black clay, make a clay circle separate it into half, and stick it beside the red clay circle to form the face of the ladybug. Now, dough tiny clay balls from the clay and place one in the center of the ladybug’s red body and 3 on both sides along the boundary to make the texture of the ladybug. Also, grab a black sketch pen, and make a line over the ladybug’s body, dividing it in half. ake the antennas above the face of the ladybug on the base in a curly shape. Make the legs of the ladybug on both sides of its body on the base. Stick 2 googly eyes on the face by pressing it over the clay side by side.
Make 2 more ladybugs on the base randomly and over the common wheat. Make one on the left side of the yellow clay body and one on the right of the blue clay body. See the image for reference.
Also, dough tiny clay balls from orange and yellow clay and place them randomly over the base and press to flatten them as well.
Congratulations! You have successfully made your beautiful ladybugs in the fields!
You should be proud of your amazing creations and skills! How flawlessly you have made the ladybugs, they look so real! Decorate it in your room to have a self-made decor! You can even customize the artwork in any way you like, add more colorful ladybugs to it, make even the grass from clay, give another background, anything! Your imagination and creativity are the limit! Make it as unique as you are!
We’re hoping you liked the article! Share it as much as you can to keep us motivated to keep bringing such artwork for you! Also, drop your feedback and tell your artwork journey to us in the comments section!
You May Also Like
- Clay Snails On Leaves Craft Tutorial For Kids
- Clay Flower Pot Model Craft Tutorial For Kids
- Beautiful Peacock: Colorful Clay Craft Tutorial
- Clay Flower Vase Model Craft Tutorial For Kids
- Designer Chicks: Tissue And Clay Craft Tutorial


