“Create stunning paper flower bouquets with our step-by-step tutorial! Perfect for DIY enthusiasts, this guide covers all you need to craft beautiful, lasting blooms.”
Crafting your paper flower bouquet is a delightful and creative way to add a personal touch to your home decor or gift to someone special. Unlike fresh flowers, paper flowers won’t wilt and can be cherished for years to come. Whether you’re a seasoned crafter or a beginner, this step-by-step tutorial will guide you through the process of creating a stunning paper flower bouquet.
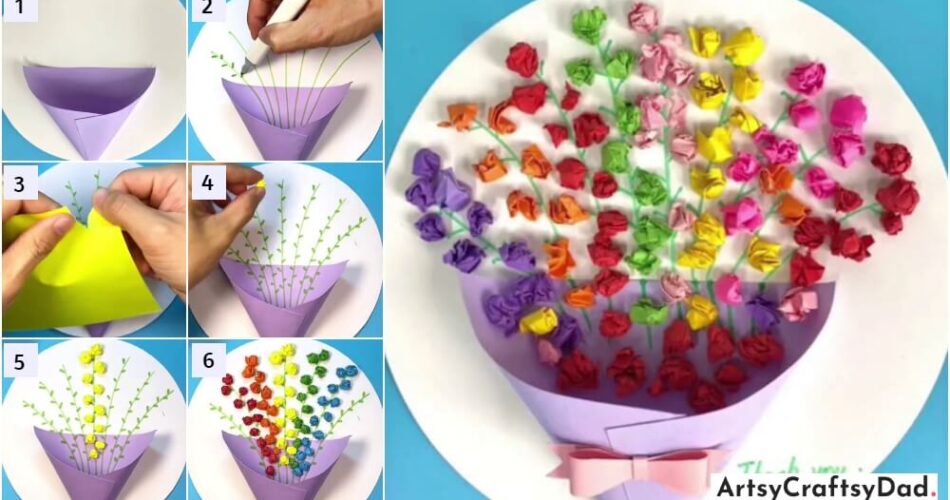
Flower Bouquet Paper Craft Tutorial

Must Read: Clay Flower Bouquet – Pretty Craft Tutorial For Kids
Supplies & Tools
- Sheet( Green, Red, Yellow, Orange, White, Blue, Purple, Pink, and Skinny)
- Glue
- Scissor
- Green Marker
- Bow
Flower Bouquet Craft Instructions
Step #1: Prepare the Paper Craft

Firstly, take a sky blue sheet for the background and a white sheet, circularly cut that sheet, and paste it above the blue sheet then, take the colorful paper and roll it out. You can take paper by your choice here I am choosing pink, purple, green, orange, yellow, skinny, and red color paper to make a small roll of flowers.
Step #2: Make A Bouquet

Take a purple sheet fold its right and left bottom sides upwards and paste their ends. and then paste it into the white sheet.
Step #3: Make Stems

Use the green marker to draw the lines from the inside of the purple bouquet to the white sheet.
Step #4: Add Leaves

Now, with the green marker make levels to that branches accordingly.
Step #5: Prepare Flowers

Now, prepare the flowers first here we are using a yellow sheet cutting it with a hand, and making a roll according to your requirements.
Step #6: Paste It

Then, start pasting it in the stem and above the leaves.
Step #7: Then It Should Be Posted

In this way, the flower roll should be pasted. here, I am pasting the yellow flower rolls in the middle row you can paste them according to your preference.
Step #8: Prepare More, Paste More

In the same way, the orange, and green will also be pasted.
Step #9: Repeat The Step

Again, the red and blue are pasted accordingly.
Wow! Your Beautiful Flower Bouquet Is Ready.

That is what it looks like. Complete it by pasting all the flowers adding the bow at the end and writing a message whatever you want to write. Here, I a writing to thank you.
In conclusion, creating a flower bouquet through papercraft is a delightful and rewarding endeavor. This step-by-step tutorial not only enhances your crafting skills but also provides a beautiful handmade decoration. Enjoy the process, and let your creativity blossom with each unique flower you design.
You Might Also Like This
- Step-by-Step Clay Flower Bouquet Artwork Craft Tutorial
- Paper Lump Flower Bouquet Craft Tutorial For Kids
- Clay Flower and Tissue Paper Bouquet Craft Tutorial
- Paper Flower Bouquet Artwork Craft Tutorial For Kids
- Tissue Paper Flower Craftwork Step-By-Step Tutorial


