Discover a step-by-step tutorial to create simple Easter bunny paper puppets with your kids. Unleash their creativity and imagination.
Celebrate the joy of Easter with a delightful DIY paper puppet craft that will have your little ones hopping with excitement. Embark on a fun-filled journey of creativity and imagination as you guide your children through the step-by-step process of bringing these charming Easter bunnies to life using simple materials found around the house.
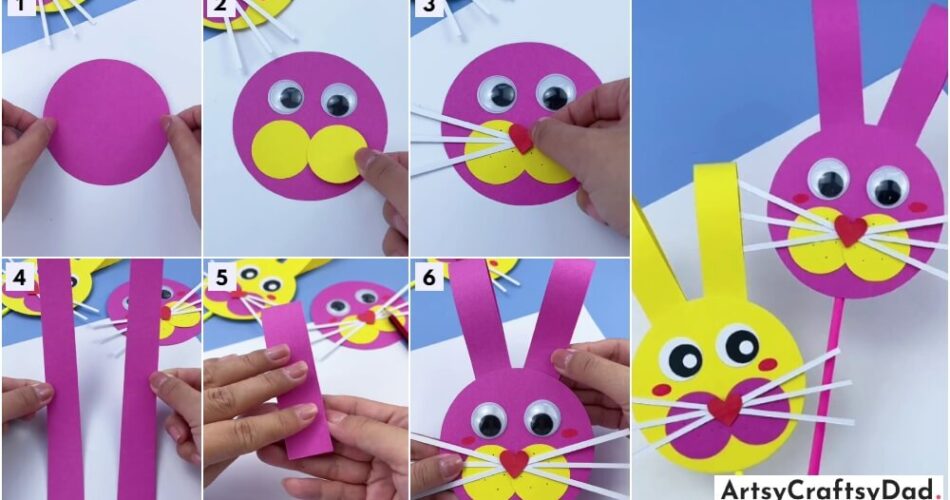
Easter Bunny Paper Puppets Craft Tutorial

Must Read: Cute Paper Easter Bunny Craft Tutorial For Kids
Supplies & Tools
- A4 Sheets (Red, Pink, Purple, Yellow, White)
- Black marker
- Glue
- Scissor
- Googly Eyes
Bunny Puppets Instructions
Step #1: Take A Purple Sheet

Now, we will take a purple sheet and cut it into a circular shape.
Step #2: Make A Face

With the help of a white and blank sheet, we will cut the shape of a circle but remember the white circle should be bigger than the black circle and paste it accordingly. It should seem like an eye and then put the eye shield on the eyes.
Step #3: Use Yellow Sheet

Now, use a yellow sheet cut two circles with the same radius, and paste at the place of mouth. Remember some parts should be in touch with each other.
Step #4: Make A Design

Then, with the help of a black marker make a design of dots on the yellow circles.
Step #5: Make It Creative

Use a red sheet cut a small heart and paste it at the left top of the yellow sheet. Then, use a white sheet and cut 3 straight long rectangular shapes and paste them along with the heart.
Step #6: Use A Purple Sheet Again

Then, firstly the steps will be repeated in the white sheet pasted on the left side in the same way it gets pasted on the right side. Use a purple sheet again and cut two straight long rectangular shapes as shown in the picture.
Step #7: Fold Both Shapes

The shape of a long rectangular sheet will get folded from the middle.
Step #8: Paste It Above The Head

Then, the folded sheet will be pasted at the top of the head on the left side of the face.
Step #9: Repeat The Step

In the same way, another got pasted at the right side of the face accordingly.
Step #10: Make A Stick

Use a pink sheet start folding it diagonally and then paste it along the sheet. It looks like a stick. On the face make its chicks with the help of a red sheet, cut it into a small oval shape, and paste it the both sides of the face.
Step #11: Paste The Stick

Now, paste the stick backside of the face.
Step #12: That Is How It Looks

This is the complete picture of Easter Bunny Paper Puppets.
WOW! Your Easter Bunny Paper Puppet Crafts Is Ready.

Congratulations! Your craft is ready that is how it should look like.
Unleash your children’s creativity and celebrate the Easter season with the enchanting craft of making paper bunny puppets. Enjoy the bonding experience and the joy of watching your little ones’ imaginations soar as they bring these adorable characters to life.
You Might Also Like This
- Easy & Adorable Easter Bunny Craft For Kids
- Easter Bunny Costume Dress Up Ideas For Kids
- DIY Bouncing Paper Bunny Craft Tutorial For Kids
- Simple Paper Christmas Tree Craft Tutorial For Kids
- Simple Rabbit / Bunny Craft Ideas for Kids


