“Discover the art of creating beautiful plant stems and paper flowers with our step-by-step craft tutorial. Perfect for DIY enthusiasts and flower lovers!”
Creating beautiful plant stems and paper flowers is an enchanting way to bring nature’s elegance into your home. This craft combines the timeless art of paper crafting with the organic beauty of botanical forms, allowing you to design stunning floral arrangements that never wither.
Easy Plant Stem & Paper Flower Craft Tutorial

Must Read: Beautiful Clay Flower Garden Craft Tutorial For Beginners
Supplies & Tools
- Sheets( Blue, Pink)
- Pink marker
- Black pen
- Glue
- Scissors
- Tree branches
- Pencil
Plant Stems Paper Flower Craft Instructions
Step #1: Prepare With The Base

Now, let’s begin with the craft, so for that, I am taking a real tree branch and pasting it on the blue sheet.
Step #2: Pasting More Branches Nearer

Then, I paste more branches on the sheets but a little nearer to the other.
Step #3: Complete The Pasting Procedure Of Branches

Now, we are completing the procedure of pasting the branch according to our base sheet.
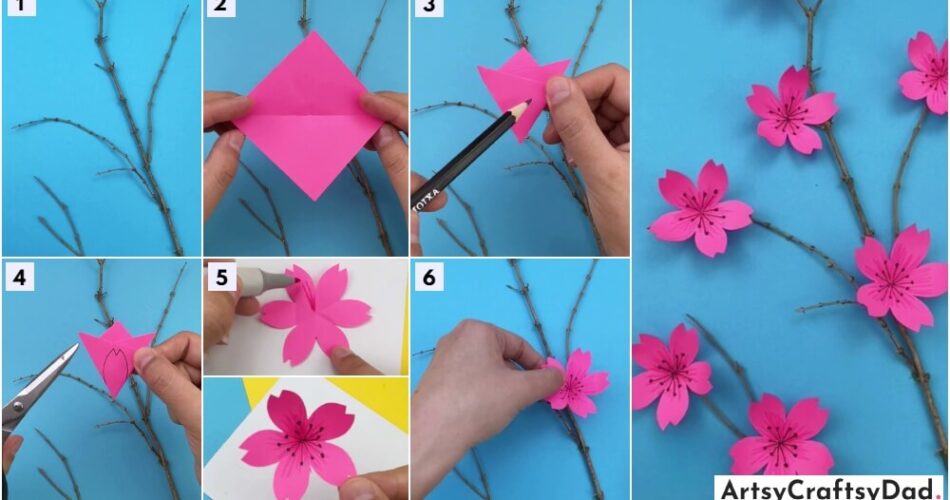
Step #4: Take A Pink Sheet

Now, I am taking a pink sheet and folding it diagonally from the middle.
Step #5: Fold It Properly

Now, fold it properly diagonally so that it will look like a triangle in shape.
Step #6: Fold Them Again

Now, fold the pink sheet from both sides in an inward direction. Then, use a pencil.
Step #7: Draw A Design With The Help Of A Pencil

Now, with the help of a pencil draw a design on the folded sheet. Make a design which should look like a fish face.
Step #8: Cut It With The Help Of Scissors

After drawing the image use scissors to cut the drawn design.
Step #9: Make The Center Part Of The Flower

After cutting the design the sheet will take a flower shape when we open the sheet. Then, make the center part of the flower with the help of a pink marker.
Step #10: Draw Seeds In The Inner Part

Put the design in only five petals of a flower instead of putting in all six. Then, draw seeds in the inner part of the five petals of the flower with the help of a black pen.
Step #11: That Is How It Looks

That is how it looks at the end.
Step #12: Cut One Extra Petal Of The Flower

Now, with the help of scissors cut that one extra petal of the flower.
Step #13: Paste Both The Separated Petals

Then, paste both the separated petals with each other properly.
Step #14: That Is How The Actual Flower Looks Like

That is what the actual flower looks like with five petals.
Step #15: Paste Flower On The Branches

Now, start pasting the flower on the branches with the help of glue.
Wow! Your Beautiful Plant Stems Paper Flower craft Is Ready

Finally! Your craft is ready.
In the end, make more flowers by repeating the mentioned steps above and paste them on the branches, and finally, your beautiful plant stems paper flower craft is ready.
Creating beautiful plant stems and paper flowers is an engaging craft that blends nature’s elegance with artistic expression. This tutorial offers step-by-step guidance, ensuring even beginners can craft stunning floral arrangements. Embrace this creative journey, and let your handmade blooms bring a touch of beauty and joy to any space.
You Might Also Like This
- Clay & Leaves Rice Plant – Easy Art & Craft Tutorial
- Handmade Clay & Paper Flower Pot Craft Tutorial
- Clay Flower and Tissue Paper Bouquet Craft Tutorial
- Beautiful Clay Flower Vase Craft Tutorial For Beginners
- Paper Lump Flower Bouquet Craft Tutorial For Kids


