Learn how to create beautiful tissue paper flowers with this step-by-step tutorial. Perfect for adding a pop of color to any occasion, these DIY craftwork flowers are easy to make and can be customized to suit your style.
Tissue paper flowers are a beautiful and versatile craft that can be used for a variety of occasions, from weddings to baby showers to everyday home decor. In this step-by-step tutorial, we will guide you through the process of creating your own stunning tissue paper flowers. Whether you are a seasoned crafter or a beginner looking to try something new, this is an easy & beautiful craft for kids that will teach them how to convert tissue paper into a beautiful flower. Let’s get started!
Attractive Tissue Paper Flower Craft For Kids

Must Read: Clay Flower and Tissue Paper Bouquet Craft Tutorial
Supplies & Tools
- Drawing Paper (Sky Blue, Green)
- Tissue Paper
- Crayon Colors (Brown, Red)
- Black Sketch Color
- Scissors
- Glue
Tissue Paper Flower Craft Instructions
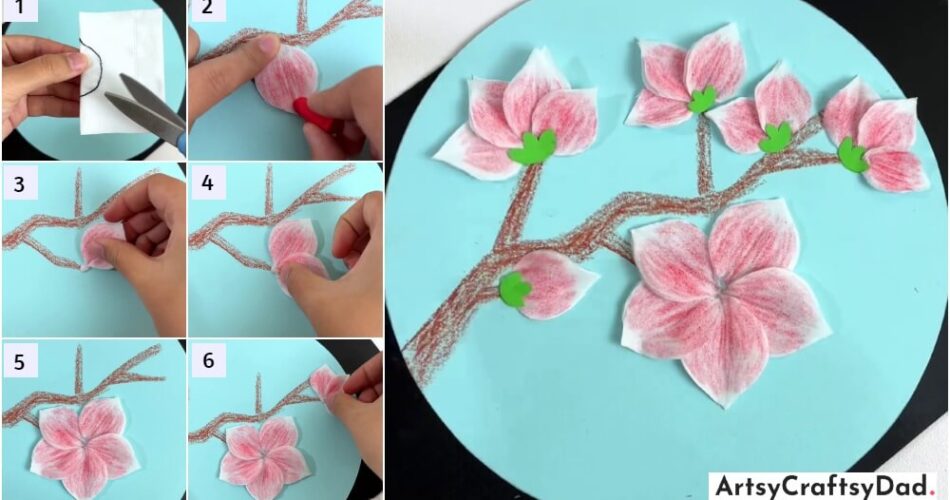
Step #1: Taking A Drawing Paper

Firstly, we take a blue drawing paper and cut it into a circle using scissors & use it as a craft base. After cutting, start drawing a tree & branches using brown crayons color.
Step #2: Folding The Tissue Paper

Complete the tree drawings here. Then we take a rectangle-shaped tissue paper and fold it vertically in half from the center to make creases & then unfold the paper.
Step #3: Cutting Flower Petals

Now, again fold the tissue paper and draw the half flower petal on tissue paper using black color. Then cut out the flower petal outline using scissors.
Step #4: Coloring Petals

Now, unfold that cut petal outline. Then we start coloring this petal with the help of red crayons color.
Step #5: Complete Coloring Petal

Now, we color that petal completely.
Step #6: Applying Glue

Now, we apply the glue on the top of the tree stem to paste that petal.
Step #7: Pasting Petal

Now, we paste that colored petal on the glue.
Step #8: Pasting Another Petal

In this step, we paste the more colored petals using the same process.
Step #9: Completing Flower

In this step, paste more flower petals and make a complete flower as shown in the above image.
Step #10: Making More Flowers

Now, we make more petals using the same process and make more flowers by pasting them.
Step #11: Making Flower Leaves

Now, we take a green color paper and draw a leaf. Then cut out the leaf outline and paste this on the middle bottom of the flower.
Our Tissue Paper Flower Craftwork Is Achieved Here!

We complete our craft by pasting more leaves in the same manner.
Now, we have ended our beautiful journey of making tissue paper crafts here. I hope it was easy for you to create this beautiful craft. You can create other flowers & make your craft different & unique. Decorate your room with this beautiful craft. Please share your feedback in the comment section.
Thanks for visiting us!
You Might Also Like This
- Colorful Butterfly: Tissue Paper Sketch Pen Hack Craft Tutorial
- Flower Bouquet: Clay & Tissue Craft Tutorial
- Paper Flower Bouquet Artwork Craft Tutorial For Kids
- Dumpling Dragon Boat Paper Craft Step-By-Step Tutorial
- Handmade Clay & Paper Flower Pot Craft Tutorial


