Follow our step-by-step tutorial for kids to make glowing apple tree leaves. Easy instructions guide you through crafting this creative project using simple materials for a fun and illuminating craft activity.
Making a glowing apple tree leaves craft is a fun and simple activity for kids. It involves using glow sticks and real leaves to create a beautiful, colorful decoration. This easy-to-follow tutorial will guide your child through the steps to make their own unique glowing tree leaves. Get ready to have a blast bringing nature to life with this creative craft!
Awesome Apple Tree Craft Using Leaves & Paper

Must Read: Colorful Clay Tree Craft Step-By-Step Tutorial For Kids
Supplies & Tools
- Sheets (Blue, Red)
- Leaves
- Brown Marker, Black Marker
- Scissor
- Double-Sided Tape
- Brown Color Pen
Glowing Apple Tree Leaves Craft Instructions
Step #1: Prepare With The Base

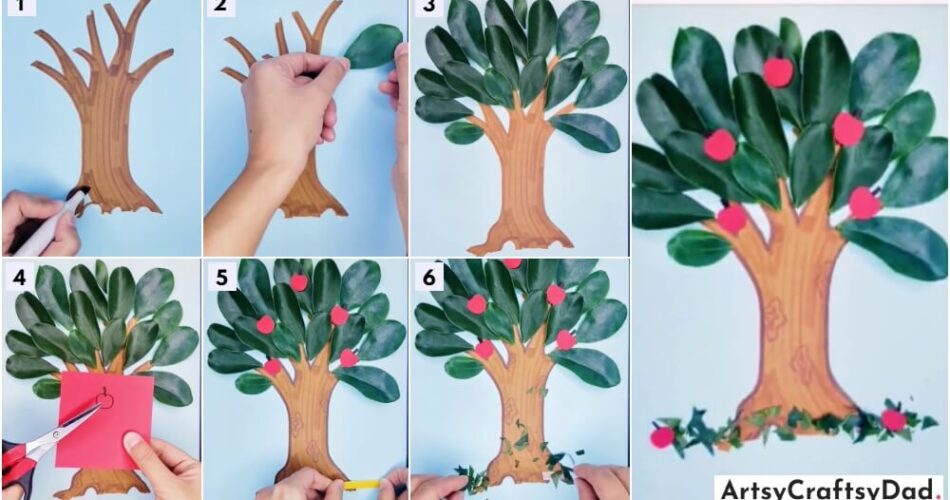
First, we will take a plain blue sheet and start drawing a tree outline with the help of a black marker.
Step #2: Then We Will Color It

Then, the drawn tree will be colored with the help of a brown marker.
Step #3: Take The Leaves Of The Tree

Then, we will take leaves from the real tree.
Step #4: Add Double Sided Tape To The Leaves

Then, we will add double-sided tape to the leaves.
Step #5: Paste The Leaves To The Drawn Tree

Then, paste all leaves into your drawn tree accordingly.
Step #6: That Is How It Should Be Posted

That is how the tree leaves should be pasted accordingly
Step #7: Decorate The Tree

Now, with the help of a brown marker draw some things which suited to your tree. Here, I am drawing some concentric circles.
Step #8: Outline The Tree

At the end, don’t forget to outline the tree with the help of a brown marker.
Step #9: Draw Apples

Now, use a red sheet, and draw an apple picture on the sheet with the help of a black marker.
Step #10: Cut The Apple

Now, cut the drawn apple with the help of scissors.
Step #11: Paste Them In The Leaves

Then, the cut apple is further pasted in the leaves so that it seems like an apple tree.
Step #12: In That Way, The Apple Be Pasted

Then, all the apples should be pasted like this in the tree. Apply double-sided tape at the bottom of the tree.
Step #13: Cut Some Leaves To The Bottom Of The Tree

Now, wherever you pasted the double-sided tape cut the leaves with the help of scissors so that the leaves will stick there easily.
Step #14: That’s How It Will Arrange

In this way, the leaves should be pasted at the bottom of the tree and the two apples should be pasted on both the sides of tree nearer to the shaded leaves.
Wow! Your Glowing Tree Leaves Craft Is Ready

Congratulations, your glowing tree leaves craft is ready to show.
This glowing apple tree leaves craft is a delightful way to nurture your child’s creativity and sense of wonder. The easy-to-follow tutorial ensures a rewarding experience, leaving them with a mesmerizing decoration that celebrates the beauty of nature and the power of their ingenuity.
You Might Also Like This
- Painting on Leaves Craft Step-By-Step Tutorial For All
- Paper Strips Tree CraftStep-By-Stepp Tutorial
- Cotton Buds Tree Painting –Step-By-Stepp Tutorial
- Autumn Tree Clay Artwork –Step-By-Stepp Tutorial
- Red Rabbits Paper CraftStep-By-Stepp Tutorial For Kids


