Learn how to create beautiful and adorable clay flower cards with this easy-to-follow tutorial for beginners. Perfect for any occasion, these handmade cards are a unique and thoughtful way to show someone you care.
Are you looking for a fun and creative craft project to try? Look no further than this adorable clay flower card tutorial for beginners! With just a few simple materials and easy-to-follow steps, you can create your own beautiful and personalized cards that are sure to impress. Whether you’re new to crafting or just looking for a new project to try, this tutorial is perfect for anyone looking to add a personal touch to their greeting cards. So gather your supplies and let’s get crafting!
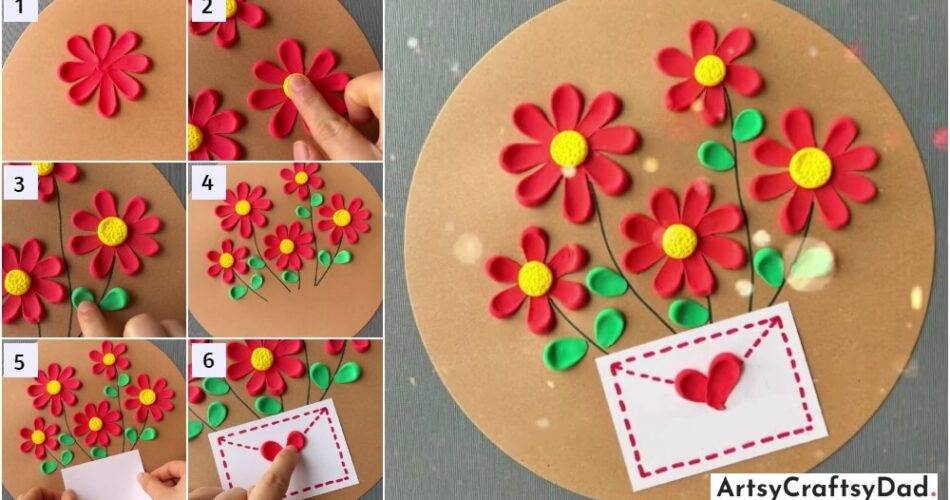
Clay Flowers Card Craft Tutorial For Beginners

Must Read: Amazing Clay Cherries Art & Craft Tutorial For Kids
Supplies & Tools
- Clay(Red, Yellow, Green)
- Cardboard
- Glue
- Red and Green Marker
- White Sheet
- Small Stick
Clay Flower Card Instructions
Step #1: Prepare Base

Firstly, take cardboard & cut it into a circular shape & use it as a craft base. Now, take a red clay & make a flower.
Step #2: Making Flowers

Start making flowers using red clay starting from the left-top side of the cardboard by using your forefinger.
Step #3: Completing Flower design

Here, This is the look of the complete flower design.
Step #4: Making Flower Pistil

Take a yellow clay and put the center of the flower. Then make small dots of the flower pistil using the stick
Step #5: Make More Flowers

Make similar designs of flowers using the same technique and put yellow clay in the center of every flower design.
Step #6: Make Stems

Now, use a green marker and make stems from the end of the flower till some length above where the cardboard ends. Do the same with every flower.
Step #7: Prepare Leaves

Use green clay and start making a green leave and put it in the stems of every flower.
Step #8: Final Look Of The Flower

Here, is the final look of the flower.
Step #9: Prepare A Bottom Base Of The Flowers

Paste a white square cut sheet at the bottom where the flower stems end.
Step #10: Make a Design On A White Sheet

Use a red marker and draw undirected lines in the whole border of the white square cut sheet.
Step #11: Use Clay To Make It More Attractive

Use red clay and make a heart design in the middle of the white square sheet.
Congratulations! Your Flowers Card Is Ready

Finally! Your craft is ready.
Creating clay flower cards is a fun and easy craft that beginners can enjoy. With just a few simple materials and some creativity, you can make beautiful and unique cards that are sure to impress. So grab some clay and get crafting!
You Might Also Like This
- Beautiful Clay Flower Garden Craft Tutorial For Beginners
- Paper And Clay Tree Craft Tutorial For Beginners
- White Clay Flowers Craft Tutorial For Kids
- Polythene Impression Flowers Painting Tutorial For Beginners
- Paper Cup And Clay Crowns Craft Tutorial For Beginners


