Learn how to create a charming clay tree craft featuring a cute ladybug and ant in this step-by-step tutorial. Follow along with easy instructions and add your flair to make it truly unique.
Get ready to get crafty with this creative clay tree tutorial featuring an adorable ladybug and an ant! Follow along with this step-by-step guide to bring your clay creation to life and add a touch of nature to your home decor . Let your imagination run wild as you sculpt and decorate your very own clay tree masterpiece!
Ladybug and Ant craft Tutorial For Kids

Must Read: Orange Peel Ladybug & Leaf Craft Tutorial For Kids
Supplies & Tools
- Clay( Green, Black, Yellow, Red, Light Green, Pink, Blue )
- Glue
- Scissors
- Black Marker
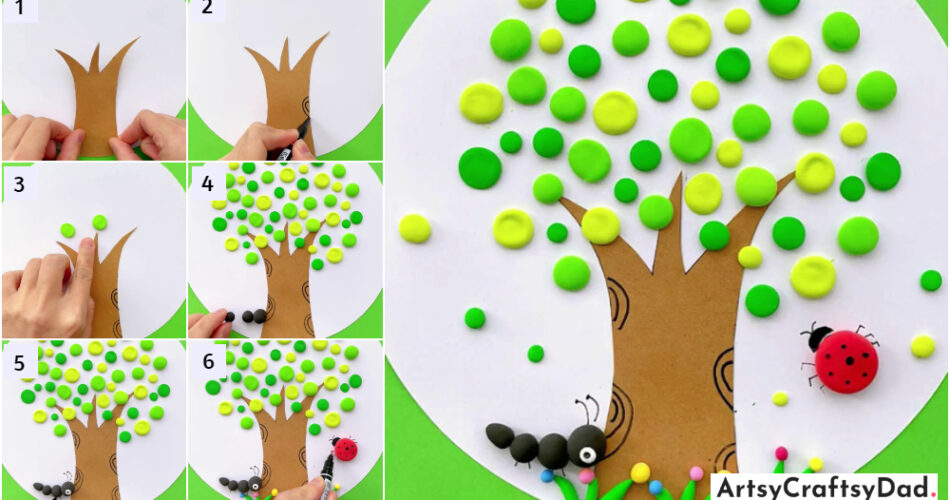
Clay Tree Craft Instructions
Step #1: Preparing The Background

Firstly, we put a green sheet for background color then use a white sheet, cut that into a circle shape, and paste it in the middle of the background sheet. Now, take a brown sheet cut that sheet into a tree figure, and start pasting it at the middle – end of the white sheet.
Step #2: Make Design On Tree

Use a black marker to put some innovative design that fits in your pasted tree design.
Step #3 Use Clay To Make Branches And Leaves Of The Tree

Use green clay or some similar color to the leaves and start sticking it to the surrounding part of the tree. Remember, the clay must pasted accordingly and it should seem like a tree structure.
Step #4: Making An Ant

Here, we are making an ant using a blank clay at the left end of the tree.
Step #5: Do Some Creativity

Here, we are creating an ant look for which we use a white sheet cut it in a diminished circle shape, and paste it at the background to the first face of the ant, then use a blank marker and put a small dot in the middle of the white sheet accordingly and draw some outline to the ant.
Step #6: Making A Ladybug

Here, we make an insect using red clay, we make a circle and put it on the right side of the tree and again using a black marker we do some creativity on that insect just to make it seem like a real insect. Use green clay to draw some grass at the bottom of the tree near all the creatures and at the end node paste different clay just to make it more attractive.
Congratulation, Your Tree Is Ready!

Finally, your clay tree craft is ready!
Creating a clay tree craft with a ladybug and an ant is a fun and imaginative way to express creativity and bring a touch of nature into your home.
This tutorial provides a step-by-step guide to help you bring this charming scene to life, allowing you to enjoy the process of crafting and the result of your unique creation. Let your imagination run wild and have fun crafting your very own clay tree masterpiece!
You Might Also Like This
- Kandinsky Circles Tree Clay Craft Tutorial
- Clay Circles Tree Artwork Craft Tutorial For Kids
- Autumn Tree Clay Artwork – Step-By-Step Tutorial
- Creative DIY Clay Art & Craft Ideas for Kids
- Creative Orange Peel Chicks Craft Tutorial For Kids


