I love aprons and think they make such a perfect present. Add in some baking, cocktail or BBQ supplies and you have a super fabulous homemade gift. Plus, these aprons are so easy to make. You can whip up one of these beauties in an hour.

Supplies

- 1 yard (1 metre) of print fabric for the apron
- Scrap of contrasting fabric for the pocket
- 1 1/2 yard (1.5 metre) grosgrain ribbon
- Scissors
- Sewing machine
- Needle and thread
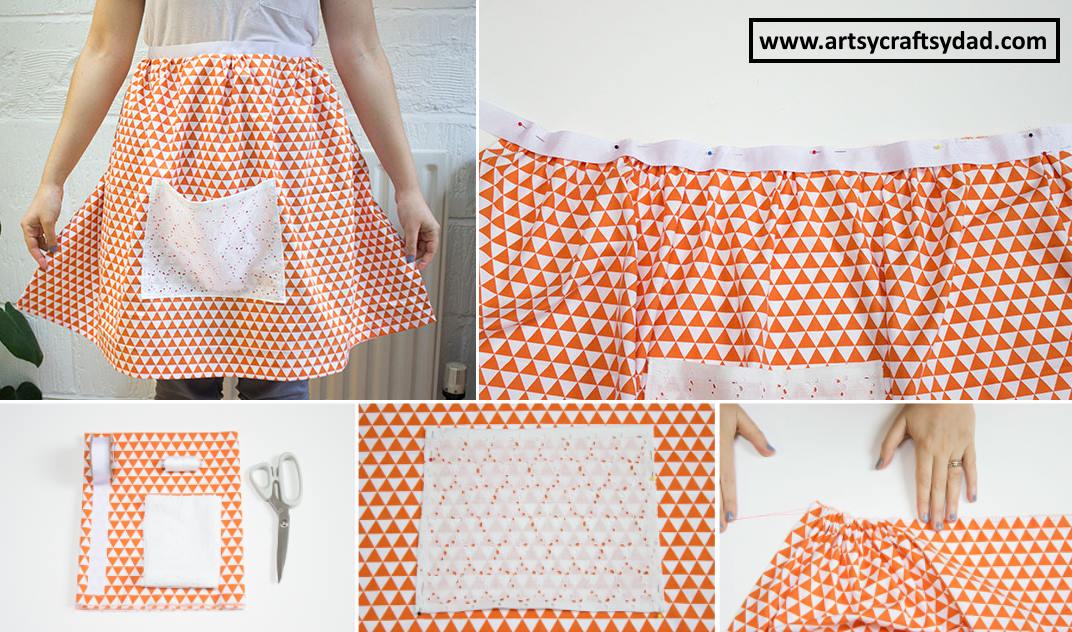
1. Prepare Your Apron
Step 1
Cut out a rectangle measuring 20in by 32in (50cm by 100cm) from the fabric for your apron.

Step 2
Turn the rectangle over so the right side of the fabric is facing down.
Hem your sides by folding the fabric 5/8in (1.5 cm) in along the two short sides of the rectangle. Place wrong sides together. Press with an iron and sew.

Step 3
Hem one long end of your rectangle by folding the fabric 6/8in (2cm). Place wrong sides together. Press and sew.

2. Create a Pocket
Step 1
Cut out a rectangle from your scrap fabric measuring 10in by 9in (25cm by 22cm).

Step 2
Turn the rectangle over so the right side of the fabric is facing down.
Fold two short edges and one long edge of the rectangle inwards by 3/8in (1cm). Place wrong sides together. Press with an iron.

Step 3
Fold one long edge of the rectangle inwards by 3/8in (1cm). Fold over again by 3/8in (1cm). Place wrong sides together. Press.
You should now have a rectangle with two short sides and one long side folded once, and one long side folded twice.

Step 4
Place the pocket right-side facing up onto the right side of the apron. Place the wrong side of the pocket to the right side of the apron. Rotate the pocket so the long edge of the pocket that has been folded twice is at the top.
Position the pocket so you are happy with where it sits. Pin in place.

Step 5
Top stitch around the top of the pocket, sewing as close to the edge of the pocket as you can.

3. Create a Ruffle
Step 1
Stitch a line of long running stitches 1/8in (0.3cm) from the top edge of your apron. Leave lots of extra thread at the start and end of your stitches.

Step 2
Stitch another line of long running stitches 2/8in (0.6cm) from the top edge of your apron. Leave lots of extra thread at the start and end of your stitches.

Step 3
Starting with the left side of the apron, hold on to the ends of the thread you left when you made your line of running stitches. Pull and you should start to get ruffles forming along the top edge of your apron. Evenly distribute the ruffles.
Repeat for the other side and tie the ends of the thread in a knot.

4. Add Your Apron Tie
Step 1
Fold the ends of the ribbon in by 3/8in (1cm). Sew.

Step 2
Centre the ribbon over the two lines of running stitches. There should be the same amount of excess ribbon running over either side of the apron. Place the right sides together. Pin in place.
Sew the top edge of the ribbon to the raw edge of the apron using a zig-zag stitch.

Step 3
Fold the ribbon up so it is off the apron. Use a seam ripper to remove the basting stitches.

Wear Your Apron
I used a funky cotton print fabric, but you could use anything you fancy. How about a dark denim for the boys, or go sweet and flirty with a vintage floral print? Now that you’ve seen how easy it is to make your own apron, there’s no excuse not to make hundreds!
How did your apron turn out? Let me know if you have any questions in the comments section below. And if you love sewing projects, you might like to check out our other sewing tutorials.
Credit: Elena Rosa Brown

