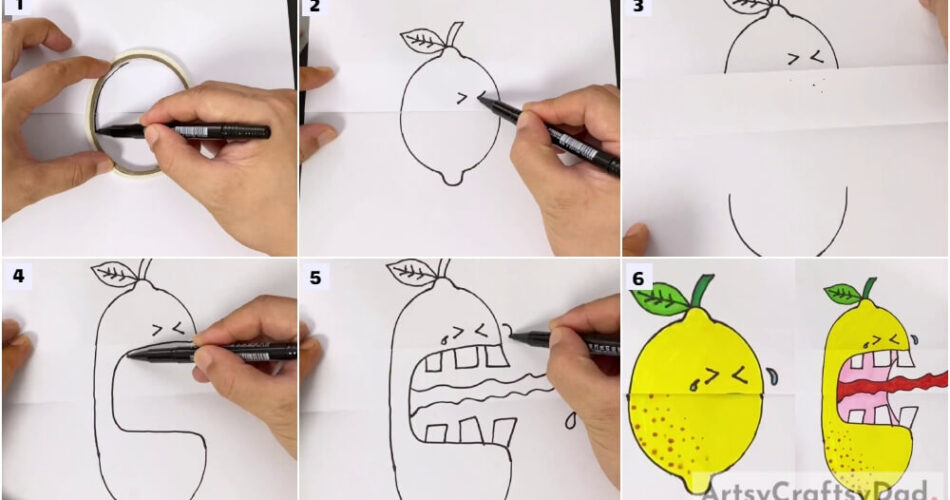
This is a tutorial where kids will learn to make a lemon that goes from being upset to screaming. This will be something innovative for them.
This is a Lemon Screaming Fun Drawing Step-by-step Tutorial for Beginners. It is apt for kids of ages around three and above. This will be something new, different, and innovative than the regular drawings. Through this, kids will learn to show a transition through their drawing or some sort of metamorphosis. Kids will have a lot of fun doing this. Below are the materials required.
Let’s get started…..
Simple Lemon Screaming Fun Drawing For Beginners

Must Read: Red Poppy Flower Drawing Tutorial For Kids
Tools & Supplies
- A White Sheet Of Paper
- Colors
- Cello Tape
- A Black Sketch Pen or Marker
Lemon Screaming Drawing Instructions
Step #1: Make An Oven On The Folded Sheet

Take a white sheet of paper. Fold one-third of the paper. Put a cello tape on it in an oval shape. Drawn an oval outline using a black sketch pen or a marker. Leave a little space in the top middle and the bottom middle to make the bulge that a lemon has.
Step #2: Draw The Face Of Lemon

Draw the stem, leaf, and eyes of the lemon using a black sketch pen or marker.
Step #3: Unfold The Sheet

After you are done with the drawing, unfold the sheet to full. Now, in the next step, you will draw in the space between the lemon halves.
Step #4: Start Making The Lemon’s Mouth

Make the lemon’s mouth. Make it huge. You can also use a pencil to draw first if you are not too sure.
Step #5: Now The Details Of The Mouth

Make the tongue, the teeth, and tears. If you are using a pencil, trace it with a black sketch pen or marker and erase the pencil with a light hand so that it does not affect the paper or the drawing. For the final step, color the lemon both folded on and unfolded. You can use markers or sketch pens crayons or pencil colors to do that. For a better idea, use the reference image presented below as the final image.
Final Image: This Is What A Lemon-Screaming Drawing Must Look Like

So, this tutorial is officially over. But you can still keep going. You can make different transitions through this technique on your own and experiment a bit. You can also work on this one further if you wish; you can make the background to give it a much better effect. And if you are searching for any ideas, articles, suggestions, tutorials, etc., check out the main website.
Thank you for your time and support.
You May Also Like
- Hand Outline Peacock Drawing Tutorial For Beginners
- Palm Outline Hen Drawing Tutorial For Beginners
- Girl & Boy In Rain: Cute Drawing Tutorial
- Hand Gesture Outline Giraffe Drawing Tutorial For Kids
- Boy In Raincoat Rainy Day Drawing Tutorial For Kids


