Discover a fun and educational drawing tutorial for kids! Learn how to create a stunning autumn trees night scenery with easy step-by-step instructions. Perfect for developing artistic skills and creativity.
Welcome to our autumn trees night scenery drawing tutorial designed especially for kids! In this step-by-step guide, we will walk you through the process of creating a beautiful nighttime landscape filled with vibrant autumn trees. With easy-to-follow instructions and helpful tips, your child will have a fantastic time exploring their creativity and developing their artistic skills.
Easy Autumn Trees Night Scenery Drawing

Must Read: Night And Day Tree Scenery Drawing Tutorial
Supplies & Tools
- Crayons Colors(Orange, Brown, Yellow, Dark Yellow)
- Scissors
- Glue
- Colored Papers (Yellow, Black)
Autumn Trees Night Scenery Drawing Tutorial
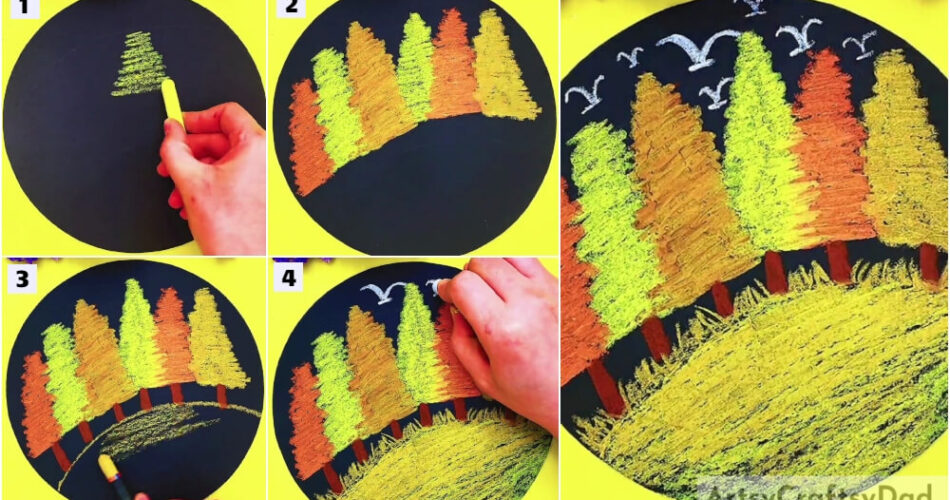
Step #1: Drawing Autumn Tree By Yellow Color

Here we first take yellow paper as the base. Now take another piece of black paper & cut it into a black circle shape with the help of scissors & paste it on the yellow base with the help of glue. Now draw an autumn tree using the yellow color on the upper middle of the black paper circle.
Step #2: Drawing Autumn Tree With Orange Color

Now, make one more tree using the yellow color on the left side of the black paper circle. Now, take an orange color & make a tree on the right side just on little over the yellow tree that we drew in the above step.
Step #3: Drawing More Trees

Now, draw three more trees as shown in the above image by following the same procedure as we mentioned in the above step.
Step #4: Drawing Trunk Of Autumn Trees Using Brown Color

Here we make a tree trunk at the bottom side of the tree. Take a brown color & draw tree trunks one by one at the bottom side of each tree.
Step #5: Drawing Garden

Here we going to draw a garden with the help of yellow color. We take a yellow color & make a curvy line that will touch the bottom of each tree & fill the yellow color on all the lower parts of that curvy line on the black circle bottom part.
Step #6: Drawing Grass Yellow Color

Now, draw some little lines on the top of that curvey line in the upward direction between the trunk of trees by using yellow color.
Step #7: Drawing Birds Using White Color

Now, take a white color & make some birds on the top of a black paper circle with the help of white color.
This is the Final Look Of Our Autumn Trees’ Night Scenery!

Make more birds with the help of the white color on the top left & right side of a black paper circle. Taada! Your beautiful autumn trees night Scenery is ready now.
Congratulations on completing your autumn trees night scenery drawing! We hope you had a wonderful time bringing this enchanting landscape to life. By following this tutorial, your child has learned valuable techniques and gained confidence in their artistic abilities. Encourage them to continue exploring the world of art and let their imagination soar!
You Might Also Like
- Autumn Trees: Fruit Foam Net Hack Artwork Tutorial
- All Four Season Trees Painting Tutorial
- Finger Stamp Trees With A Butterfly Art Tutorial
- Shaded Cactuses: Stamp Painting Step-by-Step Tutorial
- Caterpillar Over Leaf Scenery: Leaf Craft Tutorial


