Learn how to create a beautiful strawberry fruits and flower clay fruit craft with this step-by-step tutorial designed for kids. This fun and engaging activity will allow children to unleash their creativity and create their own unique pieces of art.
Introducing a fun and creative project for kids to try out – the strawberry & flower clay fruit craft! This step-by-step tutorial will guide children through the process of making their adorable clay strawberries and flowers. Kids will know to do clay modeling & make a beautiful craft. Not only will this activity spark their imagination and creativity, but it will also help them develop their fine motor skills and patience. Let’s dive into this colorful and exciting craft together!

Must Read: Step-by-Step Clay Flower Bouquet Artwork Craft Tutorial
Supplies & Tools
- Drawing Paper(White, Green, Light Green)
- Clay(Red, Yellow, Green, White)
- Glue
- Scissors
- Green Sketch Pen
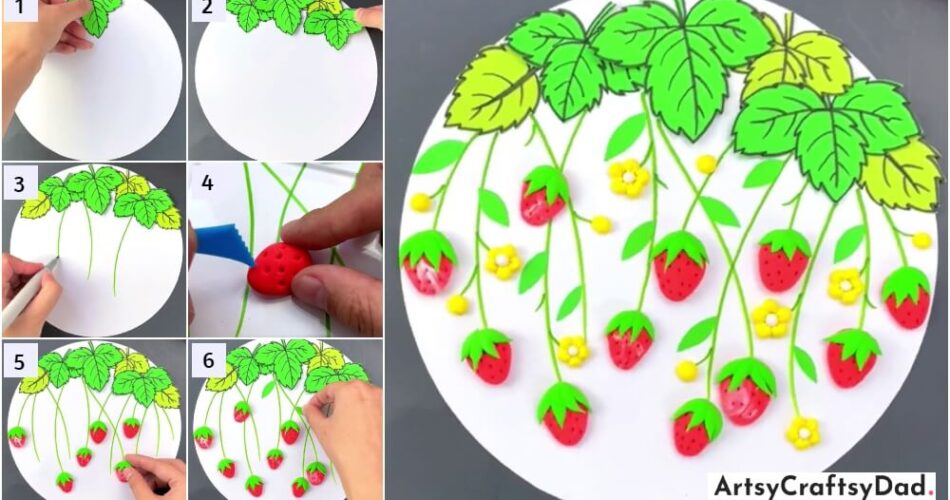
Step #1: Taking A Drawing Paper

Firstly, we take a white drawing paper and cut it into a circle with the help of scissors & use it as a craft base. Then take a green paper and draw a leaf shape on it using a black marker & cut out the outline of the leaf. Then paste the leaf at the top on the base craft using glue.
Step #2: Making More Leaves

Make one more green leaf and paste using the same process in this step. Now, take a yellow paper & make a leaf in the same manner & paste it in the same manner.
Step #3: Pasting One More Leaf

Now, paste one more leaf using the same process.
Step #4: Pasting Light Green Leave

In this step, paste light green leaves using the same process.
Step #5: Drawing Stems

In this step, we draw stems using a green sketch pen.
Step #6: Drawing More Stems

Now, we draw more stems in a way they overlap each other.
Step #7: Taking A Red Clay

In this step, we take red clay and make a strawberry shape. Then we make small little holes in the strawberry using the clay shaping tool that represent the seeds called achenes.
Step #8: Taking A Green Clay

In this step, we take green clay and make little leaf shapes & put them in attached to make a calyx (the calyx is made up of sepals which look like small leaves).
Step #9: Pasting Calyx
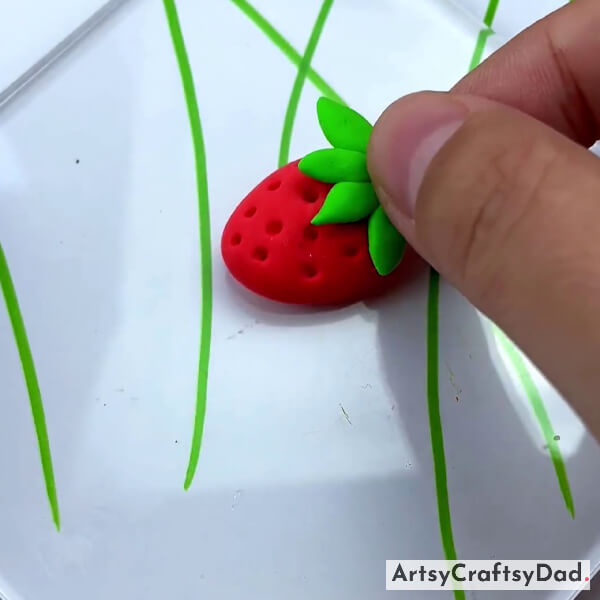
Paste the calyx that we made in the previous step on the top of the strawberry.
Step #10: Pasting Strawberry

Now, paste the strawberry at the end of the stem in the middle of the craft base.
Step #11: Pasting More Strawberry

Now, paste more strawberries using the same process.
Step #12: Making Leaves

In this step, we take green paper and cut it into a leaf & paste it on the stems using glue.
Step #13: Pasting Flower

In this step, paste more leaves using the same process. Take a green sketch pen & draw small branches on all the stems. Then take yellow clay to make a flower from it and paste it on the branch.
Finally! Strawberry & Flower Clay Craft Is Ready Now!
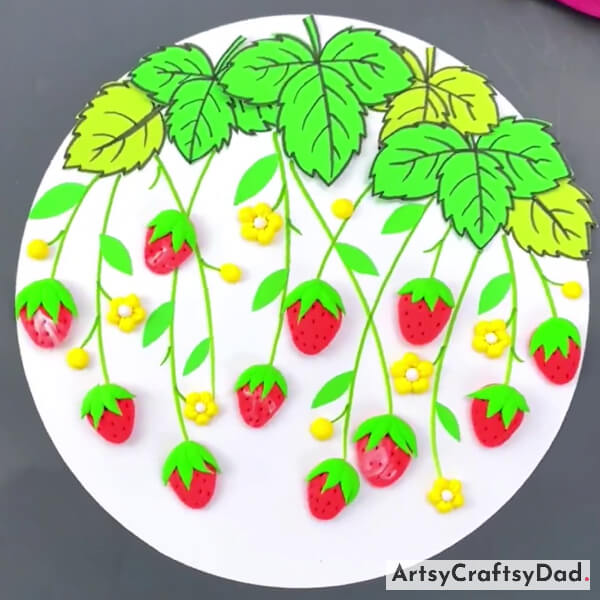
Make some more flowers using the same process & paste in the same manner. Then take a yellow clay & make a little ball from it as a bud & paste it on the branch end. Now, our beautiful strawberry flower clay craft is ready.
Our beautiful strawberry & flower clay craft is finished here. I hope you have enjoyed the process of making this fruit craft. Creating a strawberry and flower clay craft can be a fun and engaging activity for kids of all ages. By following this step-by-step tutorial, children can unleash their creativity and produce beautiful pieces of art to display or gift to others. Please don’t forget to drop your comment in the comment section.
Thanks for visiting us!
You Might Also Like This
- Clay Tomato Step By Step Craft Tutorial For Kids
- Beautiful Clay Flower Garden Craft Tutorial For Beginners
- Flower Bouquet: Clay & Tissue Craft Tutorial
- Beautiful Clay Flower Vase Craft Tutorial For Beginners
- Orange-Yellow Flower Climber Clay Craft Tutorial


