Learn how to create a stunning bouquet of colorful clay flowers and tissue paper blooms with this step-by-step craft tutorial. Follow along and create your own beautiful bouquet today!
Looking to add a pop of color to your home decor or create a unique gift for a loved one? Look no further than this colorful clay flowers and tissue papers bouquet craft tutorial. In this tutorial, we will guide you through the process of creating beautiful clay flowers and arranging them into a stunning bouquet using tissue papers.
This craft project is not only fun and easy to do, but also allows you to customize the colors and designs to suit your personal style. So gather your materials and let’s get started on creating a gorgeous bouquet that will brighten up any space!
Clay Flowers & Tissue Papers Bouquet Craft Tutorial

Must Read: Clay Flower and Tissue Paper Bouquet Craft Tutorial
Supplies & Tools
- Clay (Yellow, Purple, Pink, Green, Orange, Red)
- White sheet
- Tissue paper
- Red and black marker
- Glue
Clay Flower Bouquet Instructions
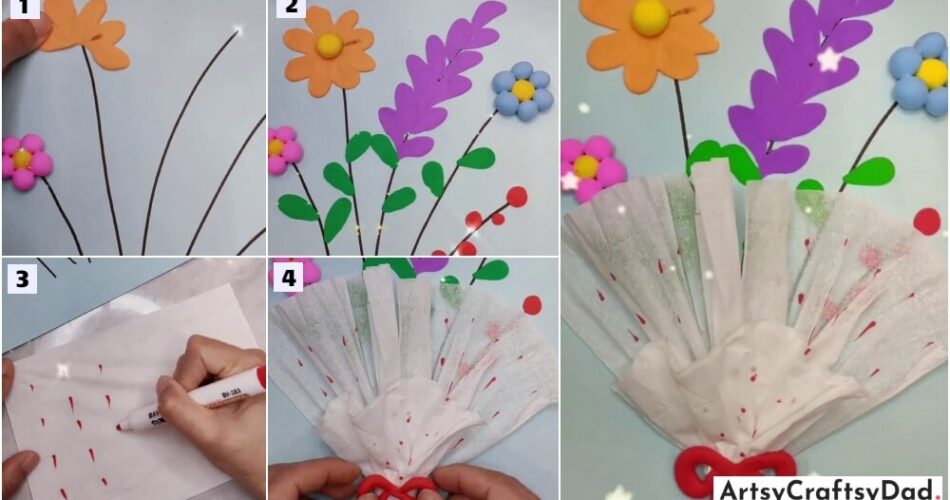
Step #1: Prepare The Base

Use a white sheet as a background, and draw four to five lines using a black marker.
Step #2: Make Flowers

Make flowers from the color which u want to choose here, I am choosing pink custard to make flowers and using yellow just to put the middle circle of the flower.
Step 3: Prepare leaves

Do prepare leaves from the coordinating flower color and start putting them in the lines.
Step #4: Complete The Flower And The Leaves

Complete the pasting part of the flower and leaves and left one line from all the lines.
Step #5: Make A Stem-Like Figure On One line

Use red clay to make small circles at put in the last remaining line.
Step #6: Prepare Bouquet Using Tissue paper

Use a tissue paper and start putting an undirected line on that paper by using a red marker.
Step #7: Prepare A Bouquet

Prepare a Bouquet take a piece of tissue paper and start folding it, First inside then outside, and fold it till the tissue ends and paste it above the flowers an leaves. Then use another tissue but small in size do the same to this also and put it at the end of the bigger Bouquet.
Step #8: Put A Bow

Use red clay to make an infinity sign and put it at the bottom of the bouquet.
Congratulations! Your Colorful Clay Flowers And Tissue Papers Bouquet Craft Is Ready

Finally! your craft is ready.
In conclusion, creating a bouquet of colorful clay flowers and tissue papers is not only a fun and creative craft project, but also a beautiful and long-lasting gift idea. This tutorial allows for endless possibilities of customization and personalization, making each bouquet truly unique. So why not try your hand at making your own stunning bouquet today? Happy crafting!
You Might Also Like This
- Colorful Butterfly: Tissue Paper Sketch Pen Hack Craft Tutorial
- Designer Chicks: Tissue And Clay Craft Tutorial
- Mini Rose Bouquet: Clay & Surgical Mask Craft Tutorial
- Heart Flowers Bouquet: Finger Impression Art Tutorial
- Colorful Clay Cactuses Craft Tutorial For Kids


