Learn how to create adorable mushroom and snail clay crafts with this fun tutorial designed for school kids. Follow along step-by-step to bring these cute creatures to life using clay and simple crafting tools.
Clay crafts are a fun and engaging way for kids to explore their creativity and develop their fine motor skills. In this tutorial, we will be focusing on creating adorable mushroom and snail clay figures. These cute and colorful creations are perfect for school projects or just a fun afternoon activity. So gather your supplies and let’s get started on this exciting clay craft adventure!
Amazing Mushroom & Snail Clay Craft

Must Read: Attractive Clay Art and Craft for Kids
Supplies & Tools
- Sky-Blue Craft Paper
- Scissors
- Colored Clay (Red, White, Green, Yellow, Brown)
- Black Marker
- Transparent Acrylic Sheet
Mushroom & Snail Craft Instructions
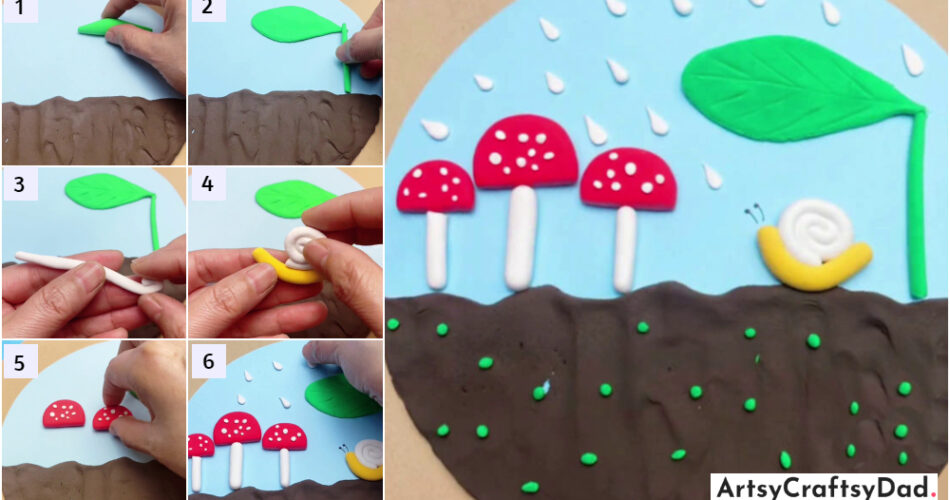
Step #1: Making A Clay Roll

First, take a sky blue craft paper & cut it into a circle using scissors & use it as a craft base. Now, take a brown clay & put it on the bottom side of the craft base & spread it with the help of your fingers & it represents soil.
Next, take green clay & roll it to make the same shape as shown in the above image & put it on the upper right side of the craft base.
Step #2: Pressing Clay Roll

Now, press it by using a transparent acrylic sheet. It represents a leaf.
Step #3: Making Leaf Stem

Take a piece of green clay & roll it to make a thin layer as the leaf stem.
Step #4: Making Leaf Pattern

Take a plastic knife & make a leaf pattern on it.
Step #5: Making Snail Shell

Now, take white clay & make a thin layer & roll it to make a snail shell shape.
Step #6: Making Snails Body

After that take yellow clay & make a thin layer from it & use it as a snail’s body.
Step #7: Pasting Snail Shell On Snail’s Body

Paste the snail’s shell on the snail’s body.
Step #8: Pasting Snail On Brown Clay

Paste the snail on the upper end of the brown clay under the leaf.
Step #9: Making Mushrooms Caps

Take red clay & make two mushroom cap shapes & paste them on the upper left side of the craft base.
Step #10: Making Mushrooms Stems

Make one more mushroom cap but smaller in size & paste it near the others. Now, take white clay & make two thin layers from it & paste them under the cap for the mushroom’s stem as shown in the above figure.
Step #11: Making Water Drop

Take a small piece of white clay & make some drop shapes & paste them on the upper side of the craft base.
Lovely Mushroom & Snail Clay Craft Final Look!

Complete the craft by adding tiny green clay balls over the brown clay.
Mushroom & snail clay craft is ended here. This craft is good for kids in educational activities. Also, parents could help their kids make mushroom & snail crafts & spend some quality time with their children. In conclusion, creating a mushroom and snail clay craft can be fun and educational for school kids. This craft also teaches them about different textures and shapes found in nature. Encouraging children to engage in hands-on art projects like this can help stimulate their imagination and develop fine motor skills. Please share your feedback in the comment section because we love to hear from you.
Thanks for visiting our website!
You Might Also Like This
- Hand Gesture Outline Snail Drawing Tutorial
- Mushroom House: Stamp Painting Tutorial
- Mushroom Garden: Stamp Painting Tutorial For Kids
- Sugar Coated Haws Candy Clay Craft Tutorial
- Clay Flower Pot Model Craft Tutorial For Kids


