Learn how to create a fun and interactive mushroom and rainy cloud clay craft with your kids! This tutorial will guide you through the steps to make adorable mushrooms clay art and fluffy rain clouds, perfect for a rainy day activity.
Looking for a fun and creative clay art project for kids? If yes then you are at the right place. This mushroom and rainy cloud clay craft Tutorial! This hands-on activity will keep little ones entertained and help them develop their fine motor skills and creativity. Kids can create adorable mushrooms and rainy clouds out of polymer clay with just a few simple materials. So gather the supplies and prepare to have a blast crafting with your little ones!
Beautiful Mushroom And Rainy Cloud Clay Craft

Must Read: Polymer Clay Mushroom Tutorial For Kids
Supplies & Tools:
- Black Craft Paper
- Clay (Brown, White, Red, Green, Yellow, Blue)
- Scissors
- Transparent Acrylic Sheet
- Glue
Mushroom And Rainy Cloud Craft Instructions
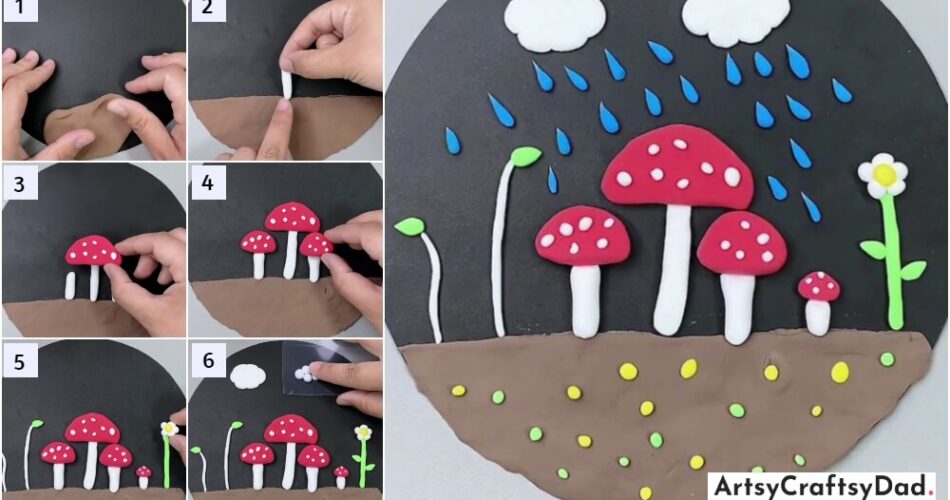
Step #1: Working With Clay

Firstly, we take black craft paper and cut it into a circle using the scissors. Also, put brown clay at the bottom of the craft base, and spread clay from your index finger to give it a soil look.
Step #2: Making Mushroom Stem

In this step, take a white clay and roll it into a thin layer to make a mushroom stem.
Step #3: Making Mushroom Cap

In this step, we take red clay and make a mushroom cap from it. Then take white clay & make little balls from white clay and paste them on the mushroom cap.
Step #4: Pasting Mushroom Cap

Now, make two more small mushroom stems & paste one on the left & other on the right side of the first mushroom stem. Now, paste the mushroom cap at the top end of the middle stem.
Step #5: Pasting More Mushroom

Now, make two more mushroom caps with the same process and paste them in the same manner.
Step #6: Making Leaves And Flower

First, we take white clay & make two plant stems by rolling them into a thin layer. In this step, we take green clay & make two leaves, and paste them on the top of the stems one by one. Now, take a green clay and make a flower stem & paste it on the right side of the brown clay. Then take white and yellow clay make a flower and paste it above at the top end of the flower stem.
Step #7: Making Cloud

In this step, we take white clay and make a little ball from it. Then put these balls on the top left side of the craft base in a circular arrangement then press with the transparent glass to give a cloud shape. Repeat the same process & make another cloud on the right side of the craft base.
Final Glimpse Of Our Mushroom And Rainy Cloud Clay Craft!

In this step, we take blue clay to make raindrops and paste them on the craft base as shown in the above image. Also, Complete our craft by making yellow & green clay balls & paste them on the brown clay.
Our beautiful & fun journey of making this amazing mushroom & rainy cloud clay craft has ended here. Parents could help their children in making this beautiful craft by clay modeling. This tutorial is a great way to make kids interested in the world of clay art and inspire them to continue exploring their creativity in the future by trying more crafts. Please share your feedback in the comment section. If you want to try some new crafts then you could visit our other articles.
Thanks for visiting our website!
You Might Also Like This
- Mushroom Garden: Stamp Painting Tutorial For Kids
- Clay Poached Egg Craft Tutorial For Kids
- Clay Flower Pot Model Craft Tutorial For Kids
- Colorful Clay Cactuses Craft Tutorial For Kids
- Mushroom House: Stamp Painting Tutorial


