Learn how to make clay poached eggs with this fun and easy craft tutorial for kids. This step-by-step guide will show you how to mold and shape clay to create realistic-looking poached eggs. Perfect for a craft activity or a school project, this craft will engage children’s creativity and help develop their fine motor skills. Get ready to have some eggcellent fun!
In the world of crafting, there are endless possibilities for creating unique and beautiful works of art. One particular craft that has gained popularity in recent years is clay sculpting. From intricate sculptures to adorable miniatures, clay allows artists to bring their imagination to life. In this tutorial, we will explore the fascinating art of creating poached egg craft using clay. This delightful craft will not only challenge your creativity but also serve as a charming addition to your collection. So, let’s dive into the world of clay crafting and embark on this delightful egg-making adventure!
Poached Egg Craft Made With Clay

Must Read: Clay Flower Pot Model Craft Tutorial For Kids
Supplies & Tools
- Colored Clay (Yellow, White)
- Colored Paper (Black)
- Colored Pen (White)
- Scissors
- Plastic Lid
Poached Egg Clay Craft Instructions
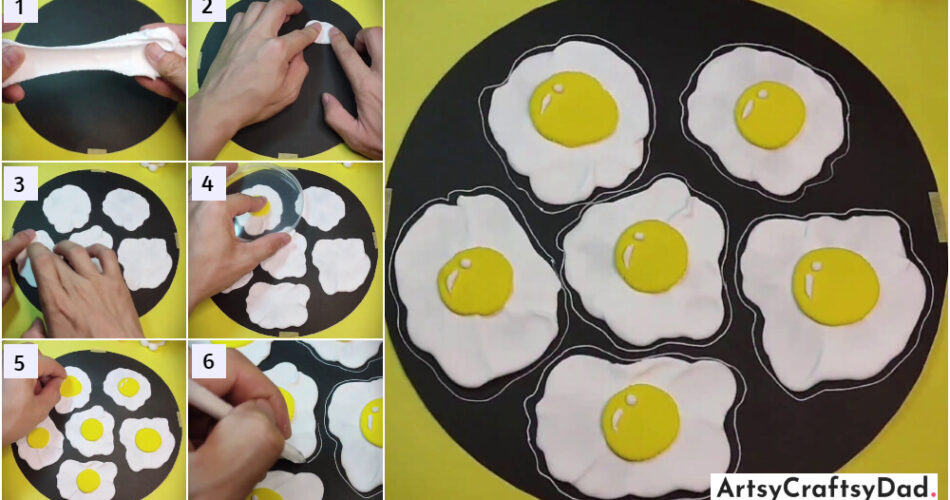
Step #1: Taking a Piece of White Clay

Take a black color paper circle and a piece of white color clay.
Step #2: Pasting White Clay on a Black Circle

Paste white color clay on the top right side of the black paper circle.
Step #3: Making Poached Egg Shape of White Clay

Take more pieces of white clay & paste them on a black circle in the shape of a poached egg.
Step #4: Making Egg Yolk

Now, paste that yellow clay circle on white clay and press it with the help of a plastic lid.
Step #5: Detailing Egg Yolk

Make more egg yolks with the same process. Use white clay & make a small circle of it then put them on egg yolk.
Step #6: Drawing Outline Around the Poached Eggs

Take a white color pen & outline the poached eggs.
This Is The Final Look Of Our Clay Poached Egg Craft!

This is the final look of our clay-poached egg craft. Yahoo, our creative & beautiful clay poached egg craft tutorial is completed now.
In conclusion, the Poached Egg Craft Tutorial using clay is a fun and creative activity that allows individuals to showcase their artistic skills and imagination. Whether it is for personal enjoyment you could give this to your family or friends as a gift for your loved ones.
This craft tutorial provides clear instructions and helpful tips to ensure a successful outcome. Don’t forget to share our site with your loved ones. Please drop your feedback in the comment section which will let us know about our crafts.
Thank you for visiting us! Have a nice day & keep creating new unique masterpieces!
You May Also Like
- Designer Chicks: Tissue And Clay Craft Tutorial
- Colorful Clay Cactuses Craft Tutorial For Kids
- Clay Flower Vase Model Craft Tutorial For Kids
- Mini Rose Bouquet: Clay & Surgical Mask Craft Tutorial
- Clay Snails On Leaves Craft Tutorial For Kids


