Learn how to create colorful spring kites with this fun paper craft tutorial for kids. This easy and engaging activity will keep children entertained while they learn about the changing seasons.
Spring is the perfect time to get outside and enjoy the fresh air and sunshine, and what better way to do that than by flying a kite? In this paper craft tutorial, we will show you how to make your very own spring-themed kite that is perfect for kids of all ages. With just a few simple materials and some creativity, you can create a beautiful and colorful kite that will soar through the sky on a breezy spring day. Get ready to have some fun and create memories that will last a lifetime with this easy and enjoyable craft project!
Spring Kites Paper Craft Tutorial For Kids

Must Read: DIY Paper & Paper Cup Hot Air Balloon Craft Tutorial For Kids
Supplies & Tools
- Colored Craft Paper(Pink, Purple, Orange, Blue, Red, White, Yellow)
- Glue
- Scissors
- Sketch Pen(Black, Pink, Purple, Orange, Blue, Red, White, Yellow)
Spring Kites Paper Craft Instructions
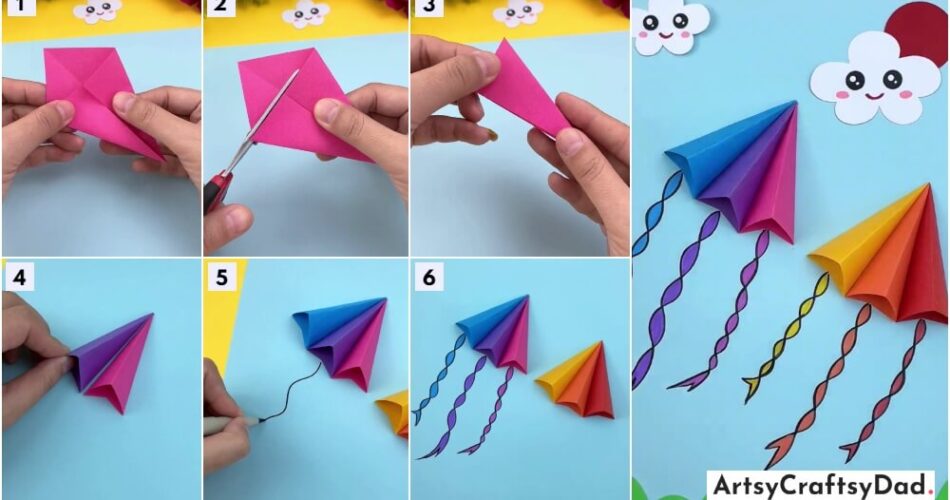
Step #1: Taking A Pink Paper

Firstly, we take pink paper hold it in the diamond shape, and fold the paper. Then unfold the paper. After unfolding the paper again fold both sides at the top position in the diamond shape using your index finger.
Step #2: Cutting Pink Paper

Now, we cut the left top part of the pink paper with the help of scissors.
Step #3: Folding Pink Paper

Fold the cutting pink craft paper with the help of your index finger and paste with the glue.
Step #4: Making Diamond

Make a diamond shape with pink craft paper. For diamond shapes, paste the cut pink craft paper from each other.
Step #5: Making More Diamond

Make a more diamond shape with purple craft paper with the same process.
Step #6: Making More Diamond

Make more diamonds with the same process.
Step #7: Drawing Curve Line

Now, Draw the curve line on the craft base at the bottom of the diamond shape with the help of black color.
Step #8: Coloring Curve Line

Draw another curved line and fill the color using a diamond-shaped color.
Step #9: Coloring More Curve lines

Fill the more curved line using a diamond-shaped color.
Step #10: Drawing More Curved Line

Draw more curved lines and fill also using the same process.
Step #11: Taking A Red Paper

We take a red craft paper cut it into a circle shape & paste it on the top of the craft base paper .
Step #12: Making Cloud

Now, we take a white sheet and cut it into a cloud shape & paste it on the bottom of the red circle paper.
Step #13: Making More Cloud

We make another cloud with the same process.
Finally, Our Beautiful Spring Kites Paper Craft Is Ready!

Our beautiful spring kite paper craft is ready!
In conclusion, making spring kites paper crafts with kids is a fun and creative activity that can be enjoyed by the whole family. It encourages imagination, fine motor skills, and provides a sense of accomplishment when the project is completed. So grab some colorful paper, string, and sticks, and get ready to soar into the spring season with your own handmade kites!
You Might Also Like This
- Paper Flower Bouquet Artwork Craft Tutorial For Kids
- DIY Paper Princesses Pencil Topper Craft Tutorial For Kids
- Colorful Hedgehog Paper Craft Tutorial For Kids
- Easy To Make Paper Sunflower Craft Tutorial For Kids
- Paper Origami Sofa Craft Tutorial For Kids


