This article provides an easy hack to help kids draw beautiful blue flowers. It includes step-by-step instructions, as well as advice on choosing the right supplies and colors. Perfect for budding young artists!
It is a very art activity for kids to do. It is very suitable for kids of ages around three and above. It is apt and very fitting for beginners. Kids will learn something new from this activity. Apart from the usual, crayons, paints and other types of colors, kids will get the opportunity to do something creative with markers. Water dripped on something made it a marker does not always lead towards a ruin, not if you control the amount of water and where it spills.
It will be something creative for the kids. They can use this hack in future in a lot of things. They will also have a lot of fun doing this. This will give them a different perspective with respect to art. Let us begin.
Easy Blue Flowers Drawing Hack For Kids

Must Read: Easy Drawing for Kids – Flowers and Animals
Supplies & Tools
- White sheet of paper
- A pair of Scissors
- Sketch pens or markers (Black, Blue, Yellow, Light green, dark green)
- Paintbrush
Flowers Drawing Instructions
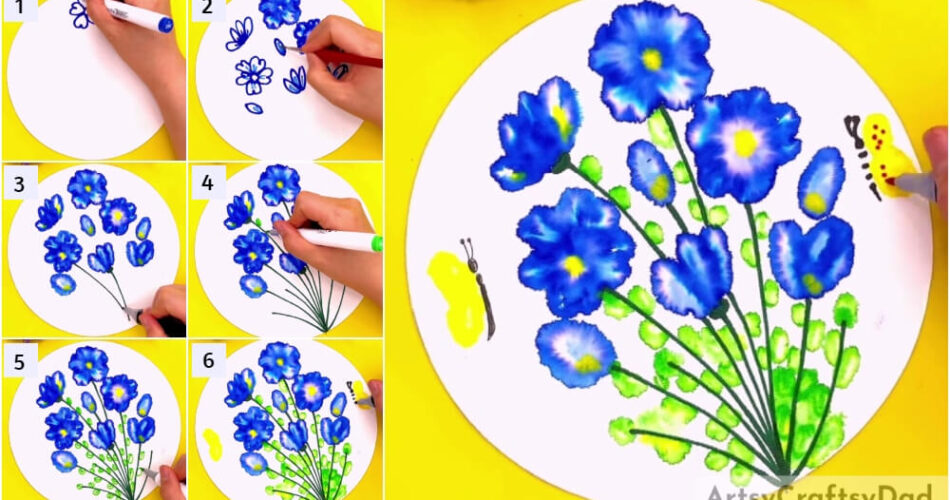
Step #1: Making A Flower

Take a plain, white sheet of paper and draw a circle in it. Cut out the circle using a pair of scissors. Now get a blue colored marker. Using the marker, make a flower at the top of the circular sheet.
Step #2: Smudging The Flower Using That Paintbrush

Take a paintbrush and some water. Dip the paint brush in the water. It must not be too watery that water started dripping in droplets but at the same time, it must not be dry as well. So, look out for that. After you have made sure that there is right amount of water in the brush, swirl it slowly in the flower and let the color smudge and blend on its own. It will give a blurry effect. Do not go outside the boundary of the flower, make sure of that.
Step #3: Making Some More Flowers And Petals And Repeat The Smudging Process

Grab your blue marker again. Look at the reference image right above. Just as that, make more petals and flowers using the marker. Repeat the smudging process now that you just did in the previous step. This will allow you to practice.
Step #4: Making A Little Circle In The Middle Of The Flowers

Now that the smudging process is over and all the flowers and petals have that effect of being blur, grab a yellow – colored sketch pen or a marker. Right, before this, make sure the paper is completely dried. Now, if it is dried, make circles in the center using the yellow marker. Have a look at the reference image above for a better idea and do the same.
Step #5: Making The Stem Of These Flowers

For this step, you need to grab a dark green colored – marker or a sketch pen. Using it, make the stem of all these flowers.
Step #6: Making The Leaves Around The Stem

After making the stems, get a light green colored sketch pen or marker and make the leaves attached to these stems.
Step #7: Making The Leaves, Throughout The Stems

This step is a continuation of the previous one. Just keep making these small leaves all around the stems using the light green colored marker or sketch pen.
Step #8: Smudging The Leaves Of Using The Paint Brush

Again, comes the fun part. Repeat the smudging thing with the leaves again. Take less water though this time as the leaves is comparatively smaller in size. After you are done with that, make the butterfly wings using a yellow sketch pen or a marker. They look like an eight, just all colored. Use the reference image presented above to get some more clarity on the subject.
Step #9: Making The Body Of The Butterflies

Well, this is the last and the final step. Take a black marker or sketch pen. Using that, make the body of the butterflies. Take the help the reference images, both above and below to get a better idea about what to do.
Here It Is! The Final Look Of Blue Flowers

Well, here we are. Finally done Blue Flowers Drawing. We hope you learned something and had fun at the same time. Now you have an idea or more like an example, how you can use sketch pens in a more creative and different way. You can try out making different things or landscapes or objects, or well anything. You can make more designs straight out of your imagination without any reference. All you need to get started with is an idea. It will be really creative and fun, really.
But in case you wish to do something else, we have a solution for that too. You can check out the main website. You will find so many articles, tutorials and ideas based on art and crafts with a lot if varieties and options to choose from. You will find at least one thing or the other that you will like. Well, keep up the art and craft.
Mention down your experience of making this, or reviews, suggestions, ideas, or literally anything that you would like to say or share, in the comment section. It will be nice to hear from you.
Thank you for your time and support. Have a good day.
You May Also Like
- Oil Pastel Rose Bouquet Drawing Hack Craft Tutorial
- Colorful Butterfly: Tissue Paper Sketch Pen Hack Craft Tutorial
- Red Vector Flowers Stamp Painting Art Tutorial For Kids
- Brinjal Drawing: Hand Outline Hack Tutorial
- Hand Gesture Outline Elephant Drawing Tutorial For Kids


