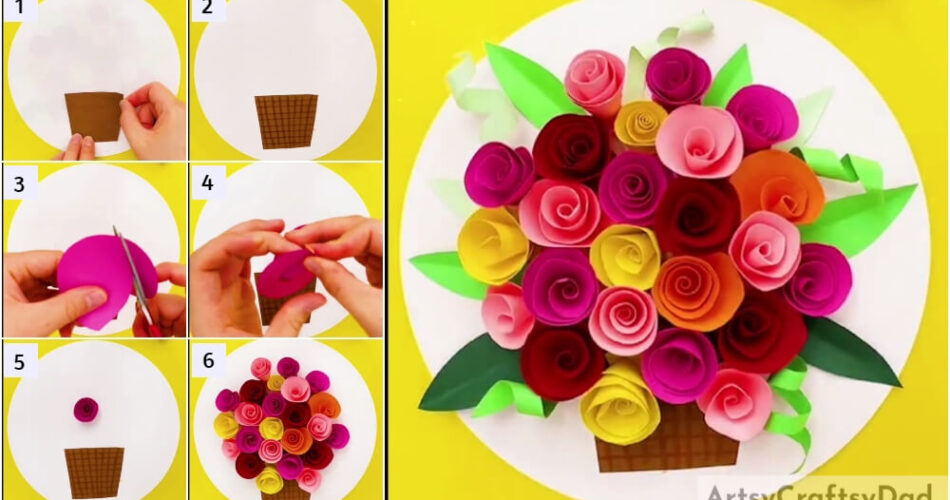
Get a rose flower pot in your room itself! This tutorial will guide you on making paper roses in a flower pot which will look 3D & realistic!
Hola craft lover! We know how much you adorn roses! So, we brought you a fabulous craft for you this time! This tutorial will guide you to make paper roses in a flower pot and the best part is they are now 2D, they are 3D and will look realistic! Having flower pots in rooms is a task, as you have to maintain them and clean up the mess they can make, like, spilling water, shredding leaves, etc. Create this rose craft to avoid the mess and beautify your room! Let’s begin!
Adorable 3D Paper Roses Flower Pot Craft

Must Read: Road In The Forest: Paper Tearing Craft Tutorial
Supplies & Tools
- Colored Paper Sheets
- Scissors
- Glue
- Brown Sketch Pen
Flower Pot Craft Instructions
Step #1: Pasting A Pot Cut-Out

Begin this craft by taking a white sheet, a brown paper sheet, and a pair of scissors. Using scissors, cut down the white sheet into a circle to make the base for the craft. Also, cut out a trapezium-shaped pot from the brown paper sheet. Paste the pot cut-out on the bottom of the base using glue. See the image for reference.
Step #2: Drawing Horizontal Lines On The Pot Cut-Out

Using a brown sketch pen, make horizontal lines over the pot cut-out at a similar distance as shown in the image.
Step #3: Making Checks Lines On The Cut Out

Using the brown sketch pen, make the slightly tilted vertical lines over the pot cut-out along its side boundaries to make check lines on the pot cut-out.
Step #4: Cutting Out A Pink Spiral

Take a pink paper sheet and cut out a circle from it using scissors, then further cut the circle into a spiral.
Step #5: Rolling Over The Spiral

Start to roll the end of your spiral over it till the center of the spiral. You will obtain a rose flower.
Step #6: Securing The Rose To The Center

Secure your rose to the center of the spiral using glue.
Step #7: Pasting The Rose

Paste the rose you made in the center of the base above the pot cut-out using glue as shown in the image.
Step #8: Pasting More Roses

In the same way, make more roses from different colored paper sheets i.e. red, orange, yellow, and peach. Stick these roses over the base closely to make a bunch of them.
Step #9: Completing Pasting The Roses

Make more and more roses of the colored sheets and paste them close to each other above the pot to make a circular bunch over it as shown in the image.
Step #10: Pasting The Leaves

From green and dark green paper sheets, cut out long leaf shapes using scissors and fold them into half to make a crease and unfold again. Paste these leaves around the rose bunch as shown in the image using glue.
This Is The Final Look Of Your Rose Flower Pot!

For the last step, cut out long strips form the green sheets and roll them around your finger to curl them and stick them between the leaves around the rose bunch using glue.
Tada! You have successfully created your amazing and beautiful roses in the pot!
You can now decorate this craft in your room to beautify it even more and add a plant pot that looks real and is very easy to maintain! You can also use this as a school craft project! I’m sure everybody will be stunned by your creation and will be envious of your skills and creativity! You can also customize this craft up to your liking, make a bouquet of it instead of a flower pot, change the color of your roses to match them with the color of your room, or anything! Your imagination is the limit!
We are hoping you liked the article and the craft idea! Share it with your friends and challenge them to make the prettiest one! Drop your craft journey in the comments section below as well!
You May Also Like
- Paper Cutting Artificial Flowers Craft Tutorial
- Colorful Snails Paper Craft Tutorial For Beginners
- Clay Flower Pot Model Craft Tutorial For Kids
- Popping Out Rice Balls Paper Craft Tutorial
- How to make a Paper Flower Vase – Paper Craft Tutorial


